Packing for a Trip
Let me start with a trip, like the one in the picture.
Imagine you are going away for a week. You could put your whole home in a truck: the bed, the kitchen, the tools in the garage, every book. You would certainly have everything you need. But the truck is slow and costly to move, and almost none of it will be used.
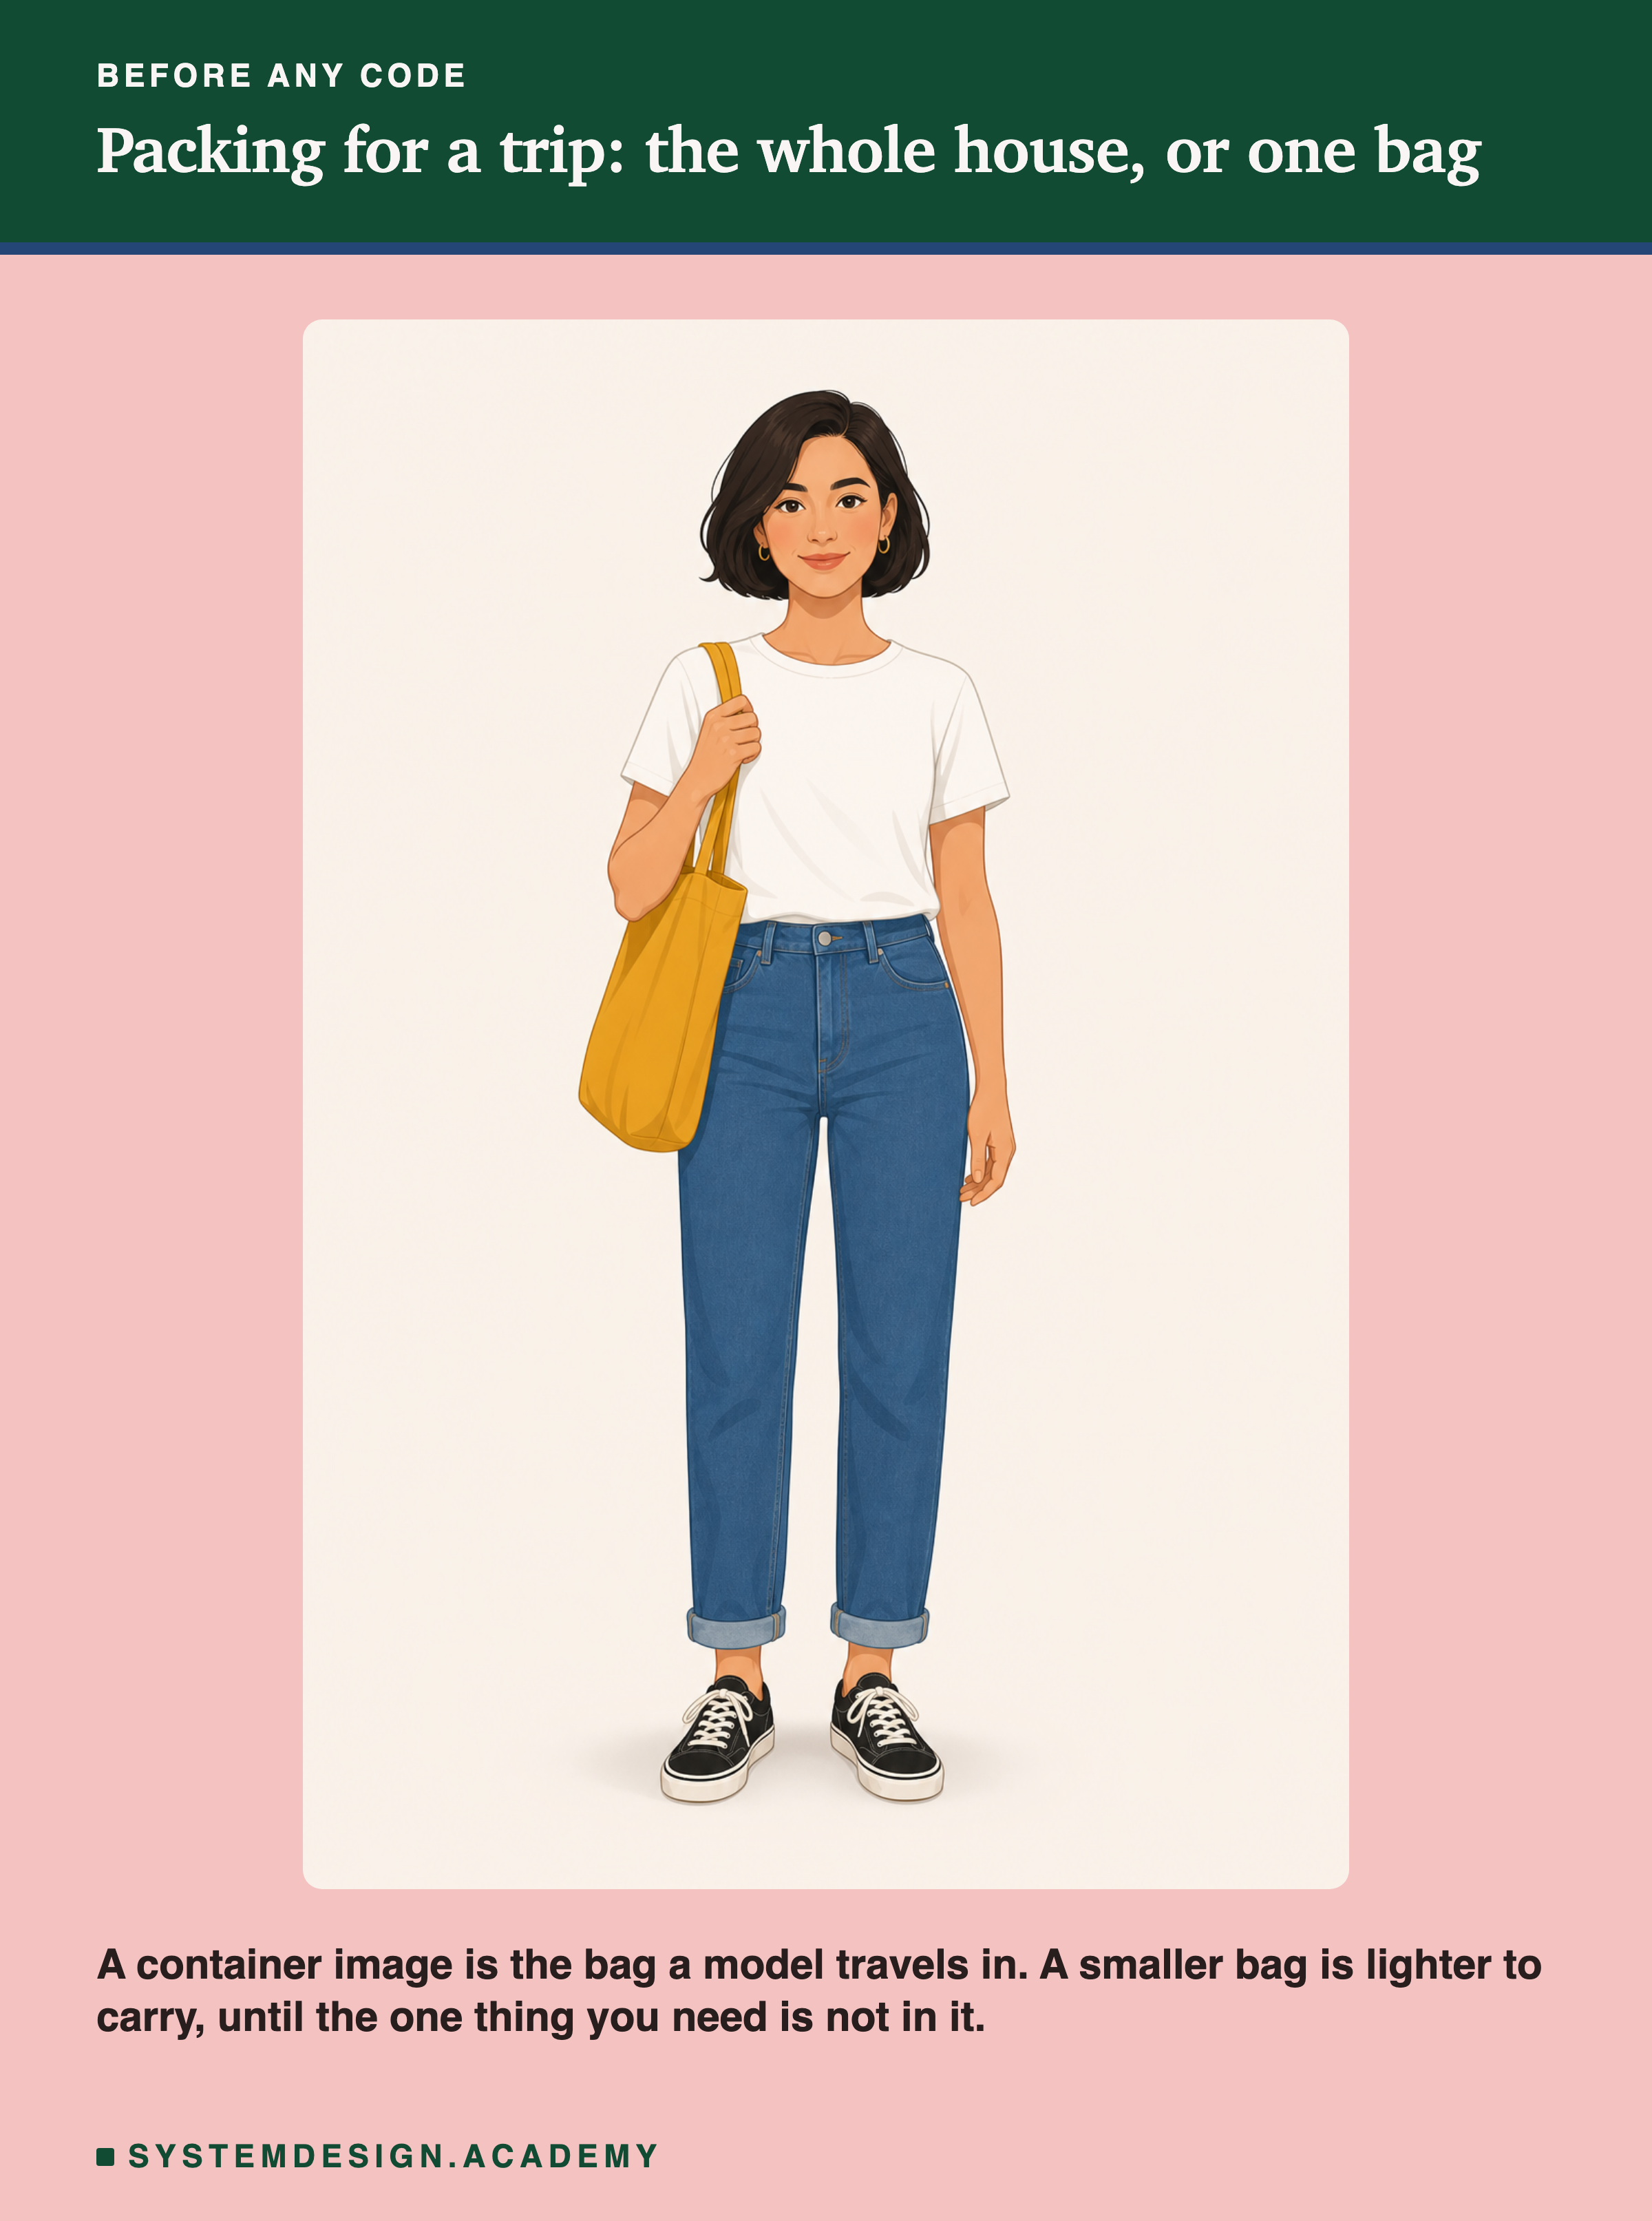
So you pack one bag instead. A small bag is quick to carry. But a small bag has a risk too. If you forget the charger for your phone, the trip goes badly, and a lighter bag does not fix that.
A trained model also has to travel: from the laptop where it was made, to a server where it answers questions. In this lesson I pack the same model into bags of different sizes, weigh each bag, and check that the model inside still gives exactly the same answers.
Where This Lesson Starts
This lesson uses the model from the features chapter. If it is new to you, please read what a feature is first. That lesson built six features for each customer of a real online shop. It asked one question: at the start of a month, will this customer buy something in the next 30 days? The model is a gradient boosted tree model from scikit-learn, and it scored a test AP of 0.5450. AP, average precision, is a score from 0 to 1 for how well the model ranks the buyers above the others.
Two lessons of this chapter come just before this one. Library version skew showed that a saved model often fails to load when the library versions change. Pinning dependencies showed how to write down the exact versions. Here I take the next step: put the model, the exact libraries and Python itself into one sealed package.
The survey lesson on model packaging and containerization explains Dockerfiles in words, with example sizes. I will not repeat it. Here I build real images and measure them.
The Words You Need First
Please read this slide slowly if any word is new. Every slide after it uses these words.
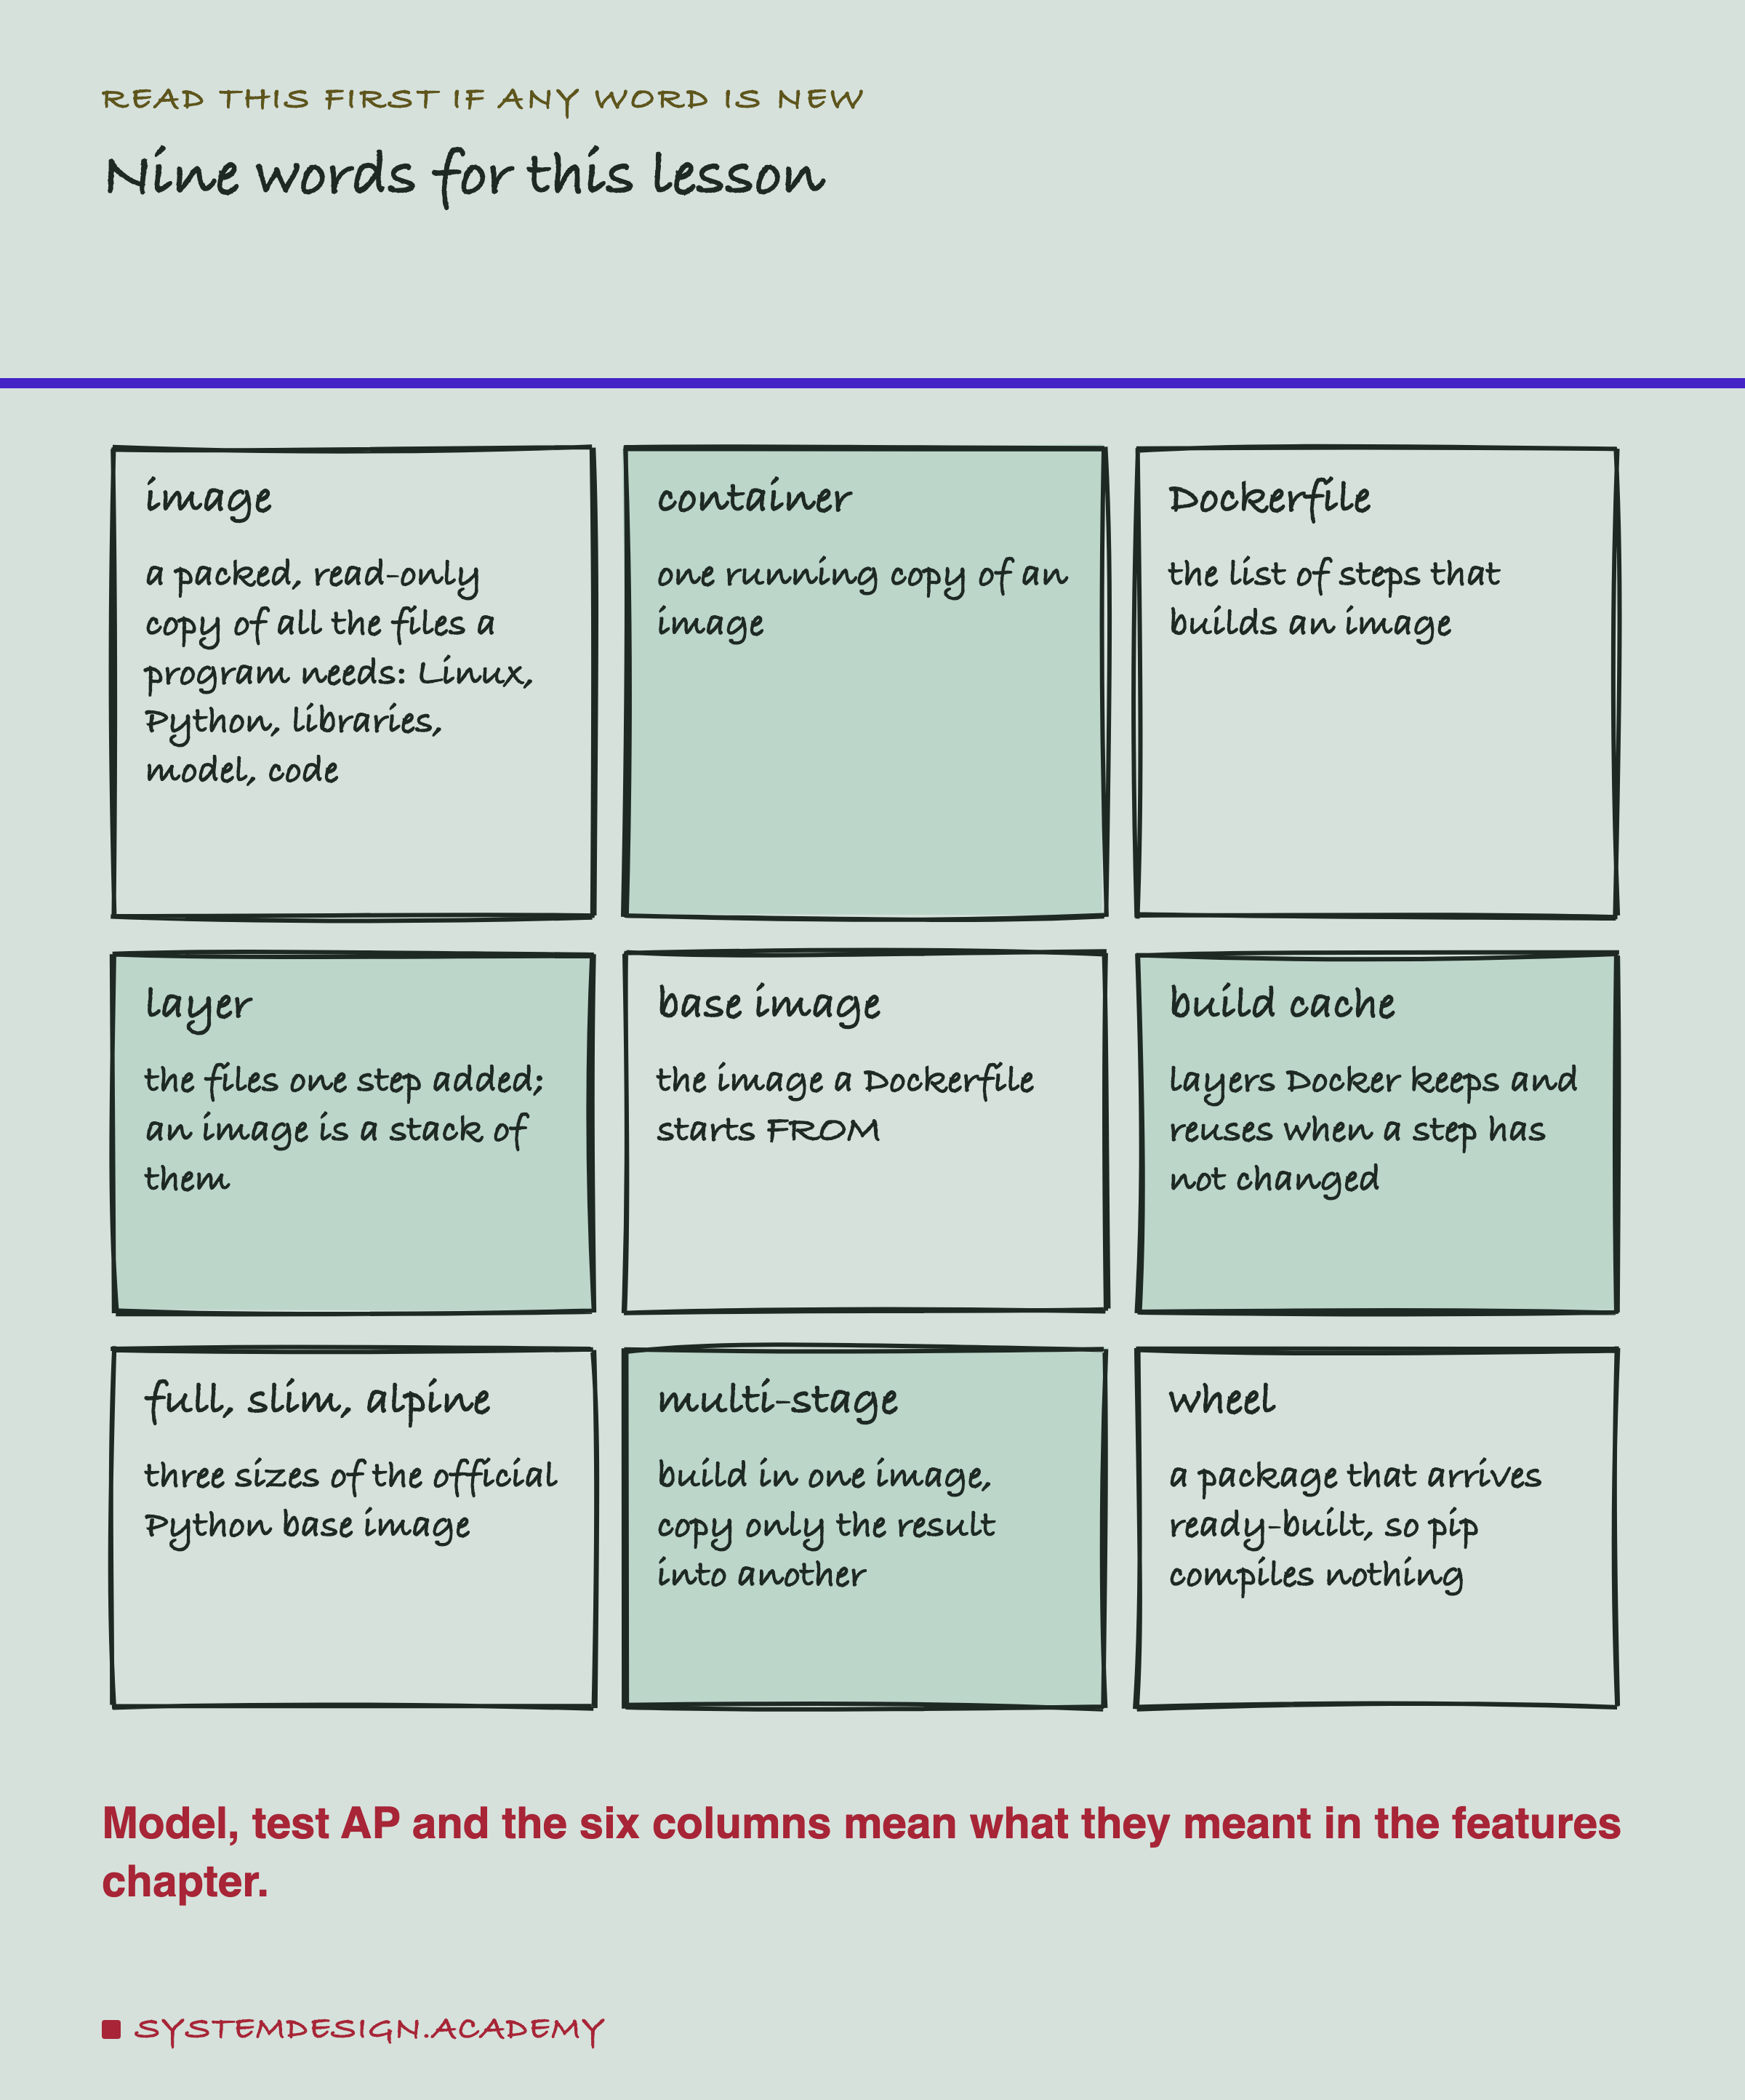
is a tool that packs a program with everything it needs. A container image, or just image, is that package. It is a read-only copy of all the files the program needs, from a small Linux system up to my own code. A container is one running copy of an image, like one cake baked from a recipe.
A Dockerfile is the recipe. It is a short text file of steps, such as "start from this image", "copy this file in", "run pip install". Each step adds a layer, the set of files that step added or changed. An image is a stack of layers.
The first step names a base image, the image my Dockerfile starts FROM. The Python project publishes official base images in several sizes. The default one I call full. Slim leaves out many system packages. Alpine is built on a much smaller Linux, called Alpine Linux.
When Docker builds an image again, it can reuse a layer it built before, if nothing that layer depends on has changed. The saved layers are the build cache.
A wheel is a Python package that arrives ready-built. When pip finds a wheel for your system, it copies files and compiles nothing. When it does not, it downloads the source and tries to compile it, which needs a compiler, a program that turns C code into machine code.
What the Documentation Says
Before building anything, I read what the tools themselves say. Every quote here was found word for word in the source file at a fixed commit, and all of them are in results/img-factcheck.json.
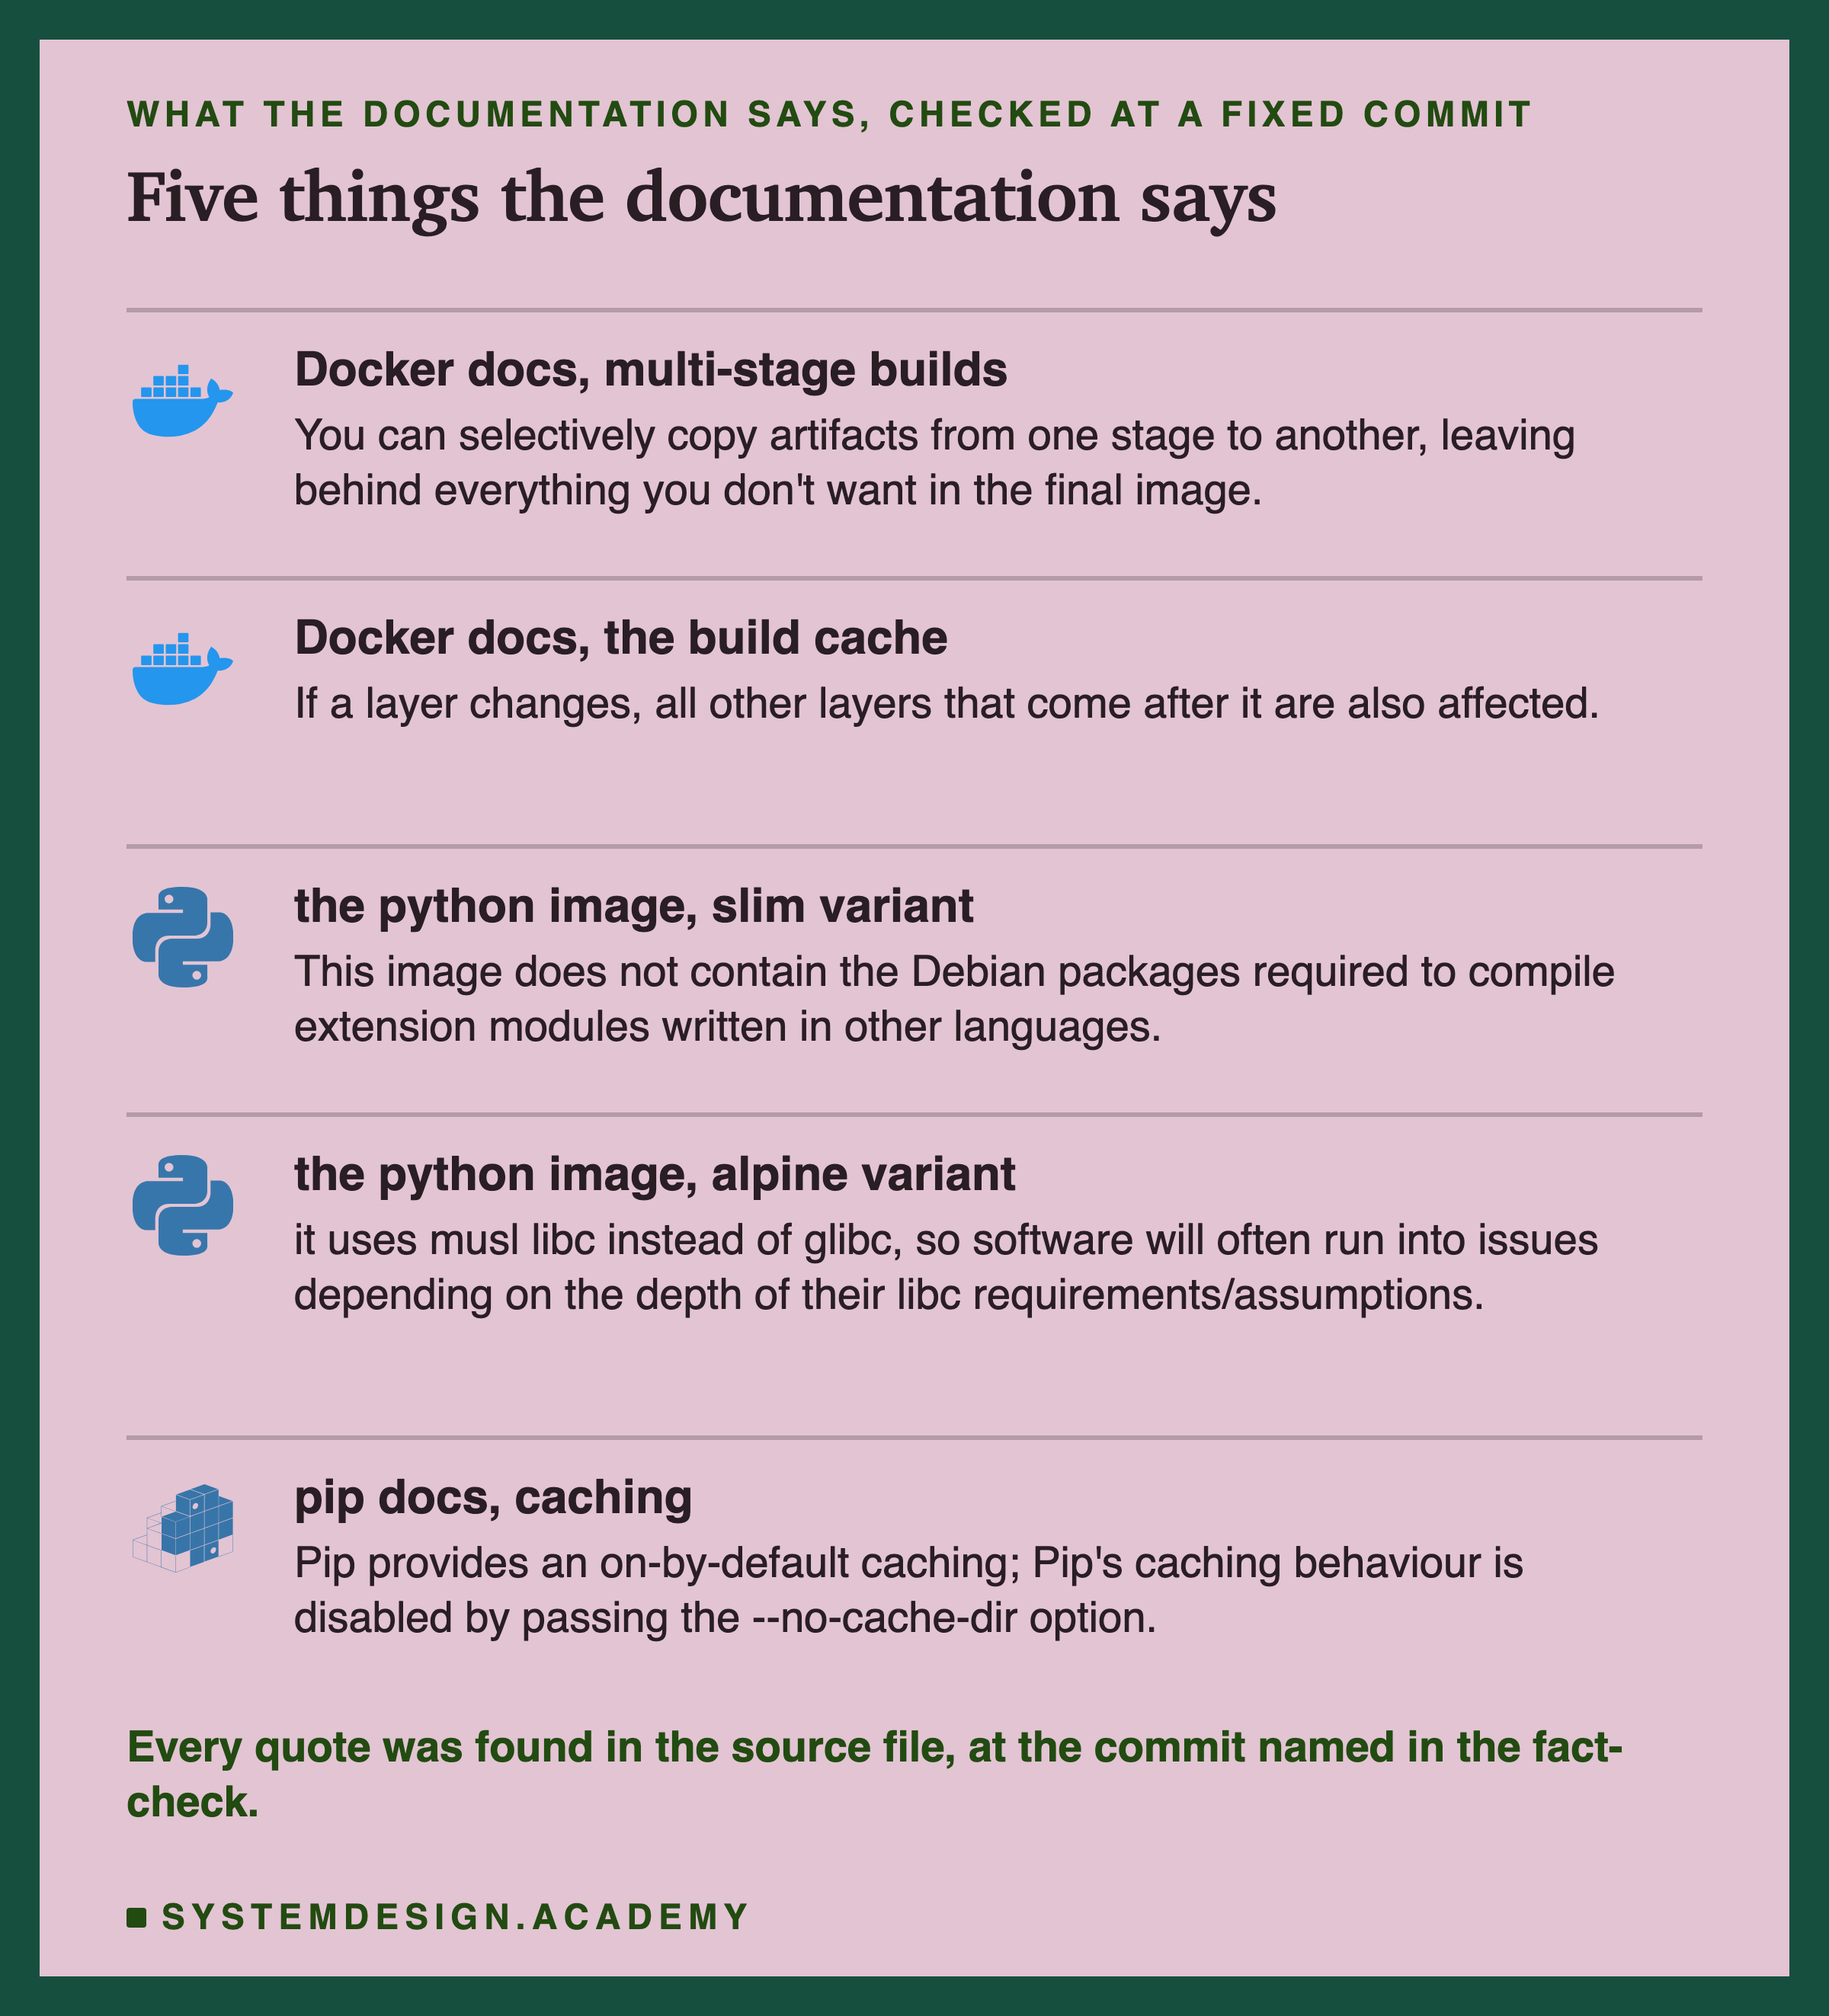
's page on multi-stage builds says: "You can selectively copy artifacts from one stage to another, leaving behind everything you don't want in the final image." Its page on the build cache says: "If a layer changes, all other layers that come after it are also affected."
The python image's own description is careful about slim. It says the slim image "does not contain the Debian packages required to compile extension modules written in other languages". It also says "pip install may fail when installing a Python distribution package from a source distribution". Debian is the Linux system inside the full and slim images.
About alpine, it says the image uses musl libc instead of glibc. A libc is the basic C library that almost every program on Linux calls for things like memory and maths. glibc is the common one; musl is a smaller one. The description warns that "software will often run into issues depending on the depth of their libc requirements/assumptions."
And pip's documentation says pip keeps a cache of downloads by default, and that --no-cache-dir turns it off. Each of these is a promise I can test.
How the Lab Was Built
I wrote the design into the docstring of scripts/labs/packaging/container_images.py before it first ran. Before that, I had pulled the three base images and looked at their sizes once, and the docstring says so. I had not built any image with this model.
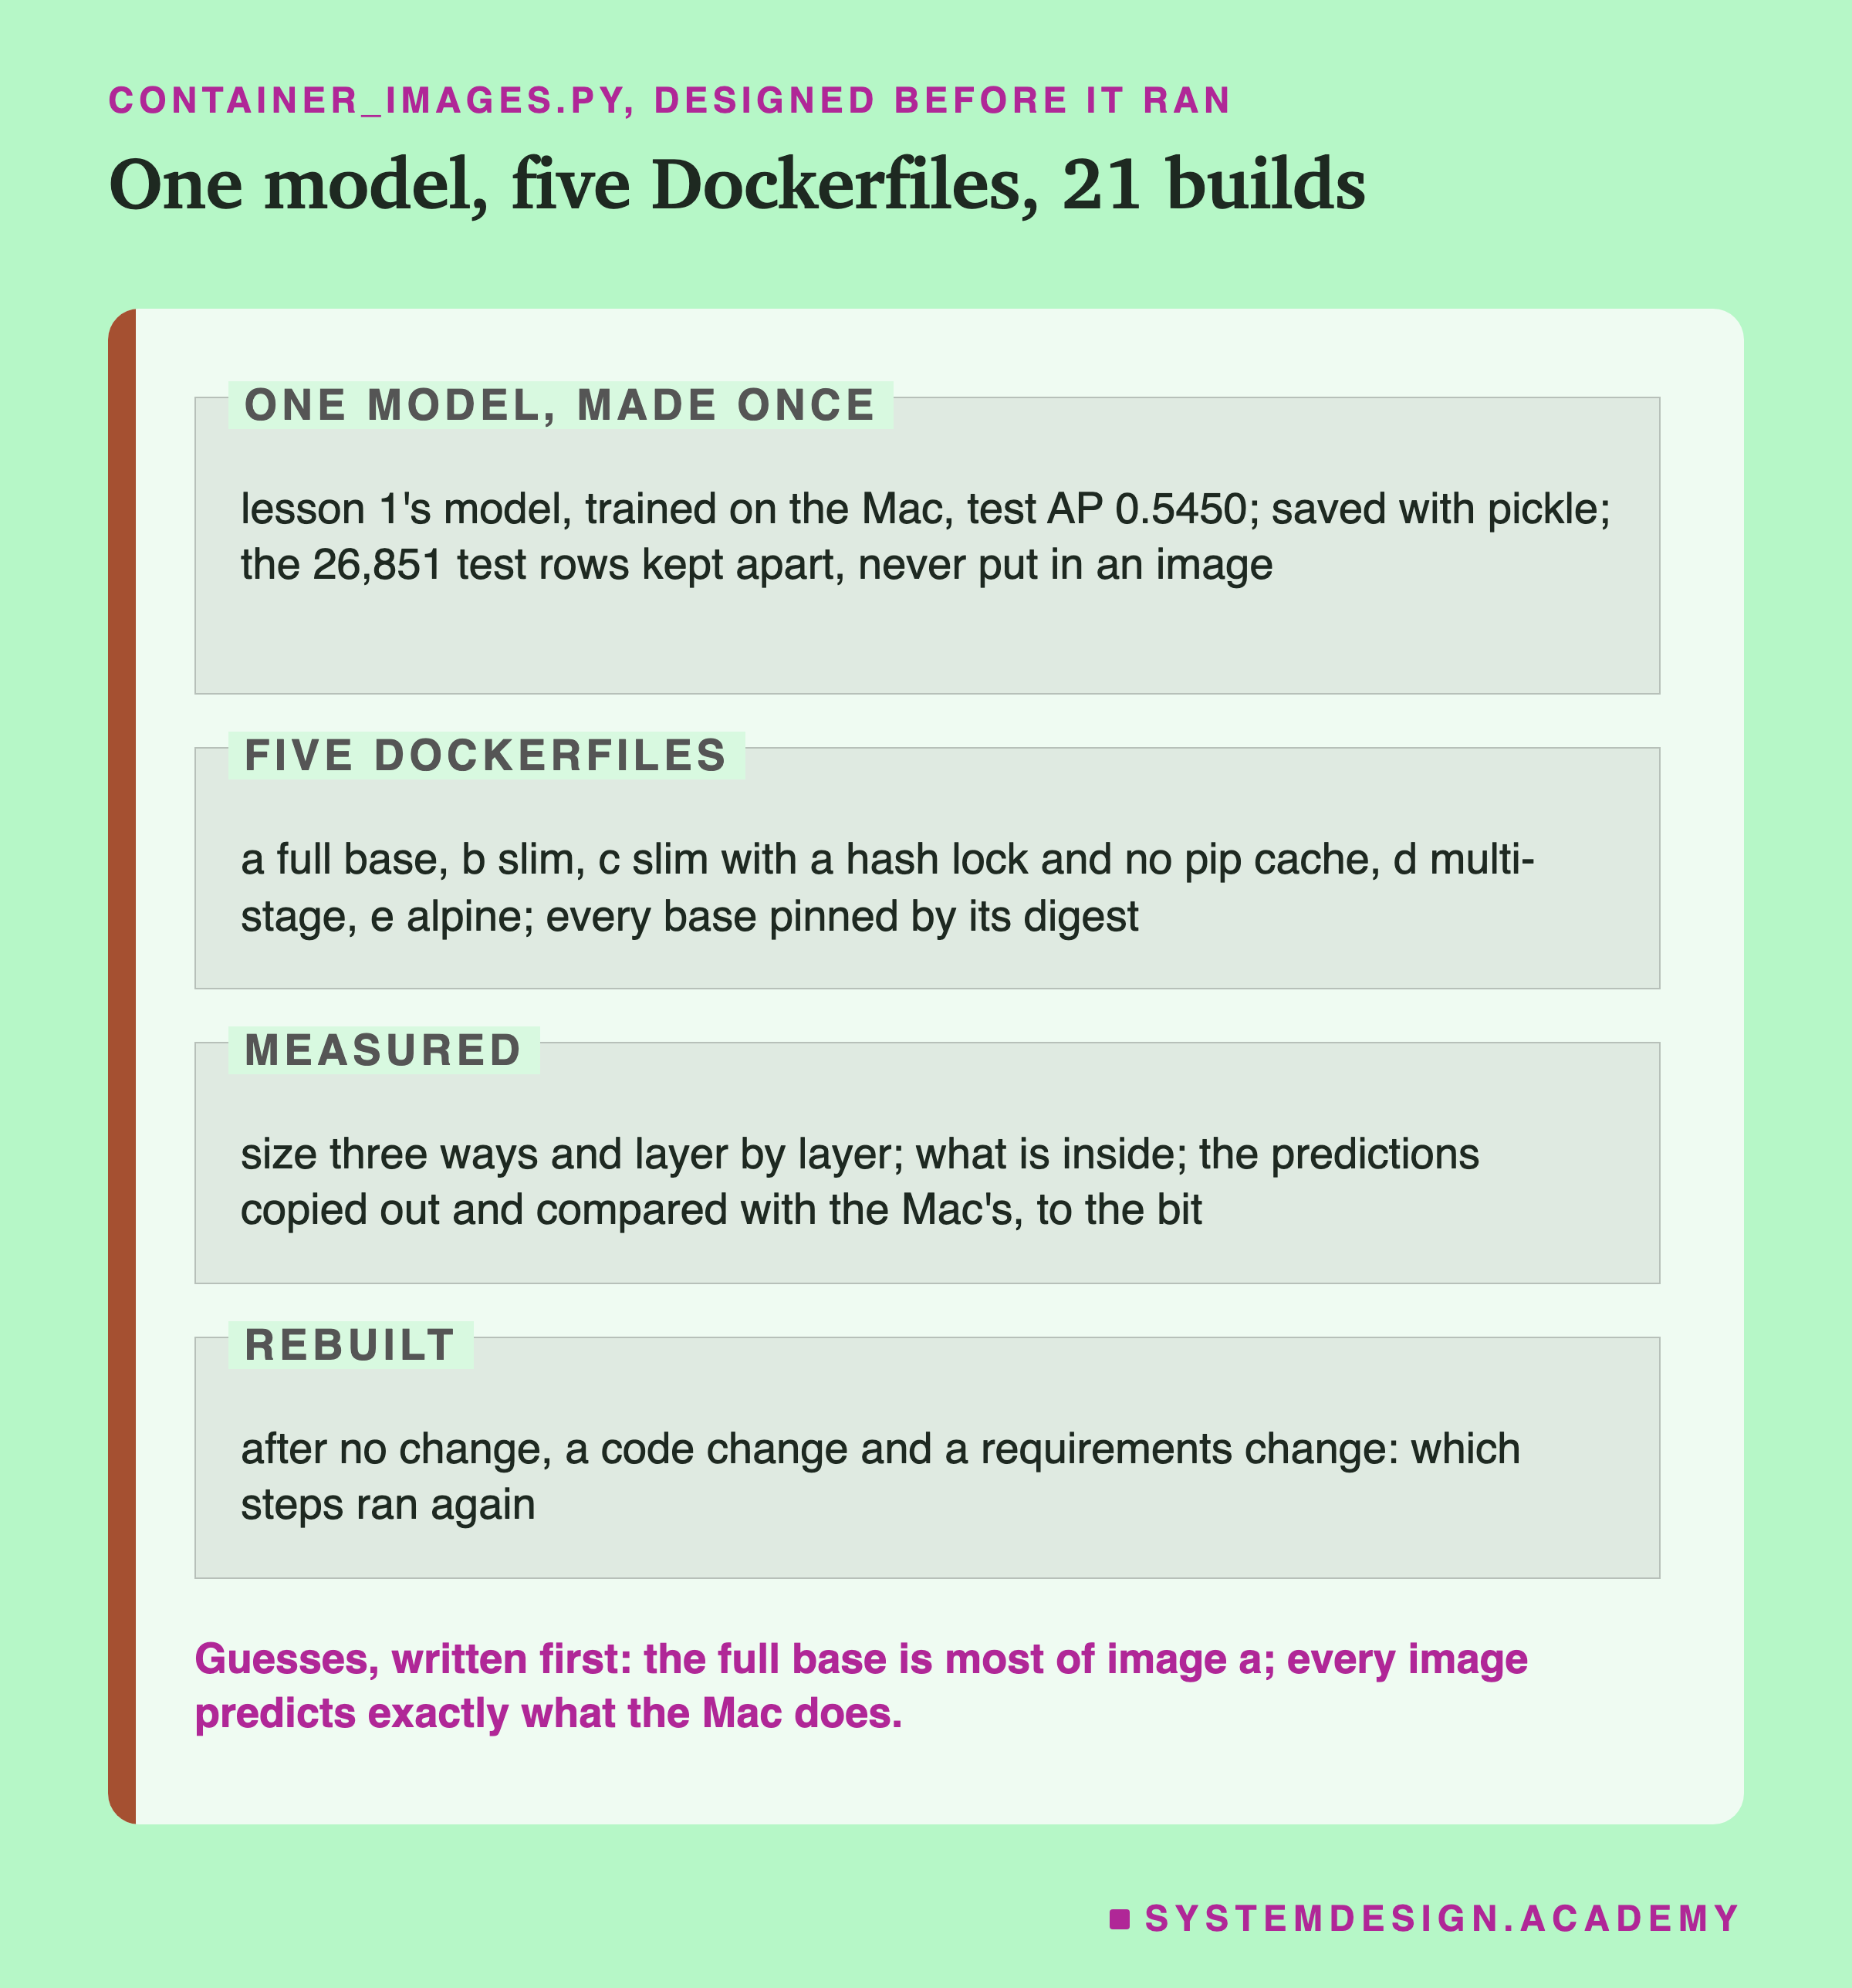
One model, made once. My main Python on the Mac trains lesson 1's model and saves it with pickle, Python's built-in way to save an object as a file. The lab stops if its test AP is not 0.5450. The Mac also predicts the 26,851 test rows, and those predictions are the reference.
A tiny program to run inside. Every image holds the same short script, predict.py. It loads the model, reads the test rows, predicts, and writes the predictions to a file. The test rows are never baked into an image. The lab copies them in when the container starts, and copies the predictions out when it stops.
Five Dockerfiles. They differ only in how the libraries get in.
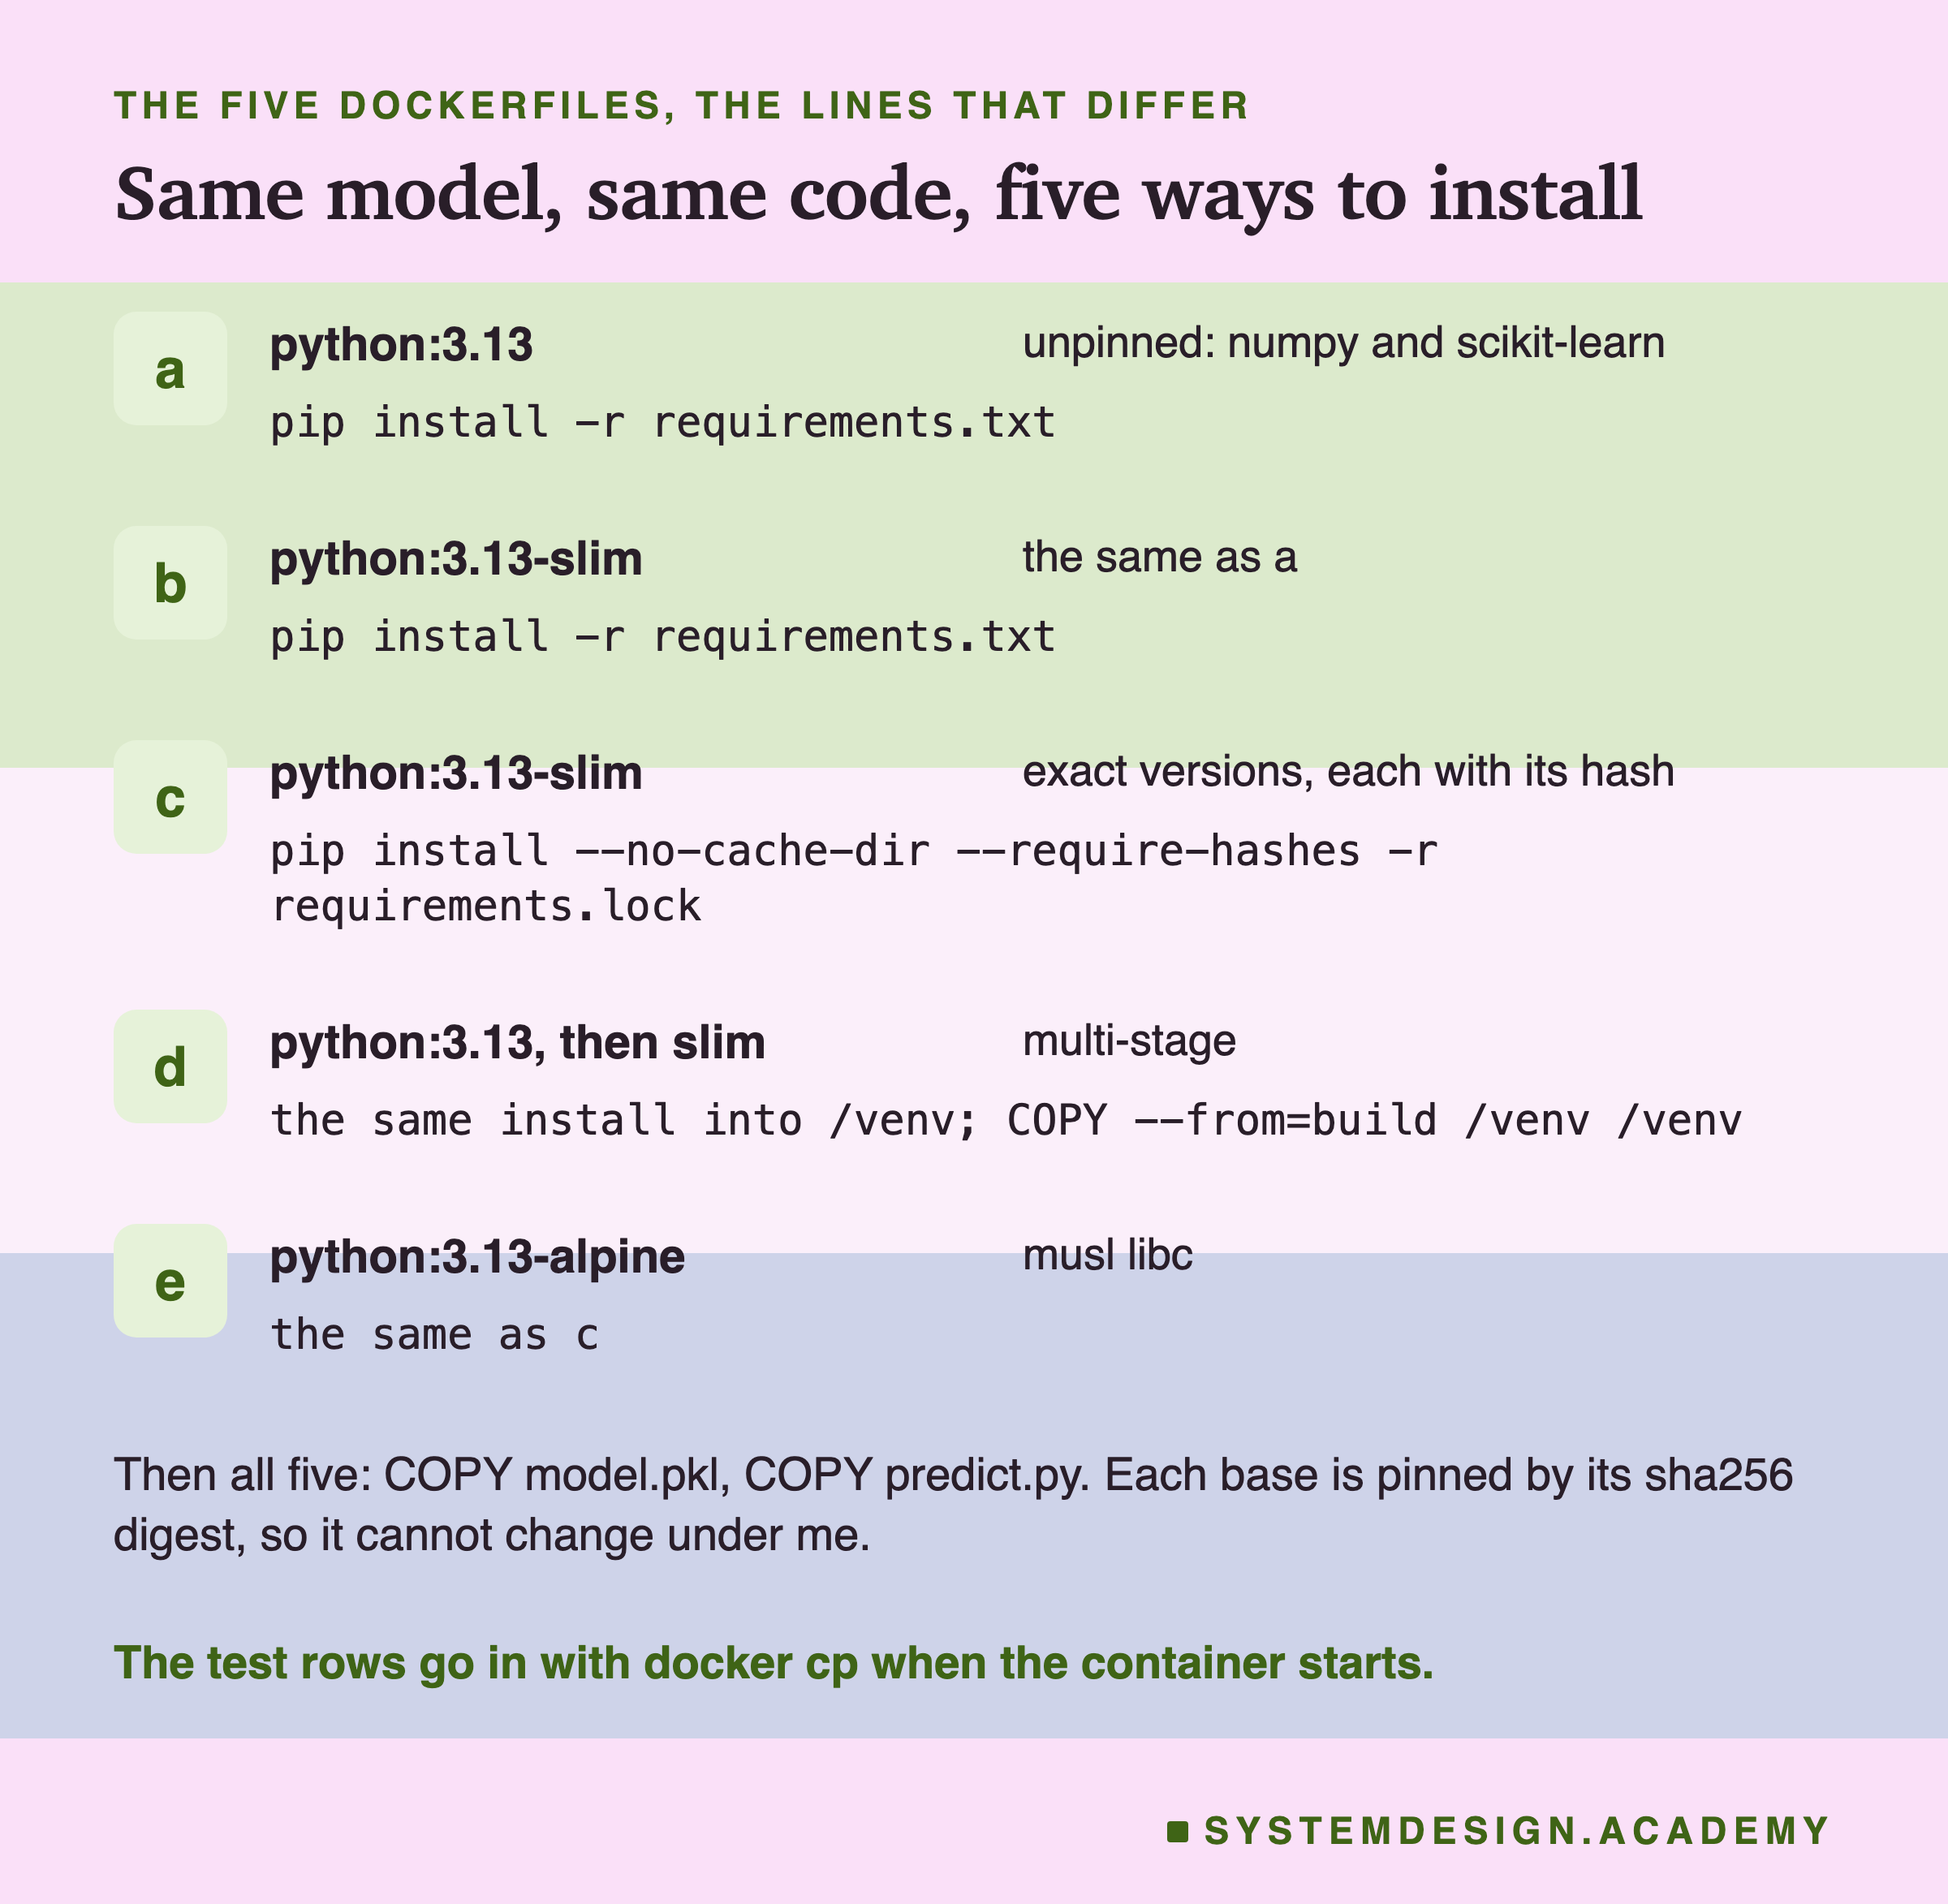
Images a and b install from a file that just says "numpy" and "scikit-learn", with no versions. Images c, d and e install from a , the kind lesson 4 built. It lists every package at the exact version my Mac used, with a of each file, a fingerprint pip checks before installing. The flag tells pip not to keep its download cache.
The Lab's Report, Running
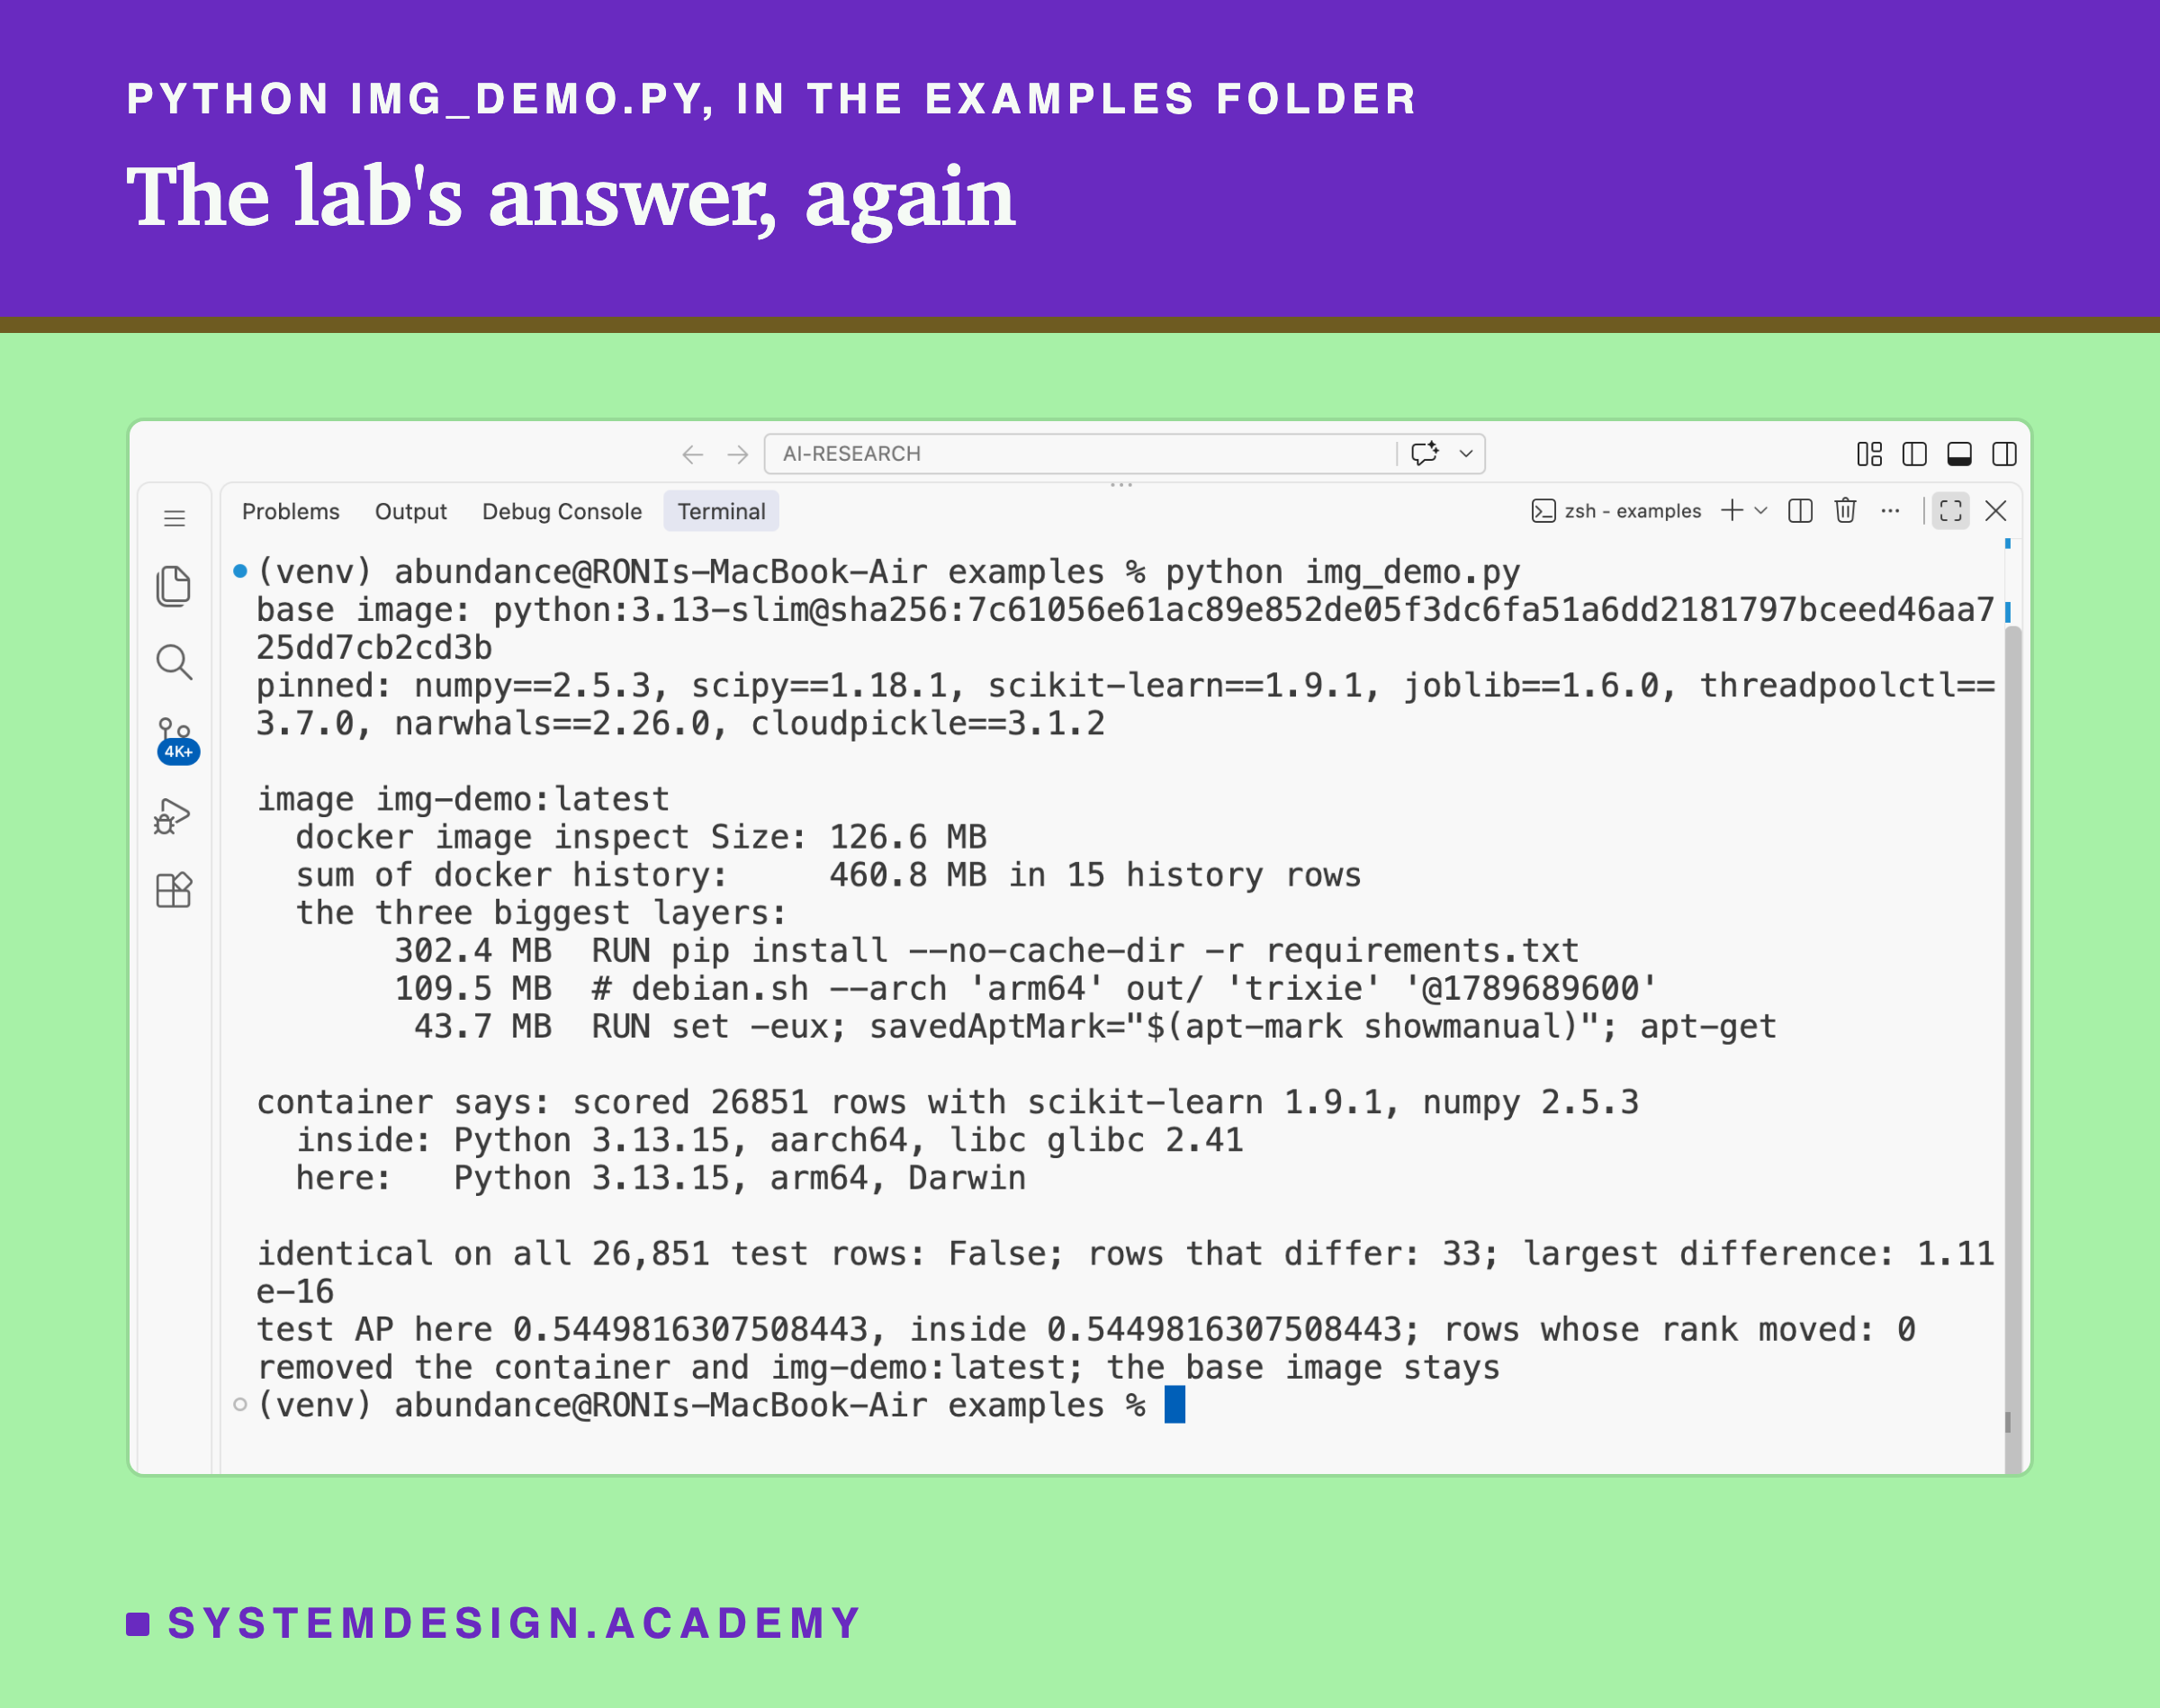
This is a real recording of the report script, img_report.py, on the laptop where the lab ran.
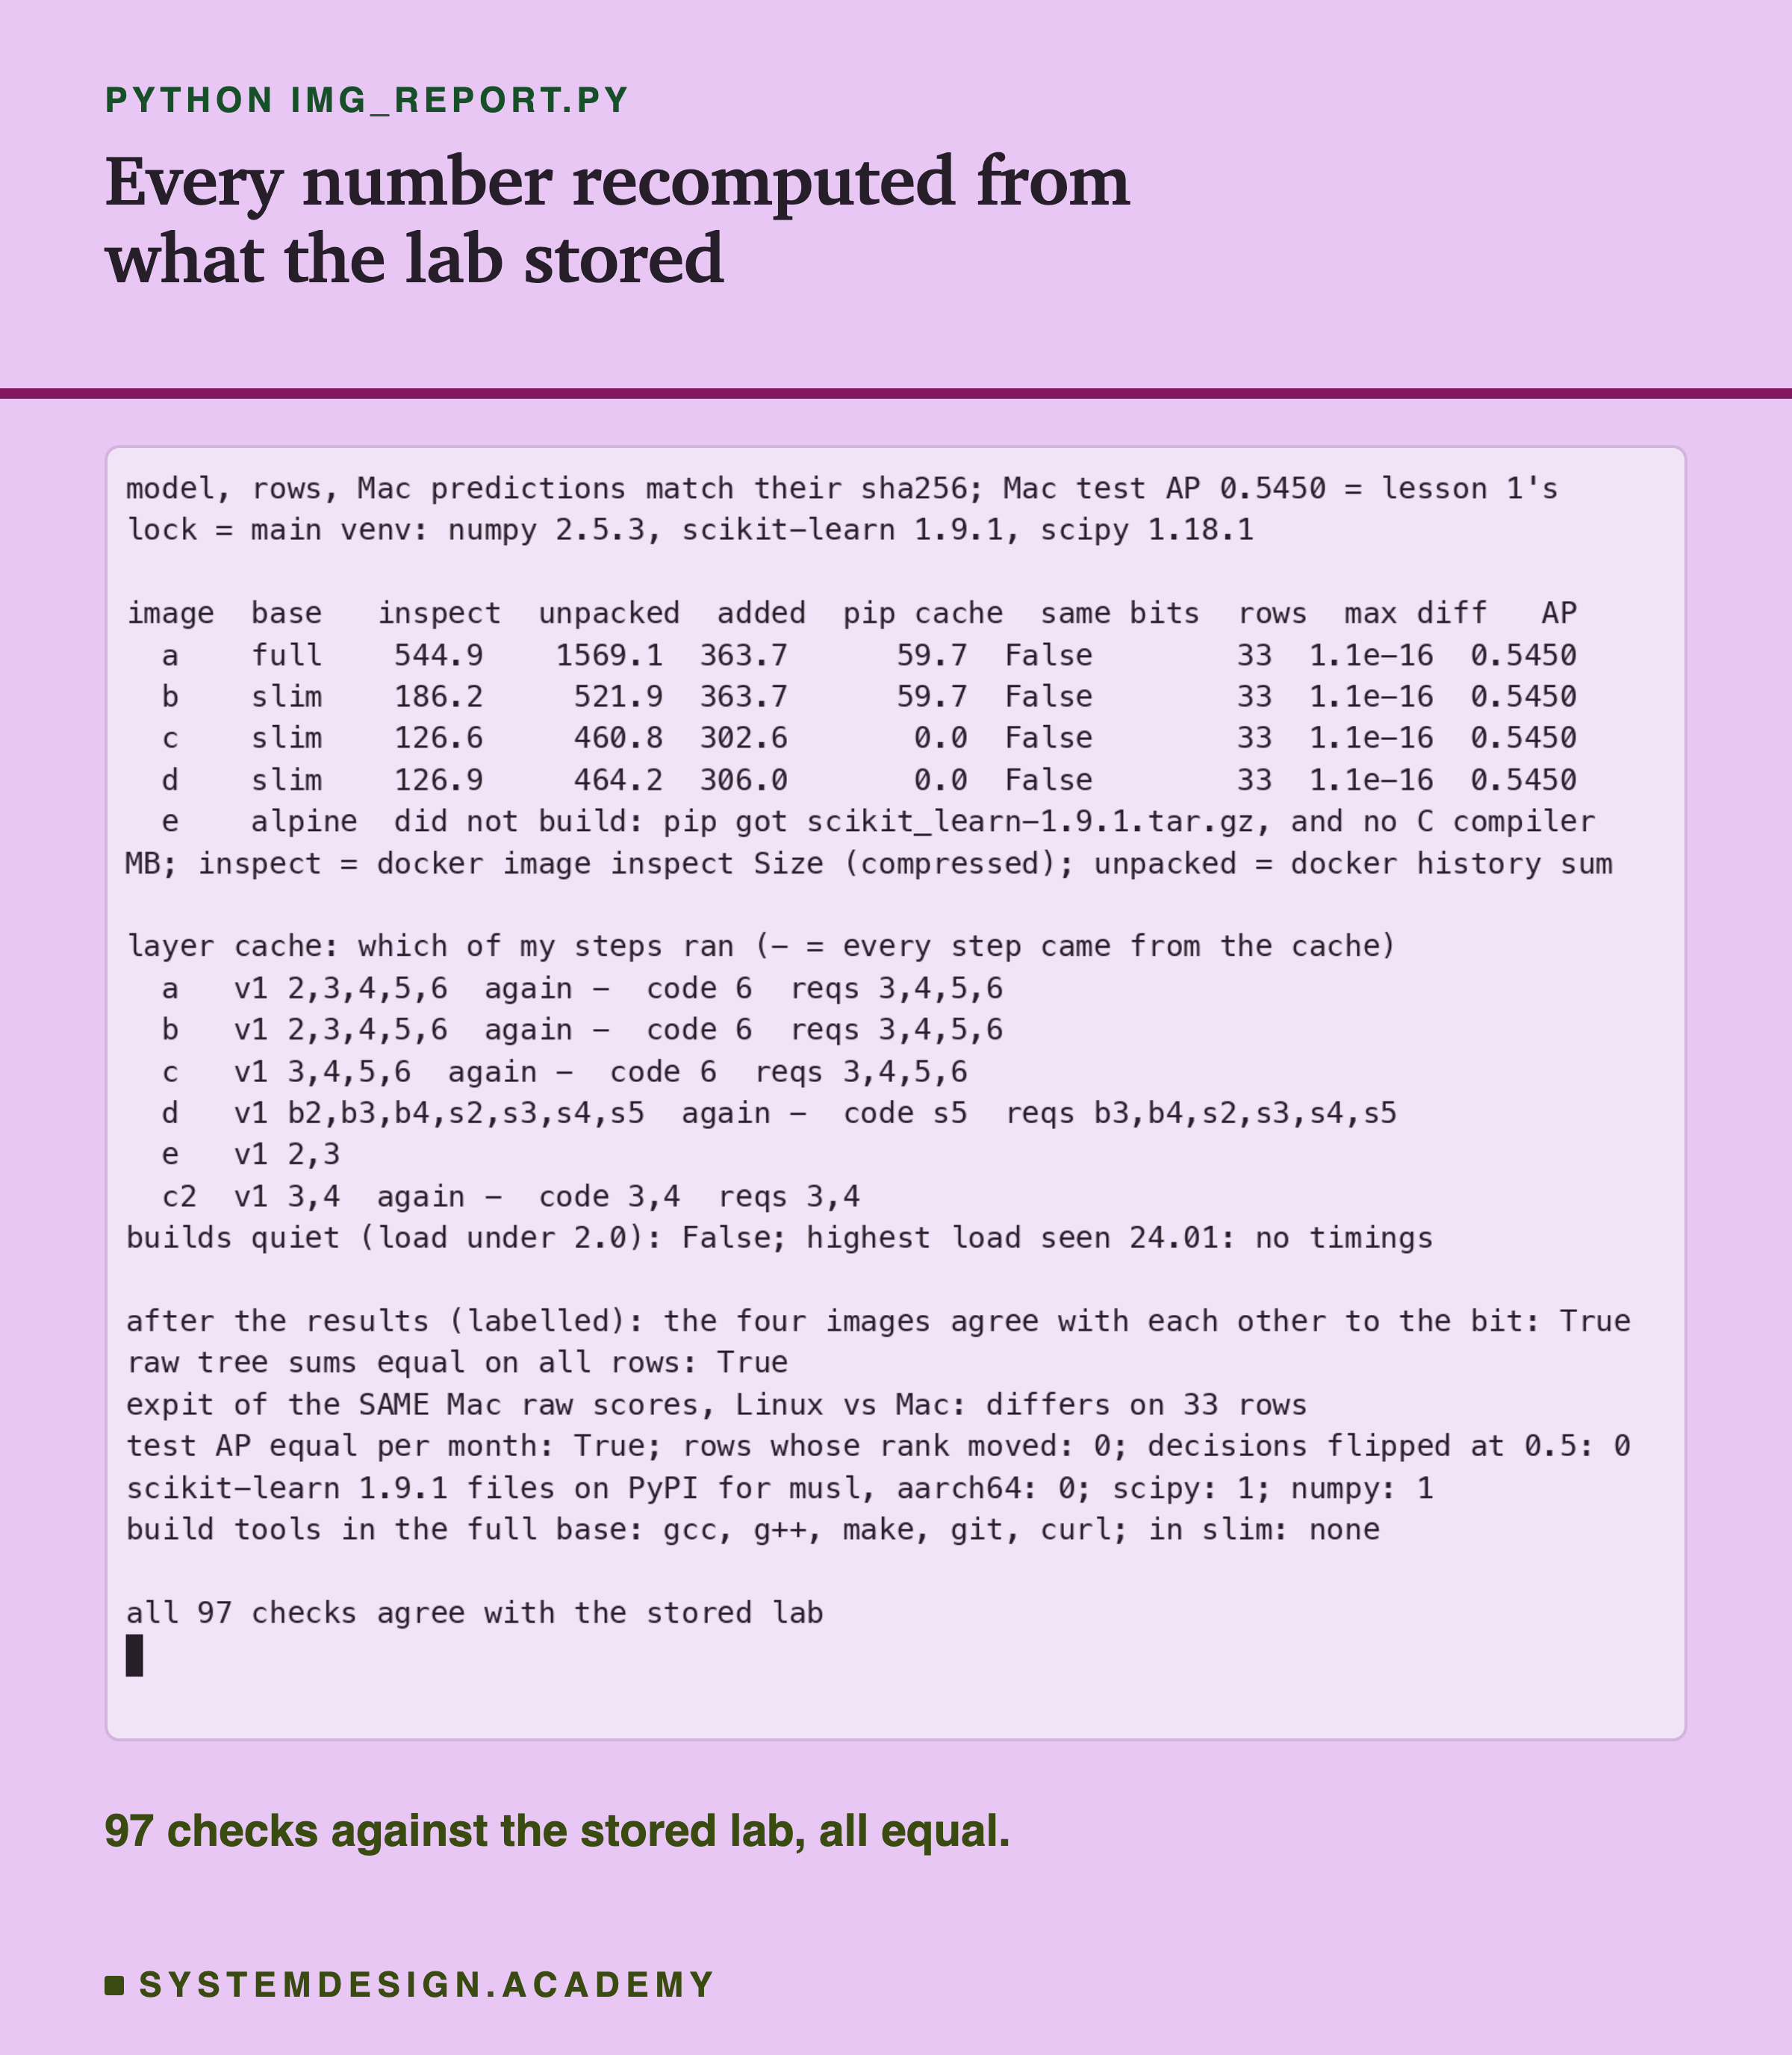
The report needs no . The lab stored every raw output it read: each build log, each layer list, each image's manifest, each du listing and every container's predictions. The report checks the sha256 of every saved file. It recomputes every AP with its own loop and compares every prediction with its own numpy calls. It adds up every layer again, and it reads every build log with its own parser, written apart from the lab's. All 97 checks agreed.
One line matters for what follows: "builds quiet: False; highest load seen 24.01". The load average is how many programs were waiting to run on the laptop. Other work was running at the same time, so build times would mean nothing. This lesson gives no timings, only which steps ran.
The Headline: Slim Cut the Most
Here are the four images that built, each measured two ways.
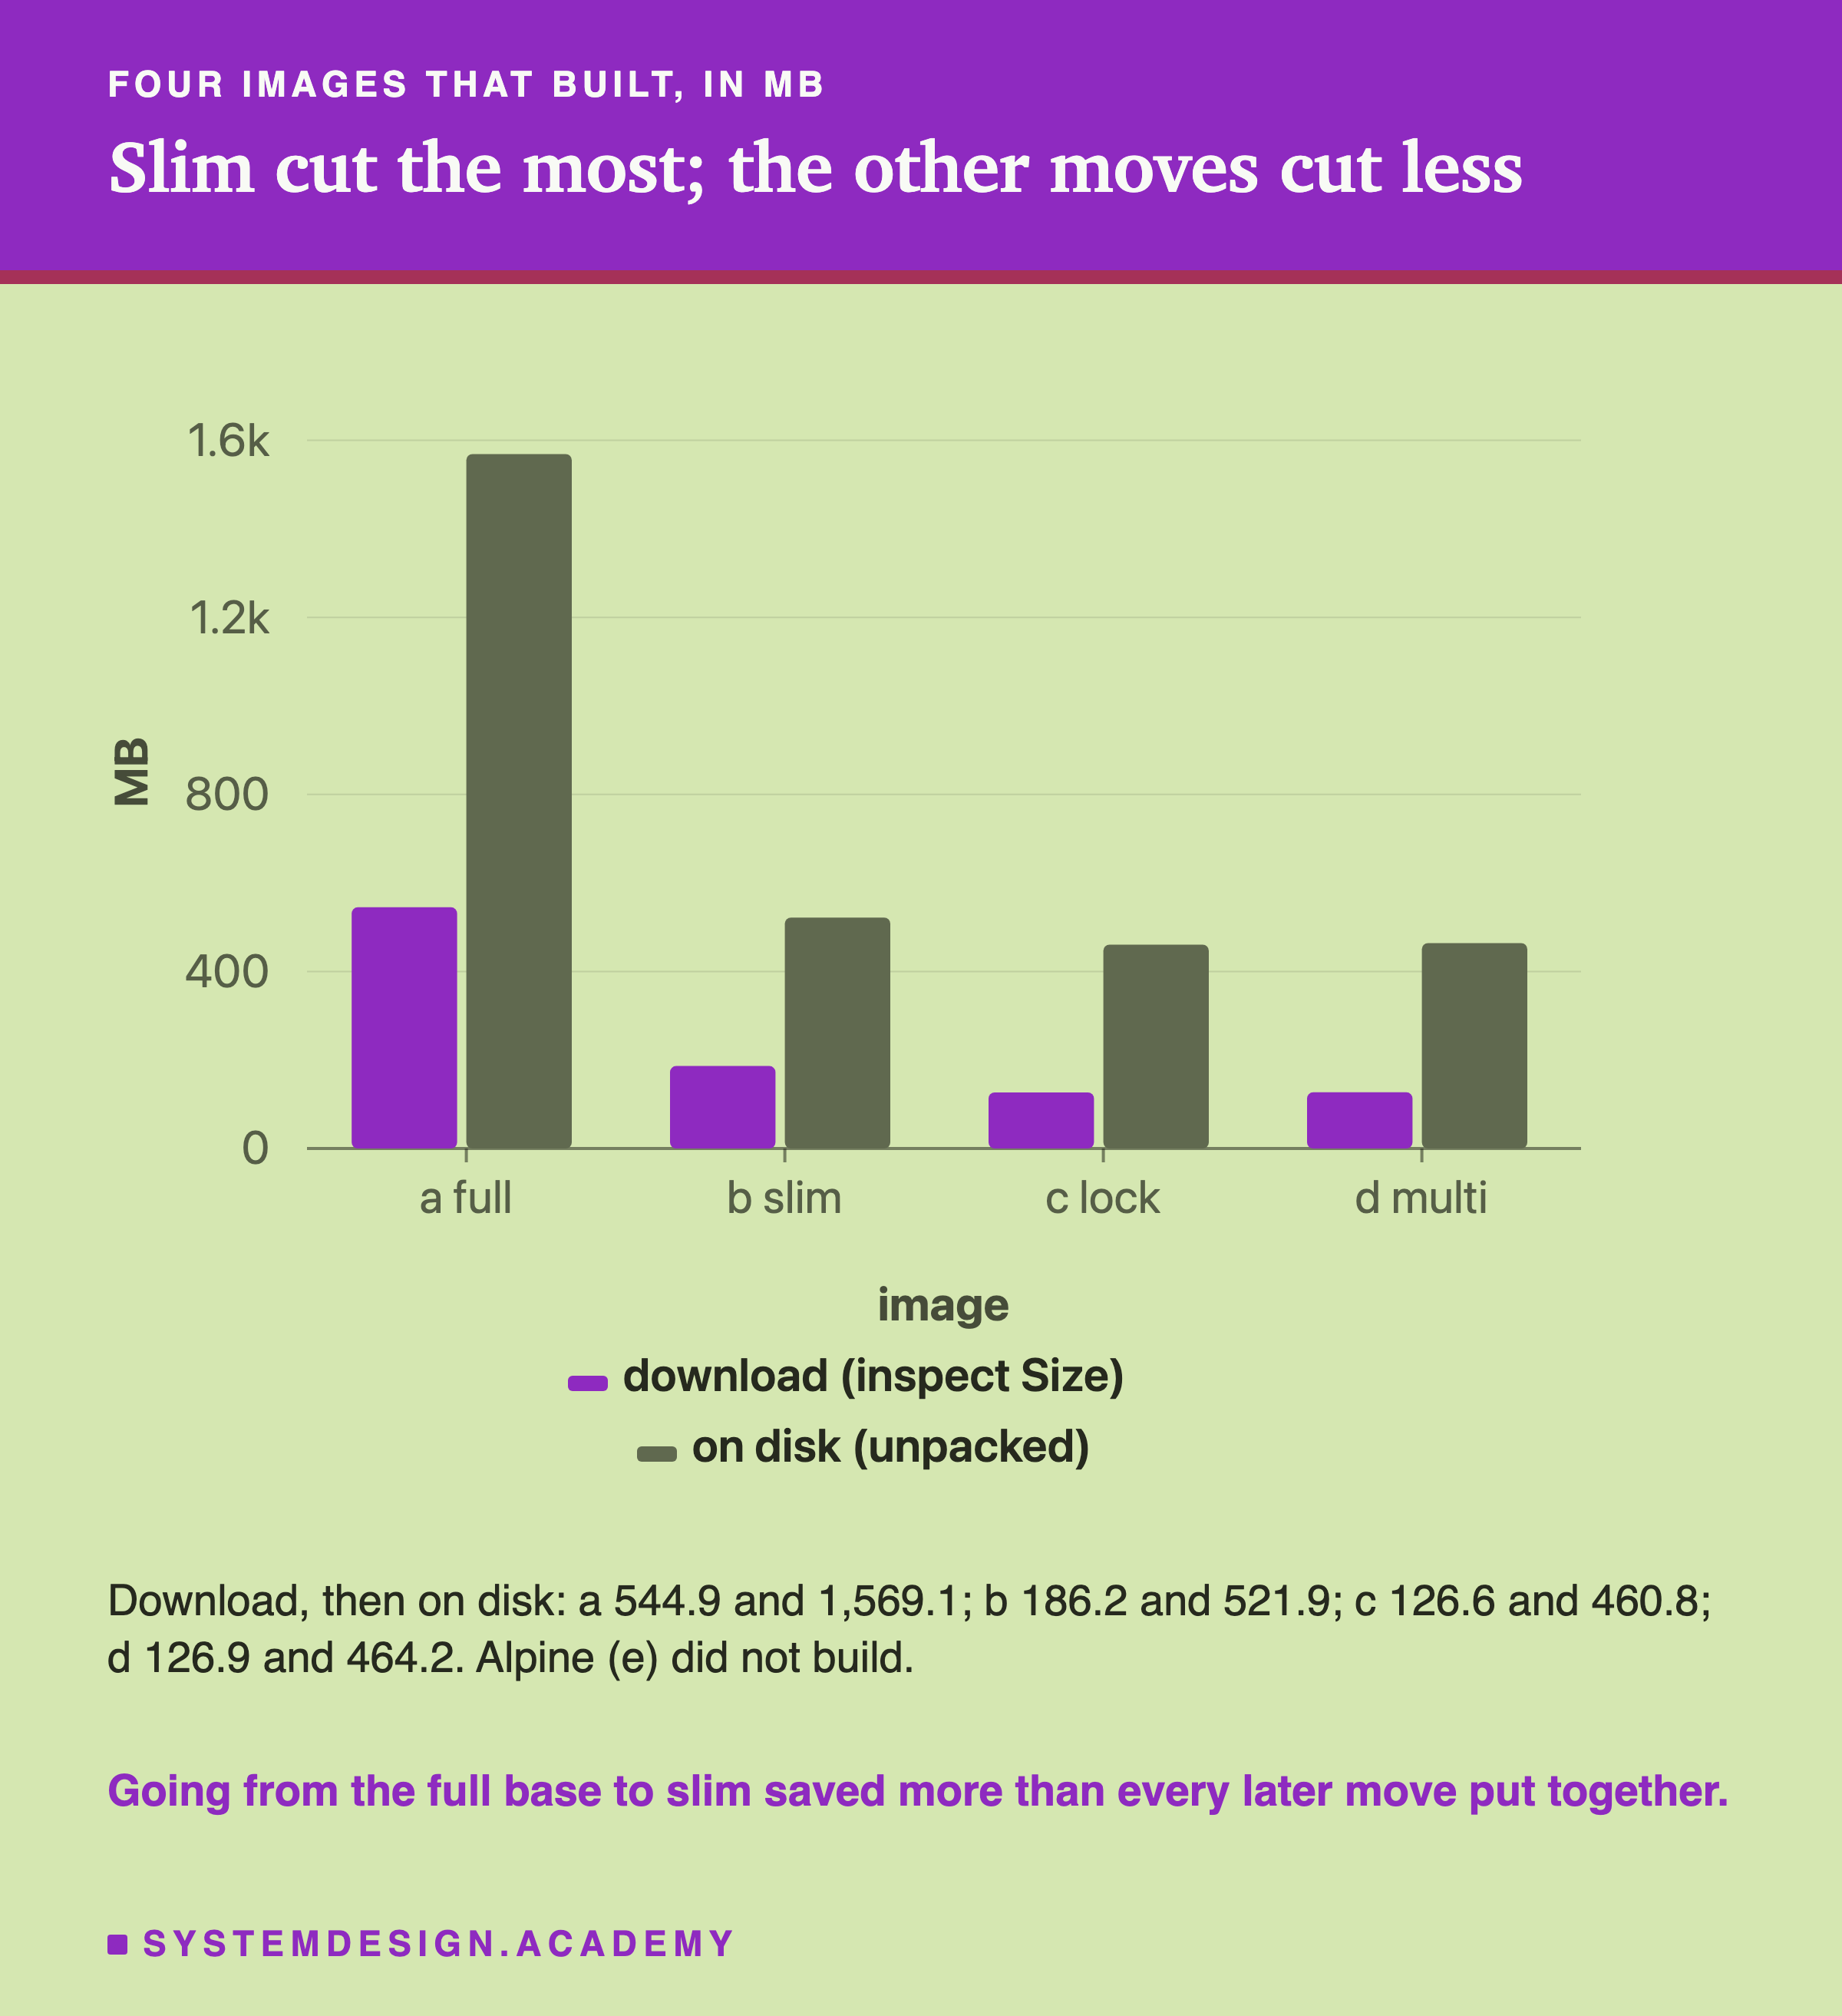
Image a, the full base, was 1,569.1 MB on disk. Image b, the same Dockerfile on slim, was 521.9 MB. That one word in the first line saved 1,047.2 MB.
The other moves saved much less. Turning off pip's cache and using the lock, image c, took b from 521.9 to 460.8 MB. The multi-stage build, image d, was 464.2 MB, a little bigger than c, not smaller.
Alpine did not build at all, so it has no bar. I explain why on its own slide.
The download sizes tell the same story, at 27 to 36% of the unpacked size: 544.9 MB for a, and 126.6 MB for c. The next slide explains why each image has two sizes.
Which Size Do You Mean?
Before going on, I have to be honest about a confusing thing. Different tools gave different sizes for the same image.
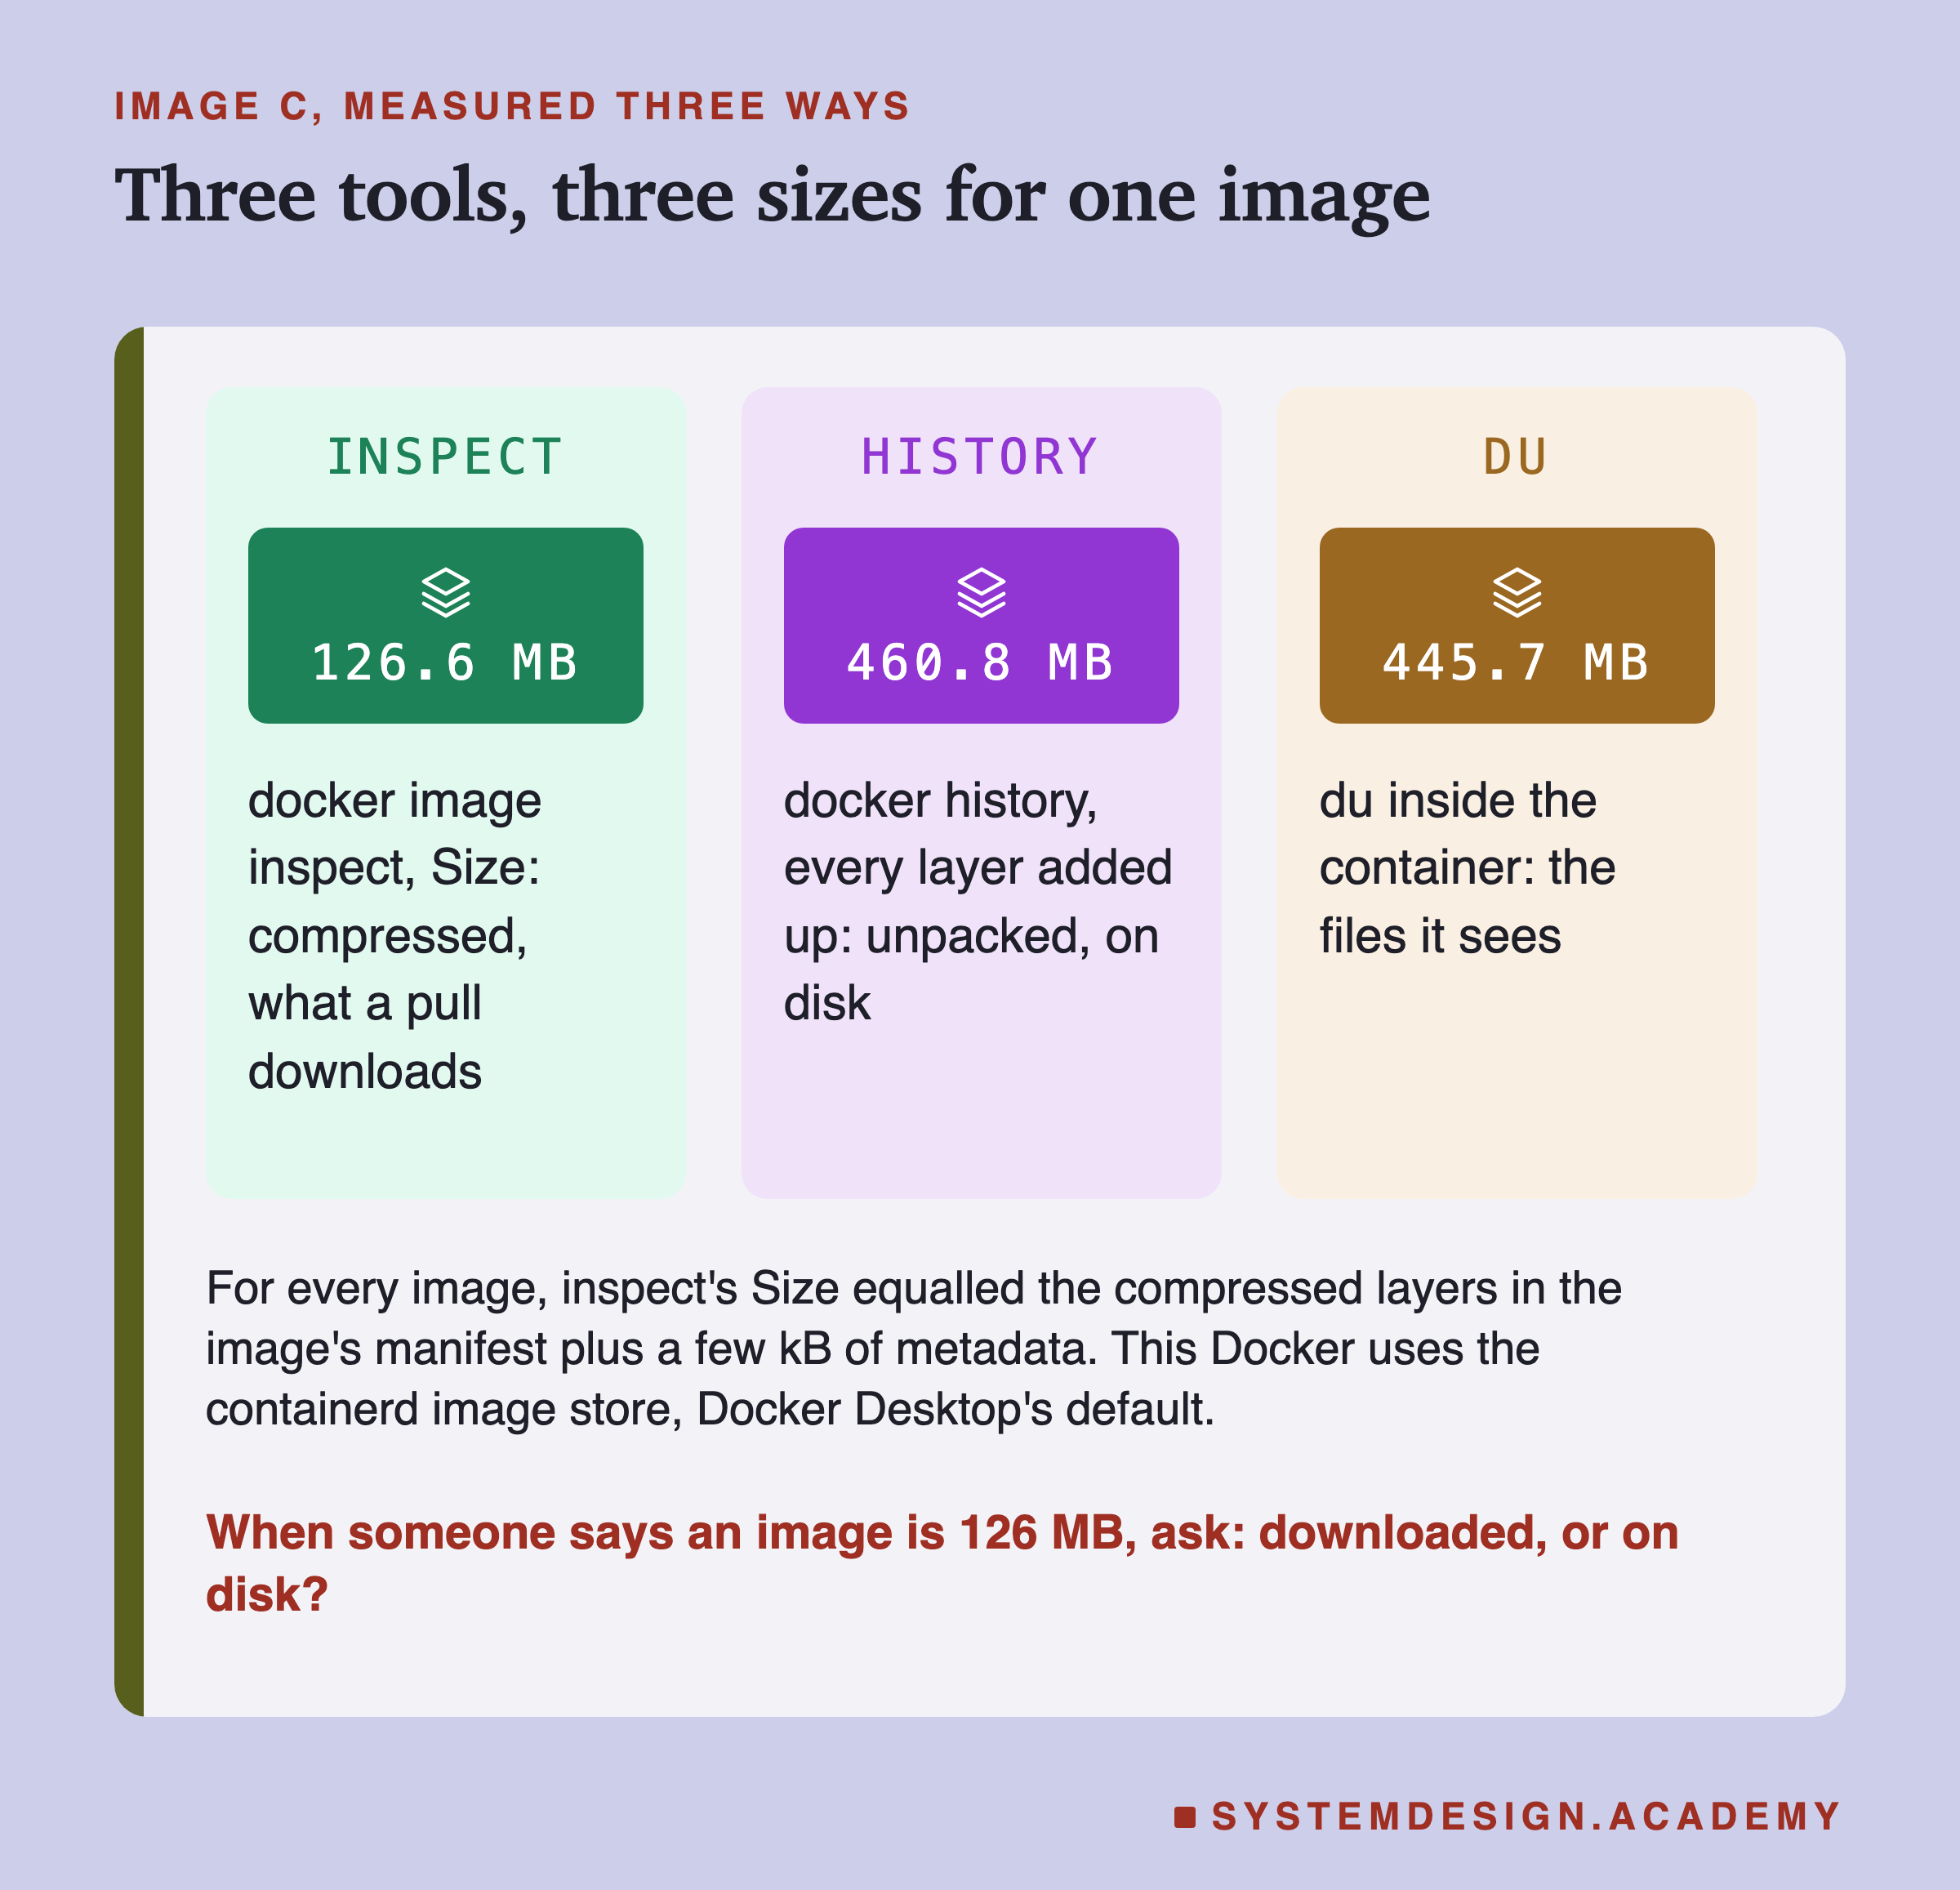
docker image inspect reported 126.6 MB for image c. Adding up every layer in docker history gave 460.8 MB. And du, a Linux tool that adds up file sizes, run inside a container, said 445.7 MB.
I checked what the first number is. A manifest is the small file that lists an image's layers. The lab saved each image with docker save and read its manifest. For every image, inspect's Size equalled the sum of the compressed layers in that manifest, plus a few kB of other metadata. Compressed means squeezed, like a zip file. So 126.6 MB is roughly what a server downloads when it pulls the image, and 460.8 MB is what the unpacked files take on its disk.
On disk, a server with this kind of pays for both. Docker's page on the containerd image store puts it this way.
"When you pull an image, containerd keeps the compressed layers (as received from the registry) and also extracts them to disk."
So image c costs about 126.6 + 460.8 MB on a server. I saw the same thing on the slim base: docker image ls said 204MB, and its compressed 43.3 MB plus unpacked 158.2 MB make 201.5 MB.
A pull also skips layers the server already has. In Docker's words, when the layers are already there, it "doesn't need to pull them again". So a server that already holds the slim base downloads only my layers, not the whole 126.6 MB. I did not measure a pull.
What the Size Is Made Of
Now the question of the lesson. Where do those megabytes come from?
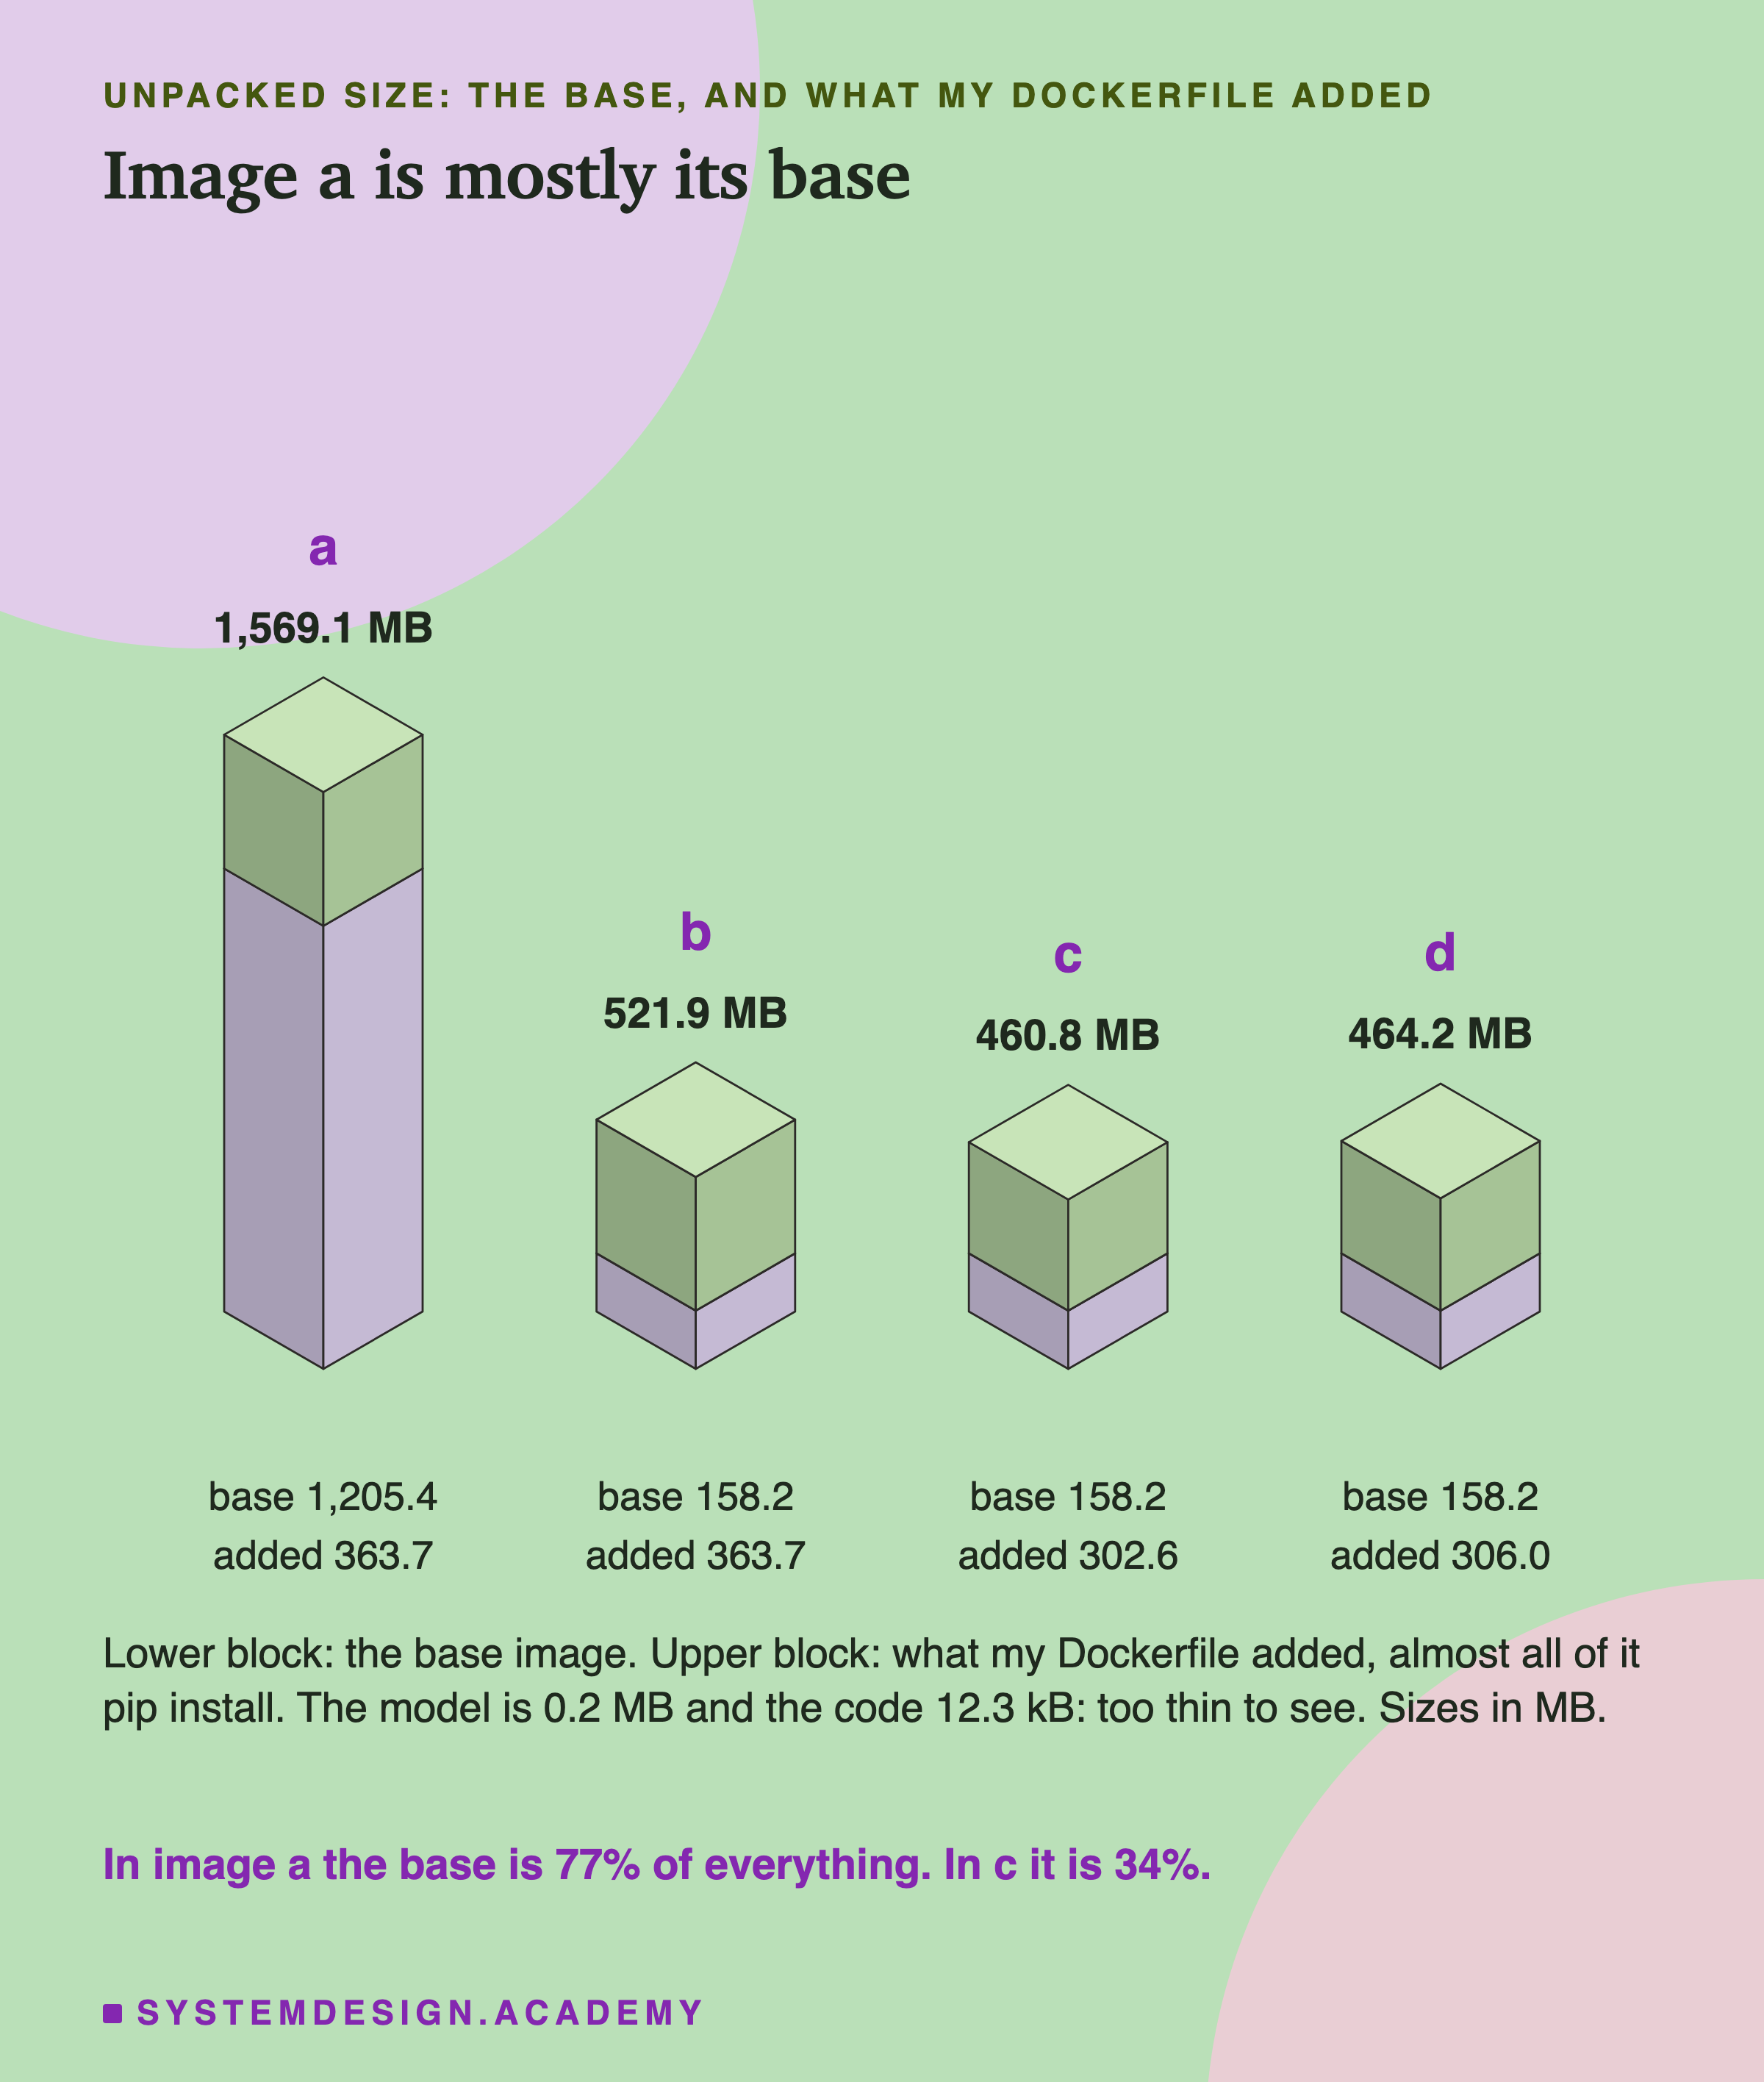
Every image is two parts: the base image, which I did not build, and the layers my Dockerfile added on top.
In image a, the base was 1,205.4 MB of the 1,569.1 MB, or 77%. Everything I added was 363.7 MB. So the biggest part of the full image was not my model and not my libraries. It was the starting point.
In images b, c and d the base was the slim one, 158.2 MB. There, what I added was the bigger part: 302.6 MB in c, about two thirds of the image.
The model itself was tiny. Its layer was 0.2 MB. My code's layer was 12.3 kB. These are the two things the image exists to carry, and together they were well under a thousandth of image a.
So there are two weights to look at: the base, and the libraries. The next two slides open each one.
What Is in the Full Base
What fills 1,205.4 MB in the full base, when slim needs 158.2 MB?
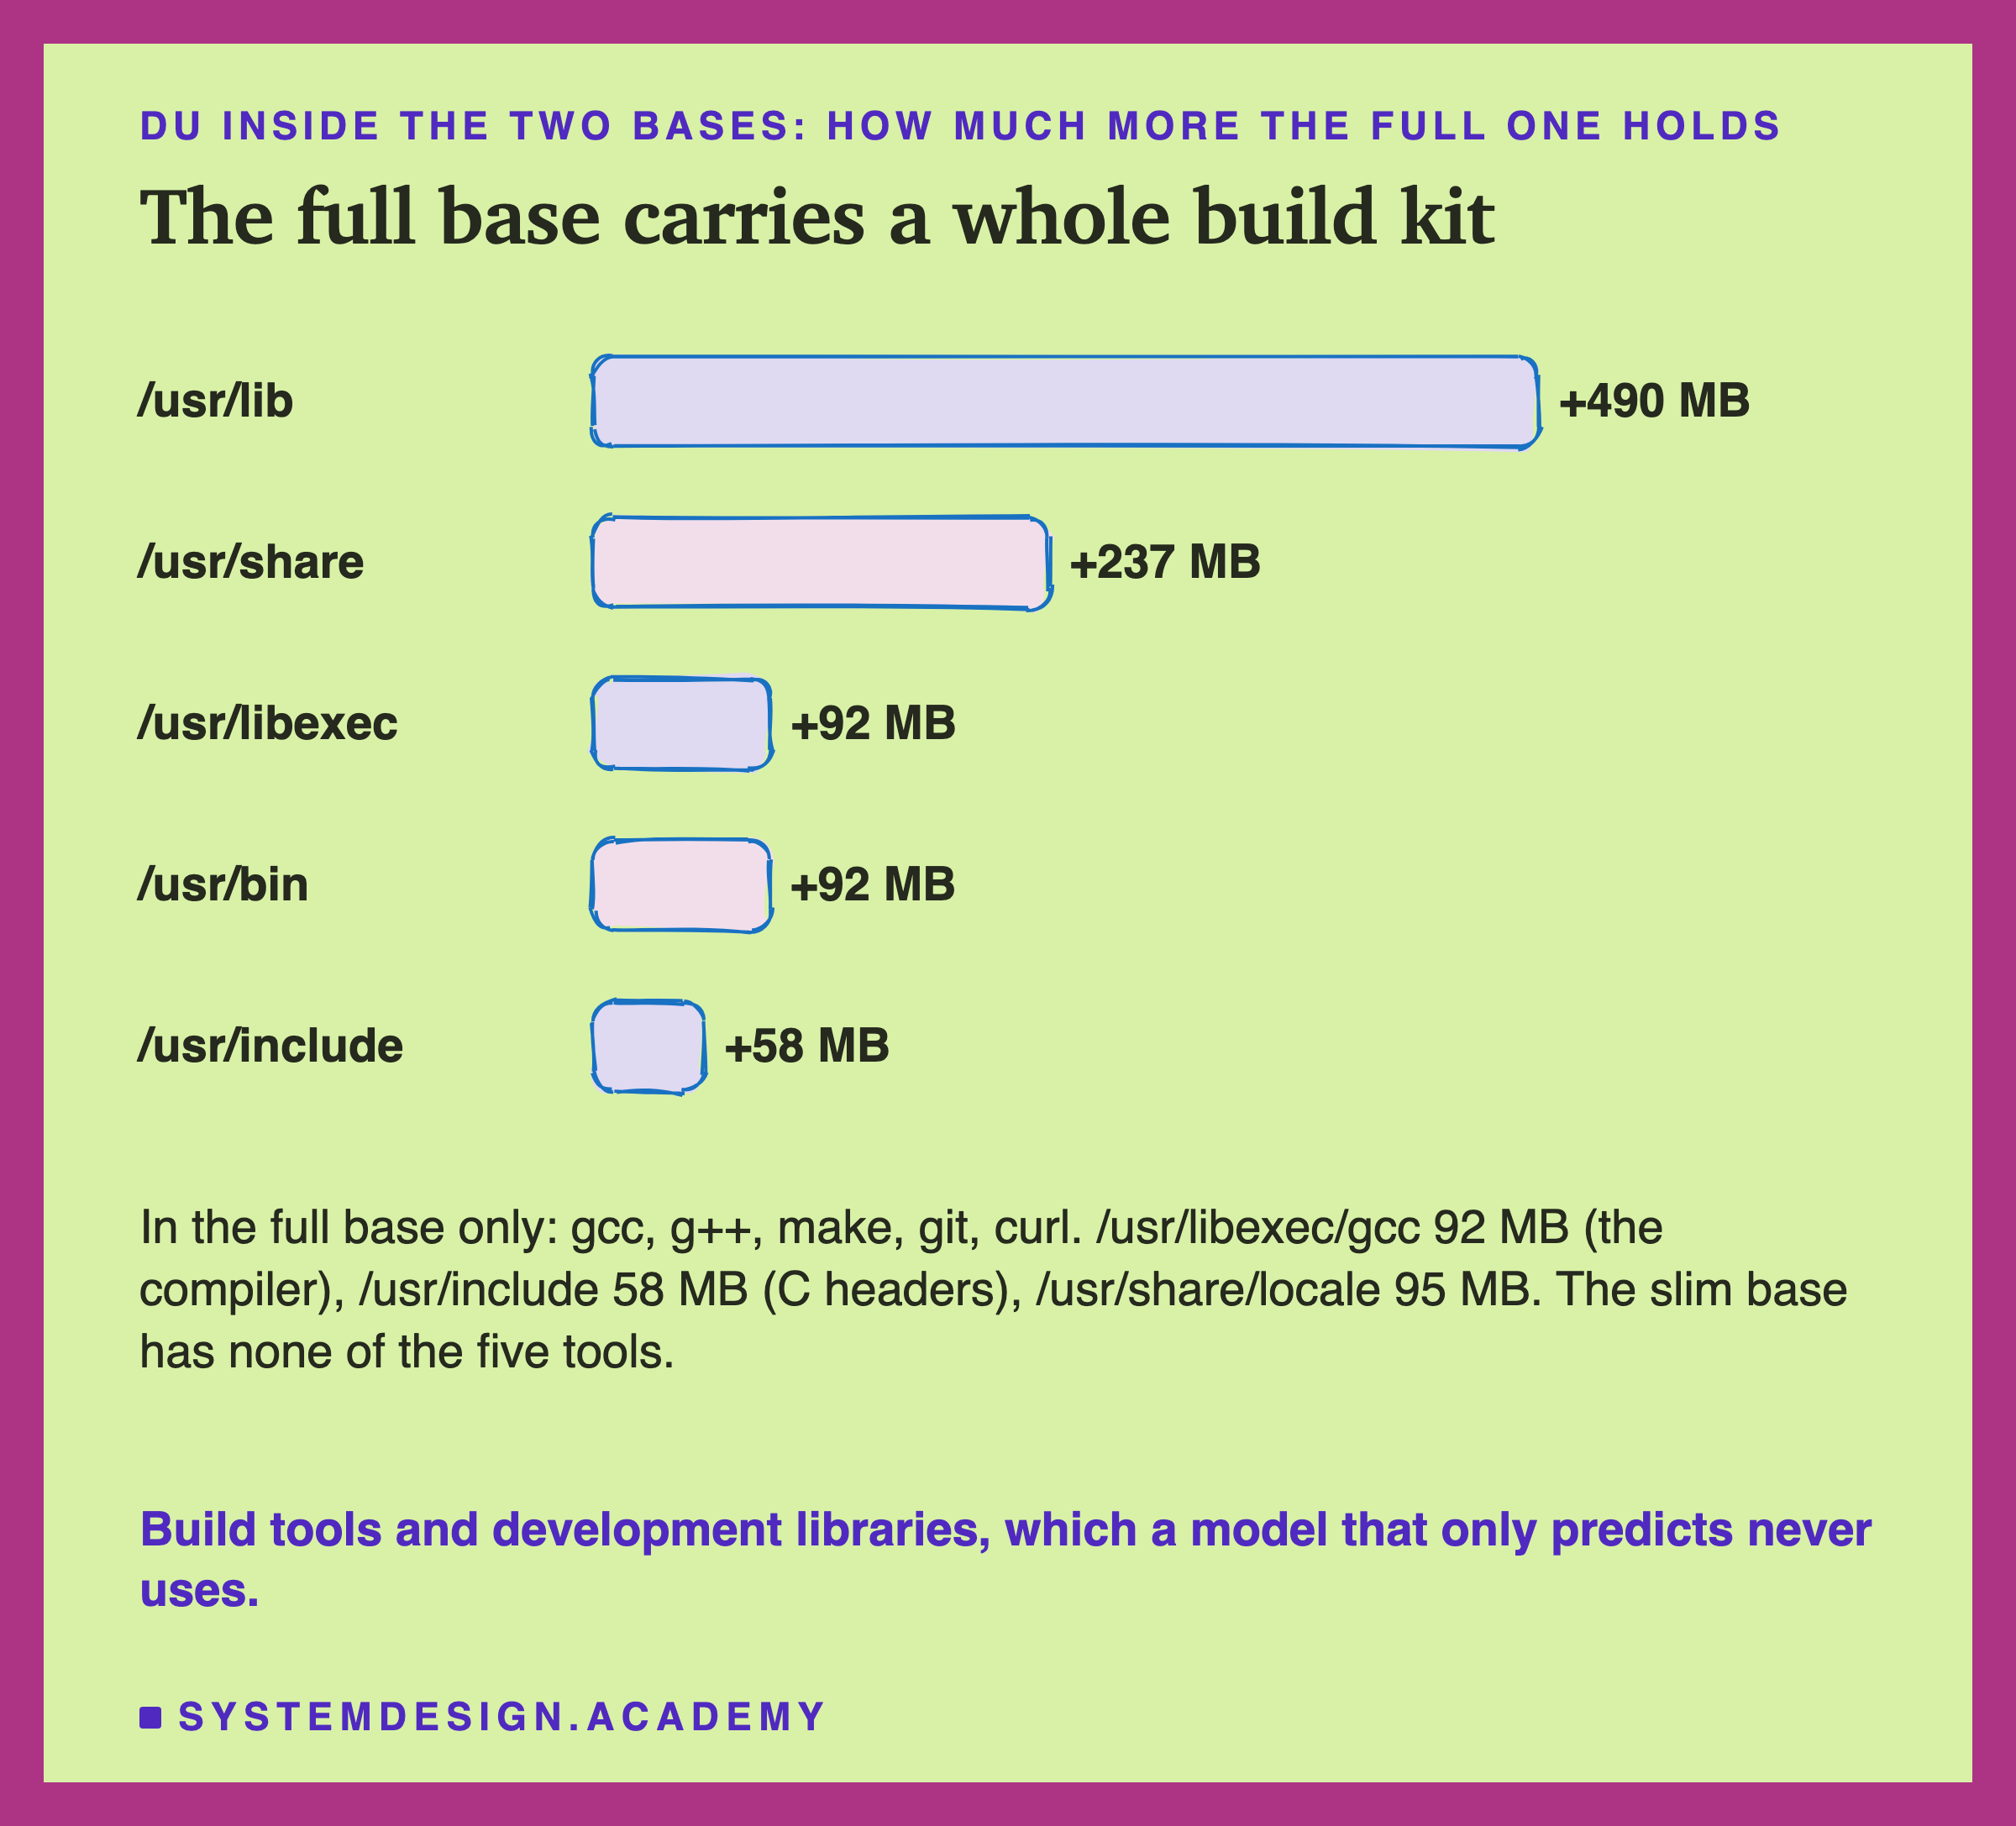
The lab ran du inside both base images, two folder levels deep, and compared them. Five system folders made up most of the difference. /usr/lib, where shared libraries live, held 490 MB more. /usr/share held 237 MB more.
Then, after seeing those folders, I asked one more labelled question: which tools are there? The full base has gcc and g++, two compilers, plus make, git and curl. The slim base has none of the five. The compiler's own folder, /usr/libexec/gcc, is 92 MB. The C header files in /usr/include, which a compiler reads, are 58 MB. Translations of program messages into other languages, in /usr/share/locale, are 95 MB.
The python image's description says the default image "contains the most commonly required Debian packages", so that most pip install commands work, even ones that have to compile. So the extra is build tools and development libraries. That is useful on a laptop where you build things. But my model only loads and predicts, and it never calls a compiler.
What Is in the Libraries
Now the second weight. What did pip install?
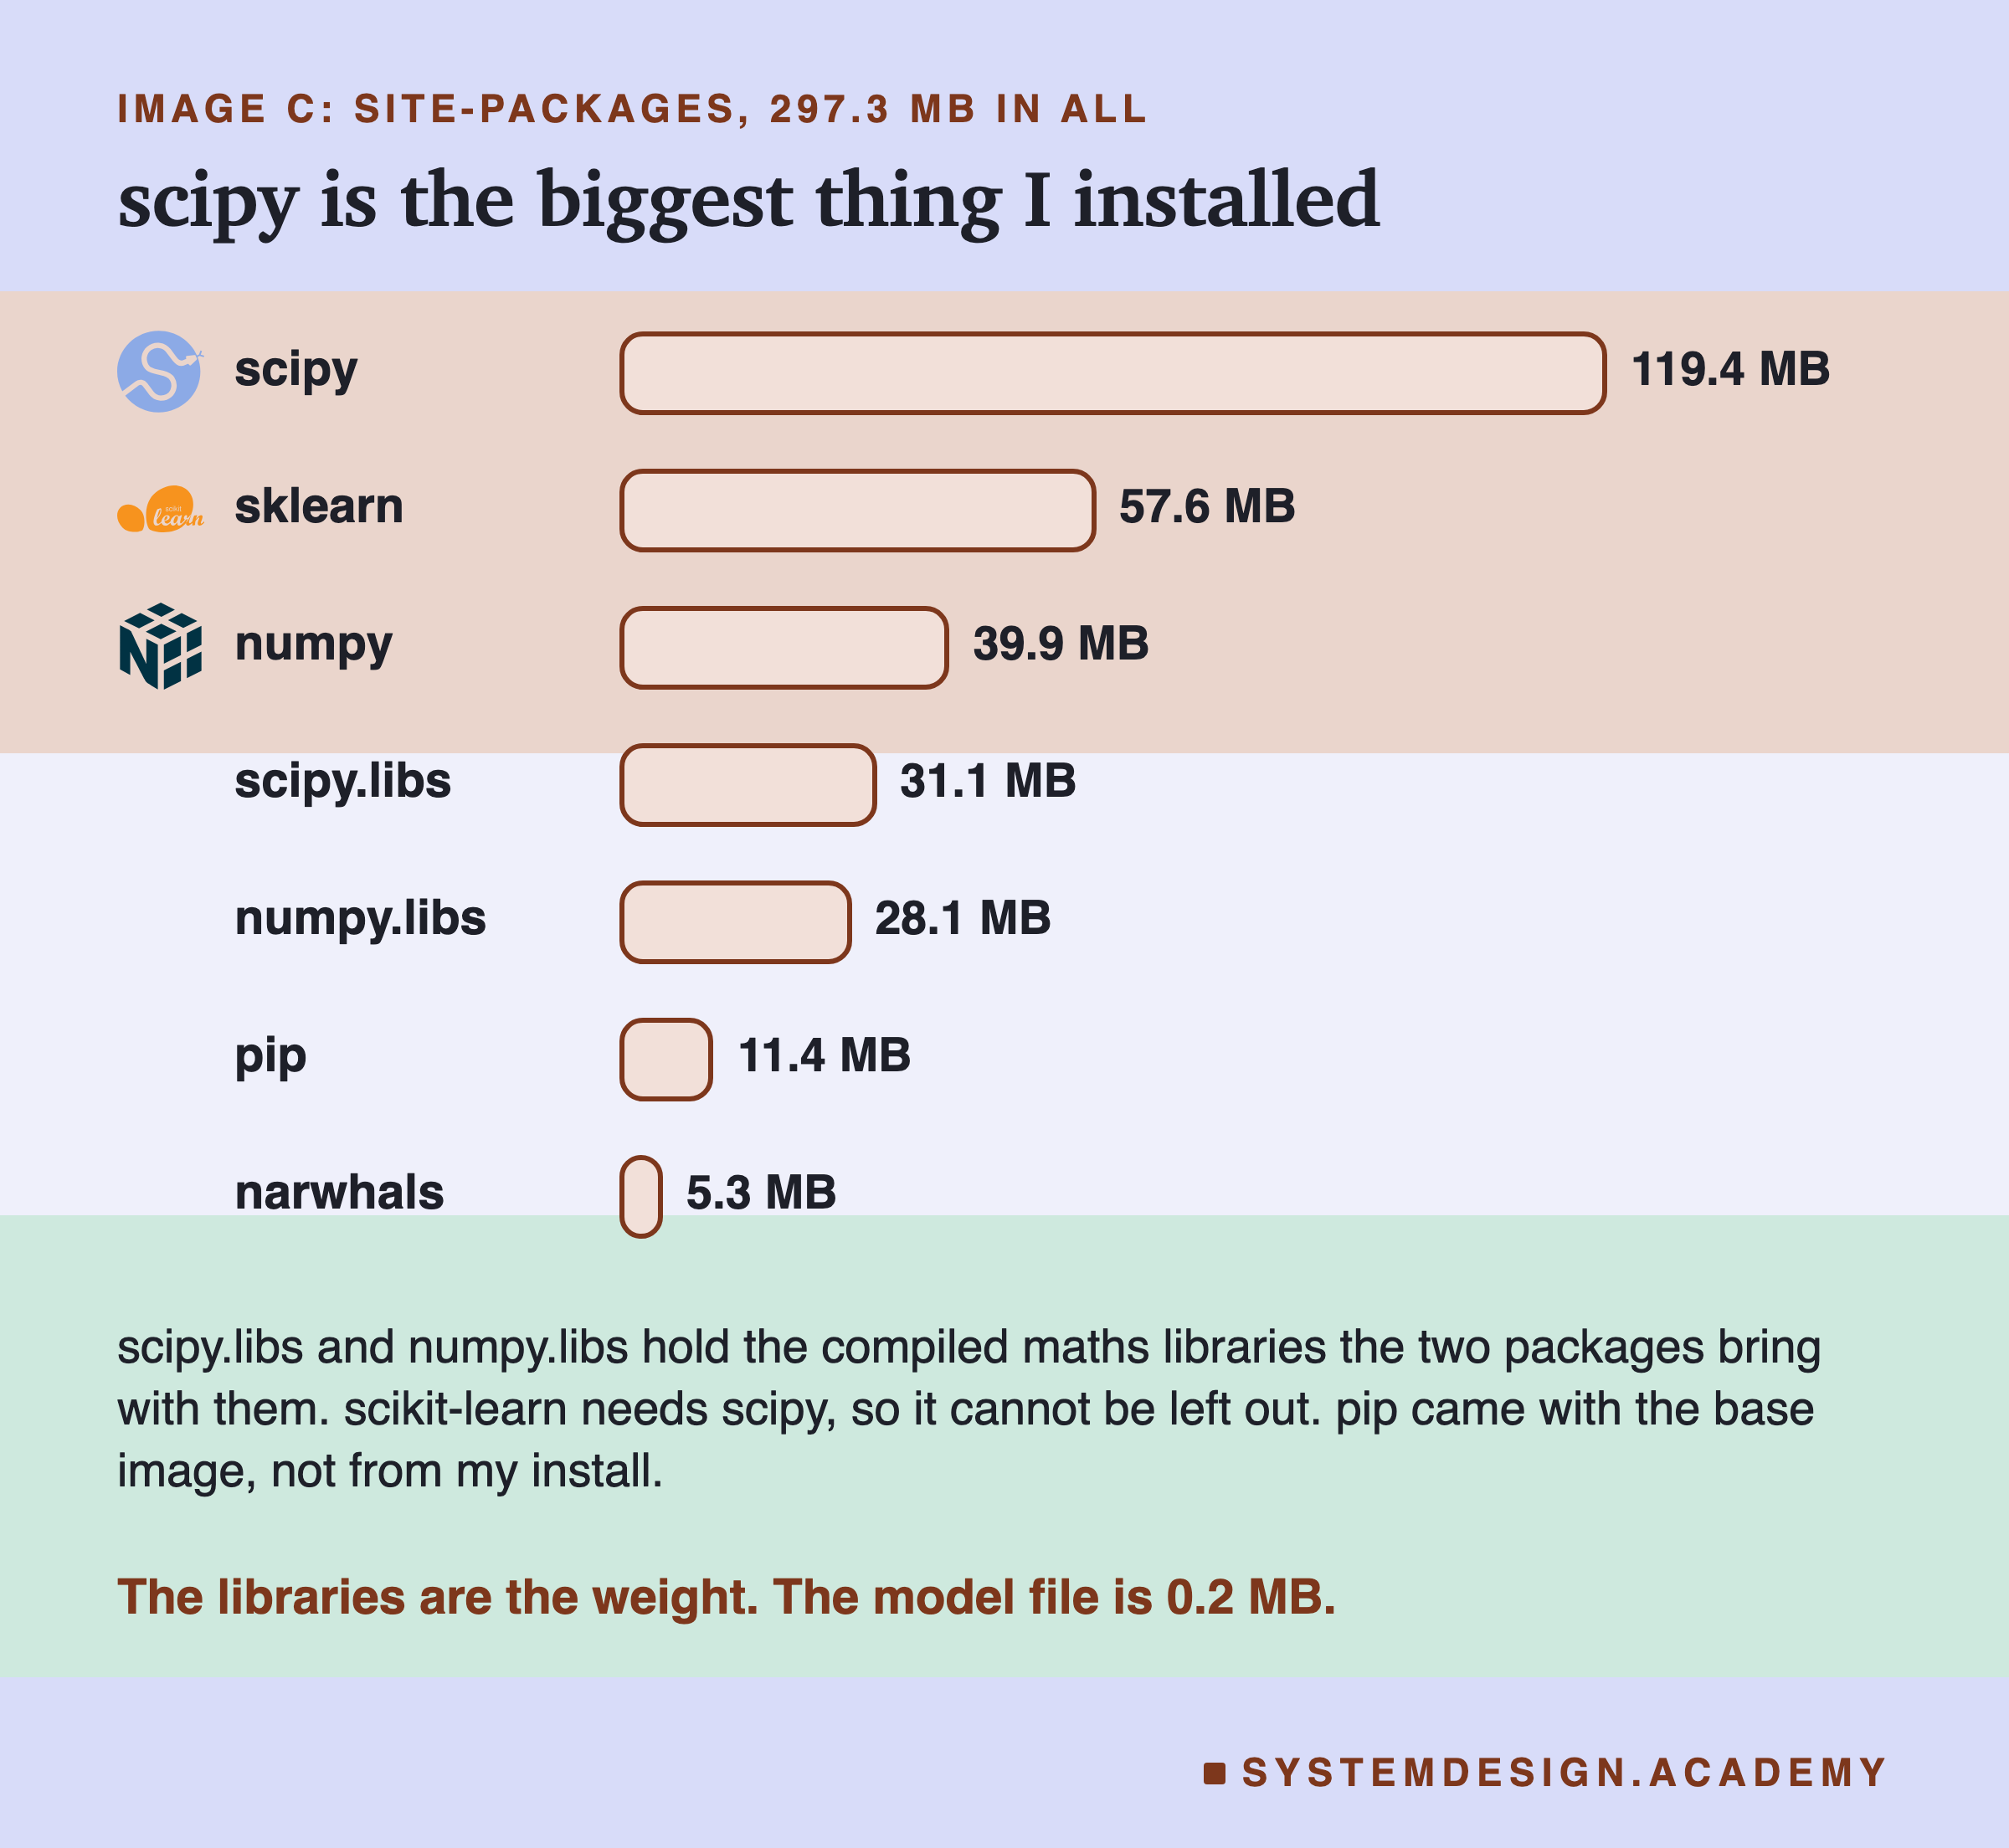
site-packages is the folder where pip puts installed packages. Inside image c it held 297.3 MB.
The biggest was scipy, at 119.4 MB, plus 31.1 MB more in scipy.libs. scipy is a library of scientific maths. My predict script never imports it by name. But scikit-learn lists scipy as a requirement, so pip installs it, and it cannot simply be left out. scikit-learn itself, in the folder sklearn, was 57.6 MB. numpy was 39.9 MB, plus 28.1 MB in numpy.libs.
The .libs folders hold compiled maths code that the wheels bring with them, so the packages do not need those libraries installed on the system. That is part of why a wheel installs on slim with no compiler: everything it needs is inside it.
So for this model, the weight I chose is mostly scipy and numpy. A model that used a deep learning library would carry far more, but I did not measure that here.
The Cache That Travels With the Image
Images b and c both use the slim base. Why was c 61.1 MB smaller?
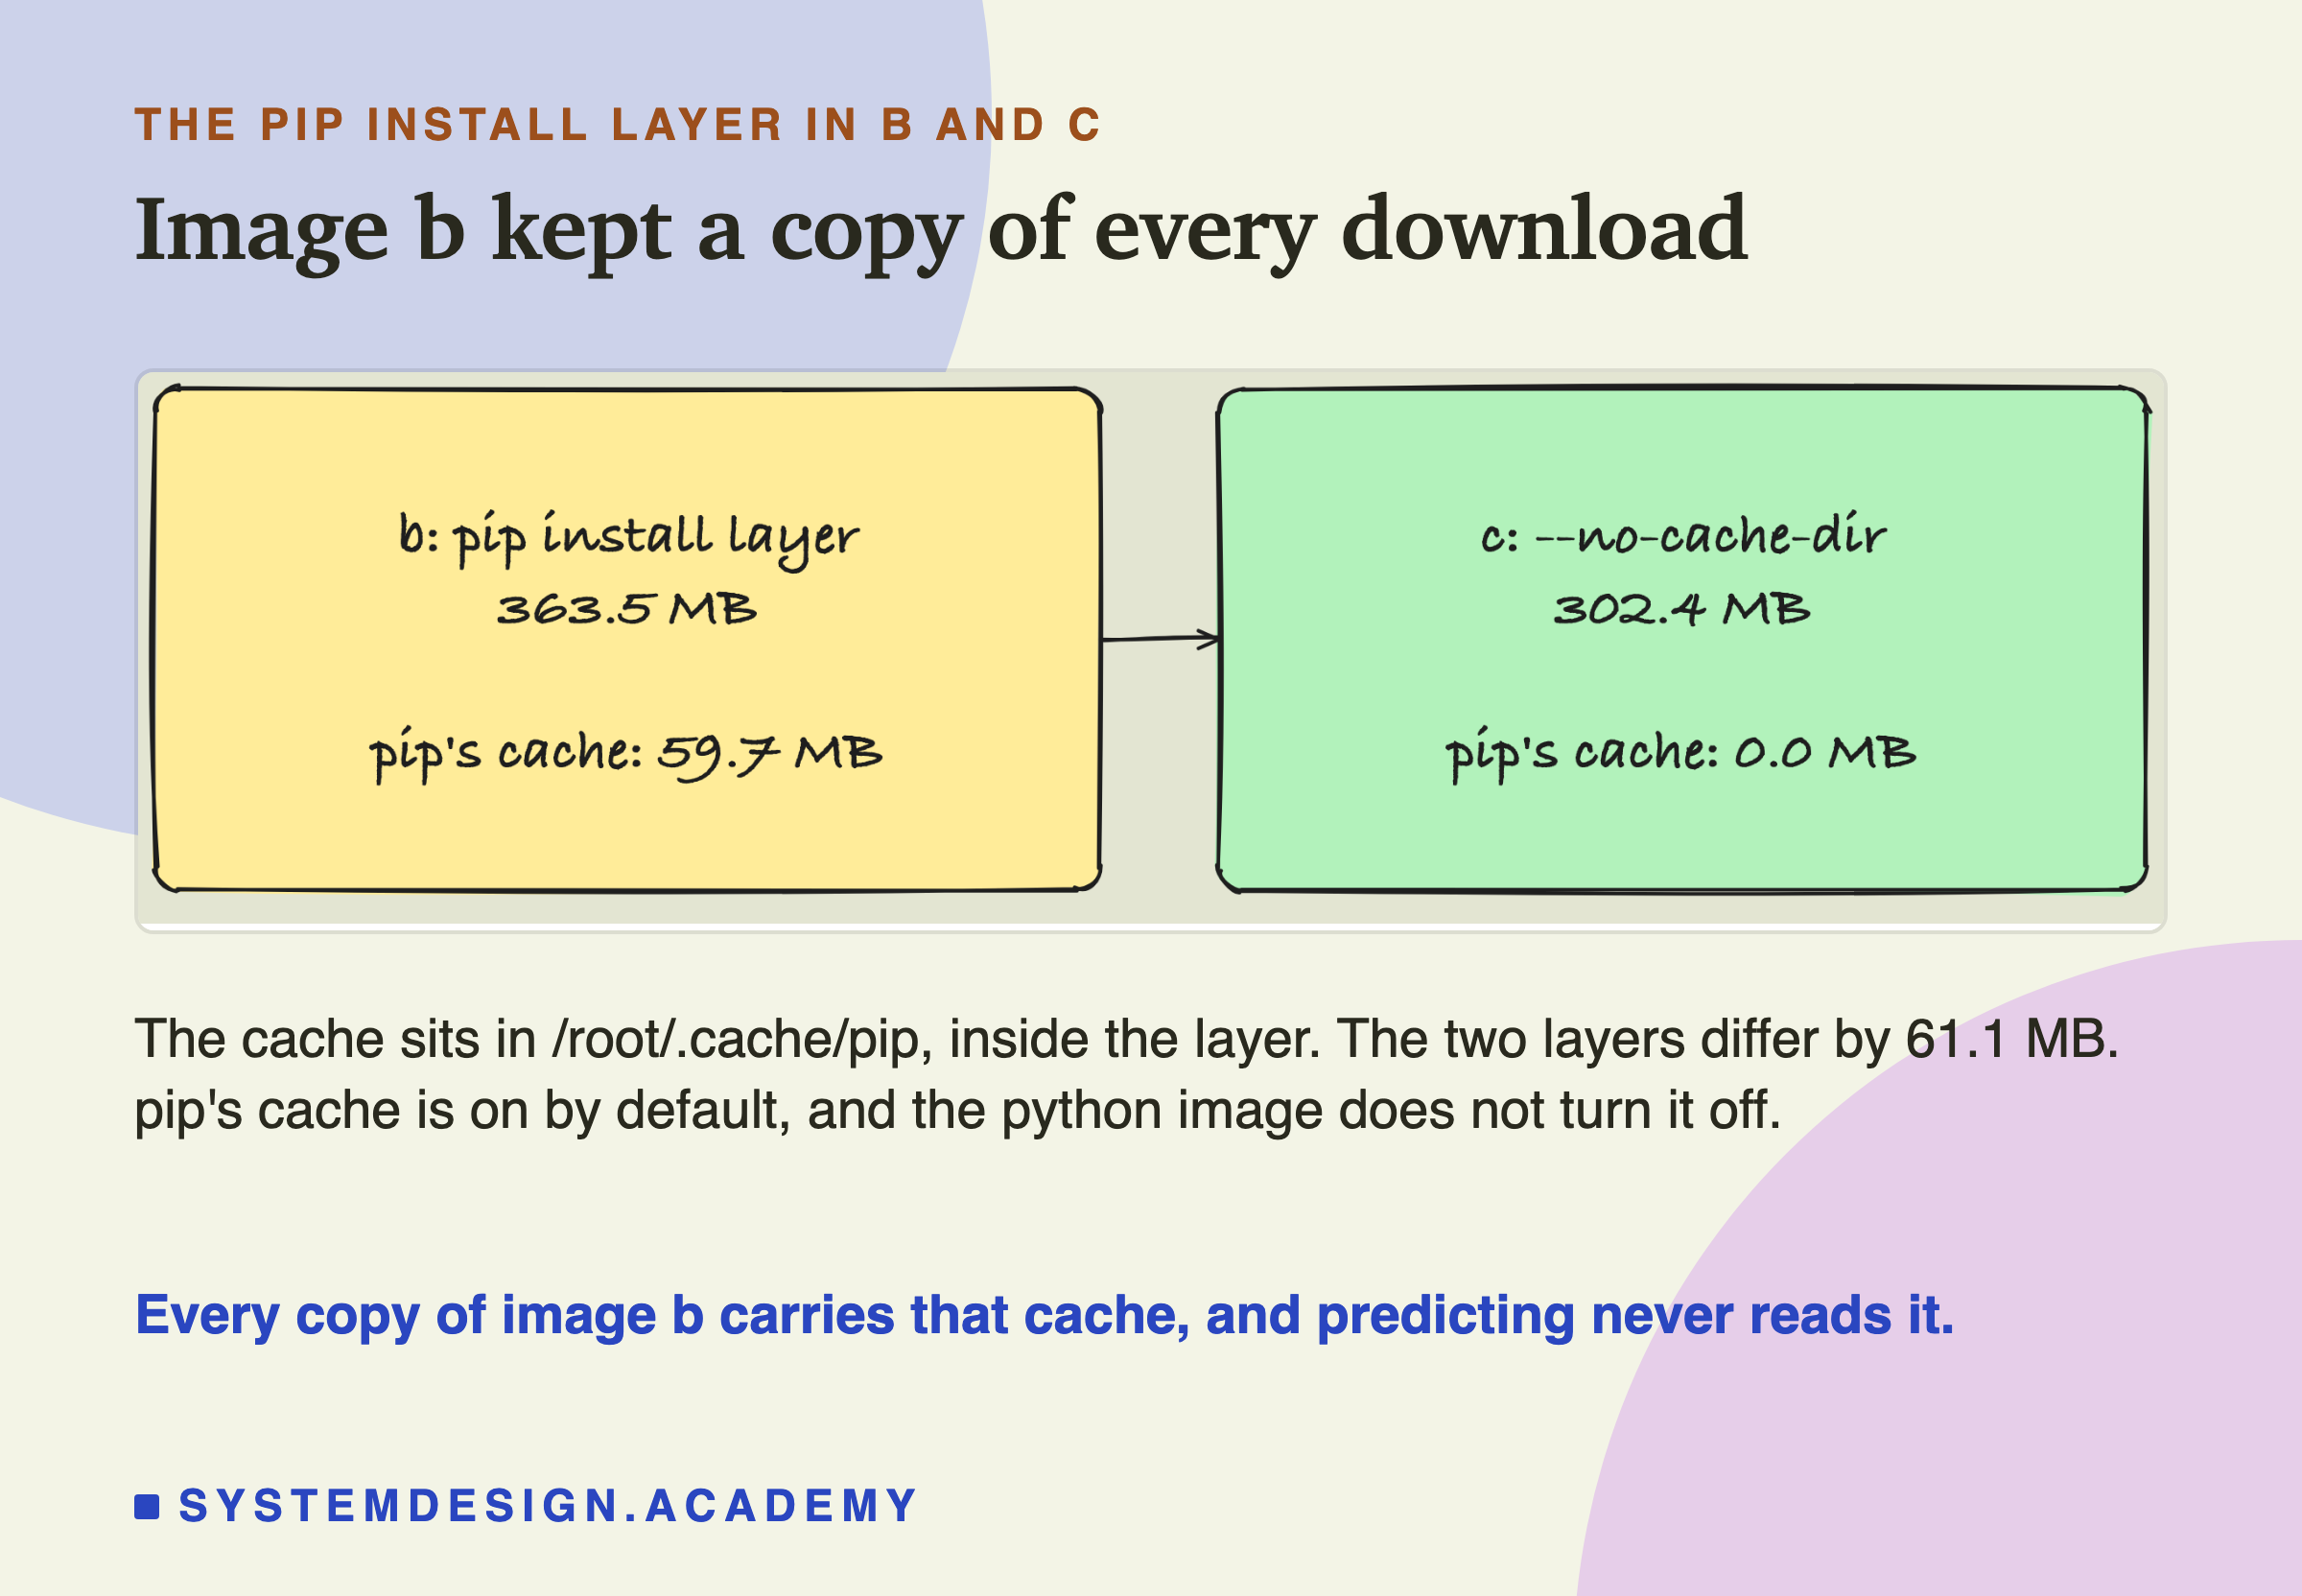
When pip installs a package, it keeps a copy of what it downloaded, in a cache folder, so the next install on the same computer is faster. Inside image b that folder, /root/.cache/pip, held 59.7 MB. It was written during the pip install step, so it became part of that step's layer, and part of the image.
In image c, --no-cache-dir kept pip from writing it. The pip layer was 302.4 MB instead of 363.5 MB, a difference of 61.1 MB, very close to the cache's size.
My guess before the run was that b minus c would be about the size of pip's cache. It was.
The cache helps nobody here. A container that only predicts never runs pip, and every server that pulls image b downloads and stores those megabytes anyway. In a Dockerfile, --no-cache-dir is close to free.
The Multi-Stage Build Saved Nothing Here
The survey lesson calls a multi-stage build "pure profit". So I built one.
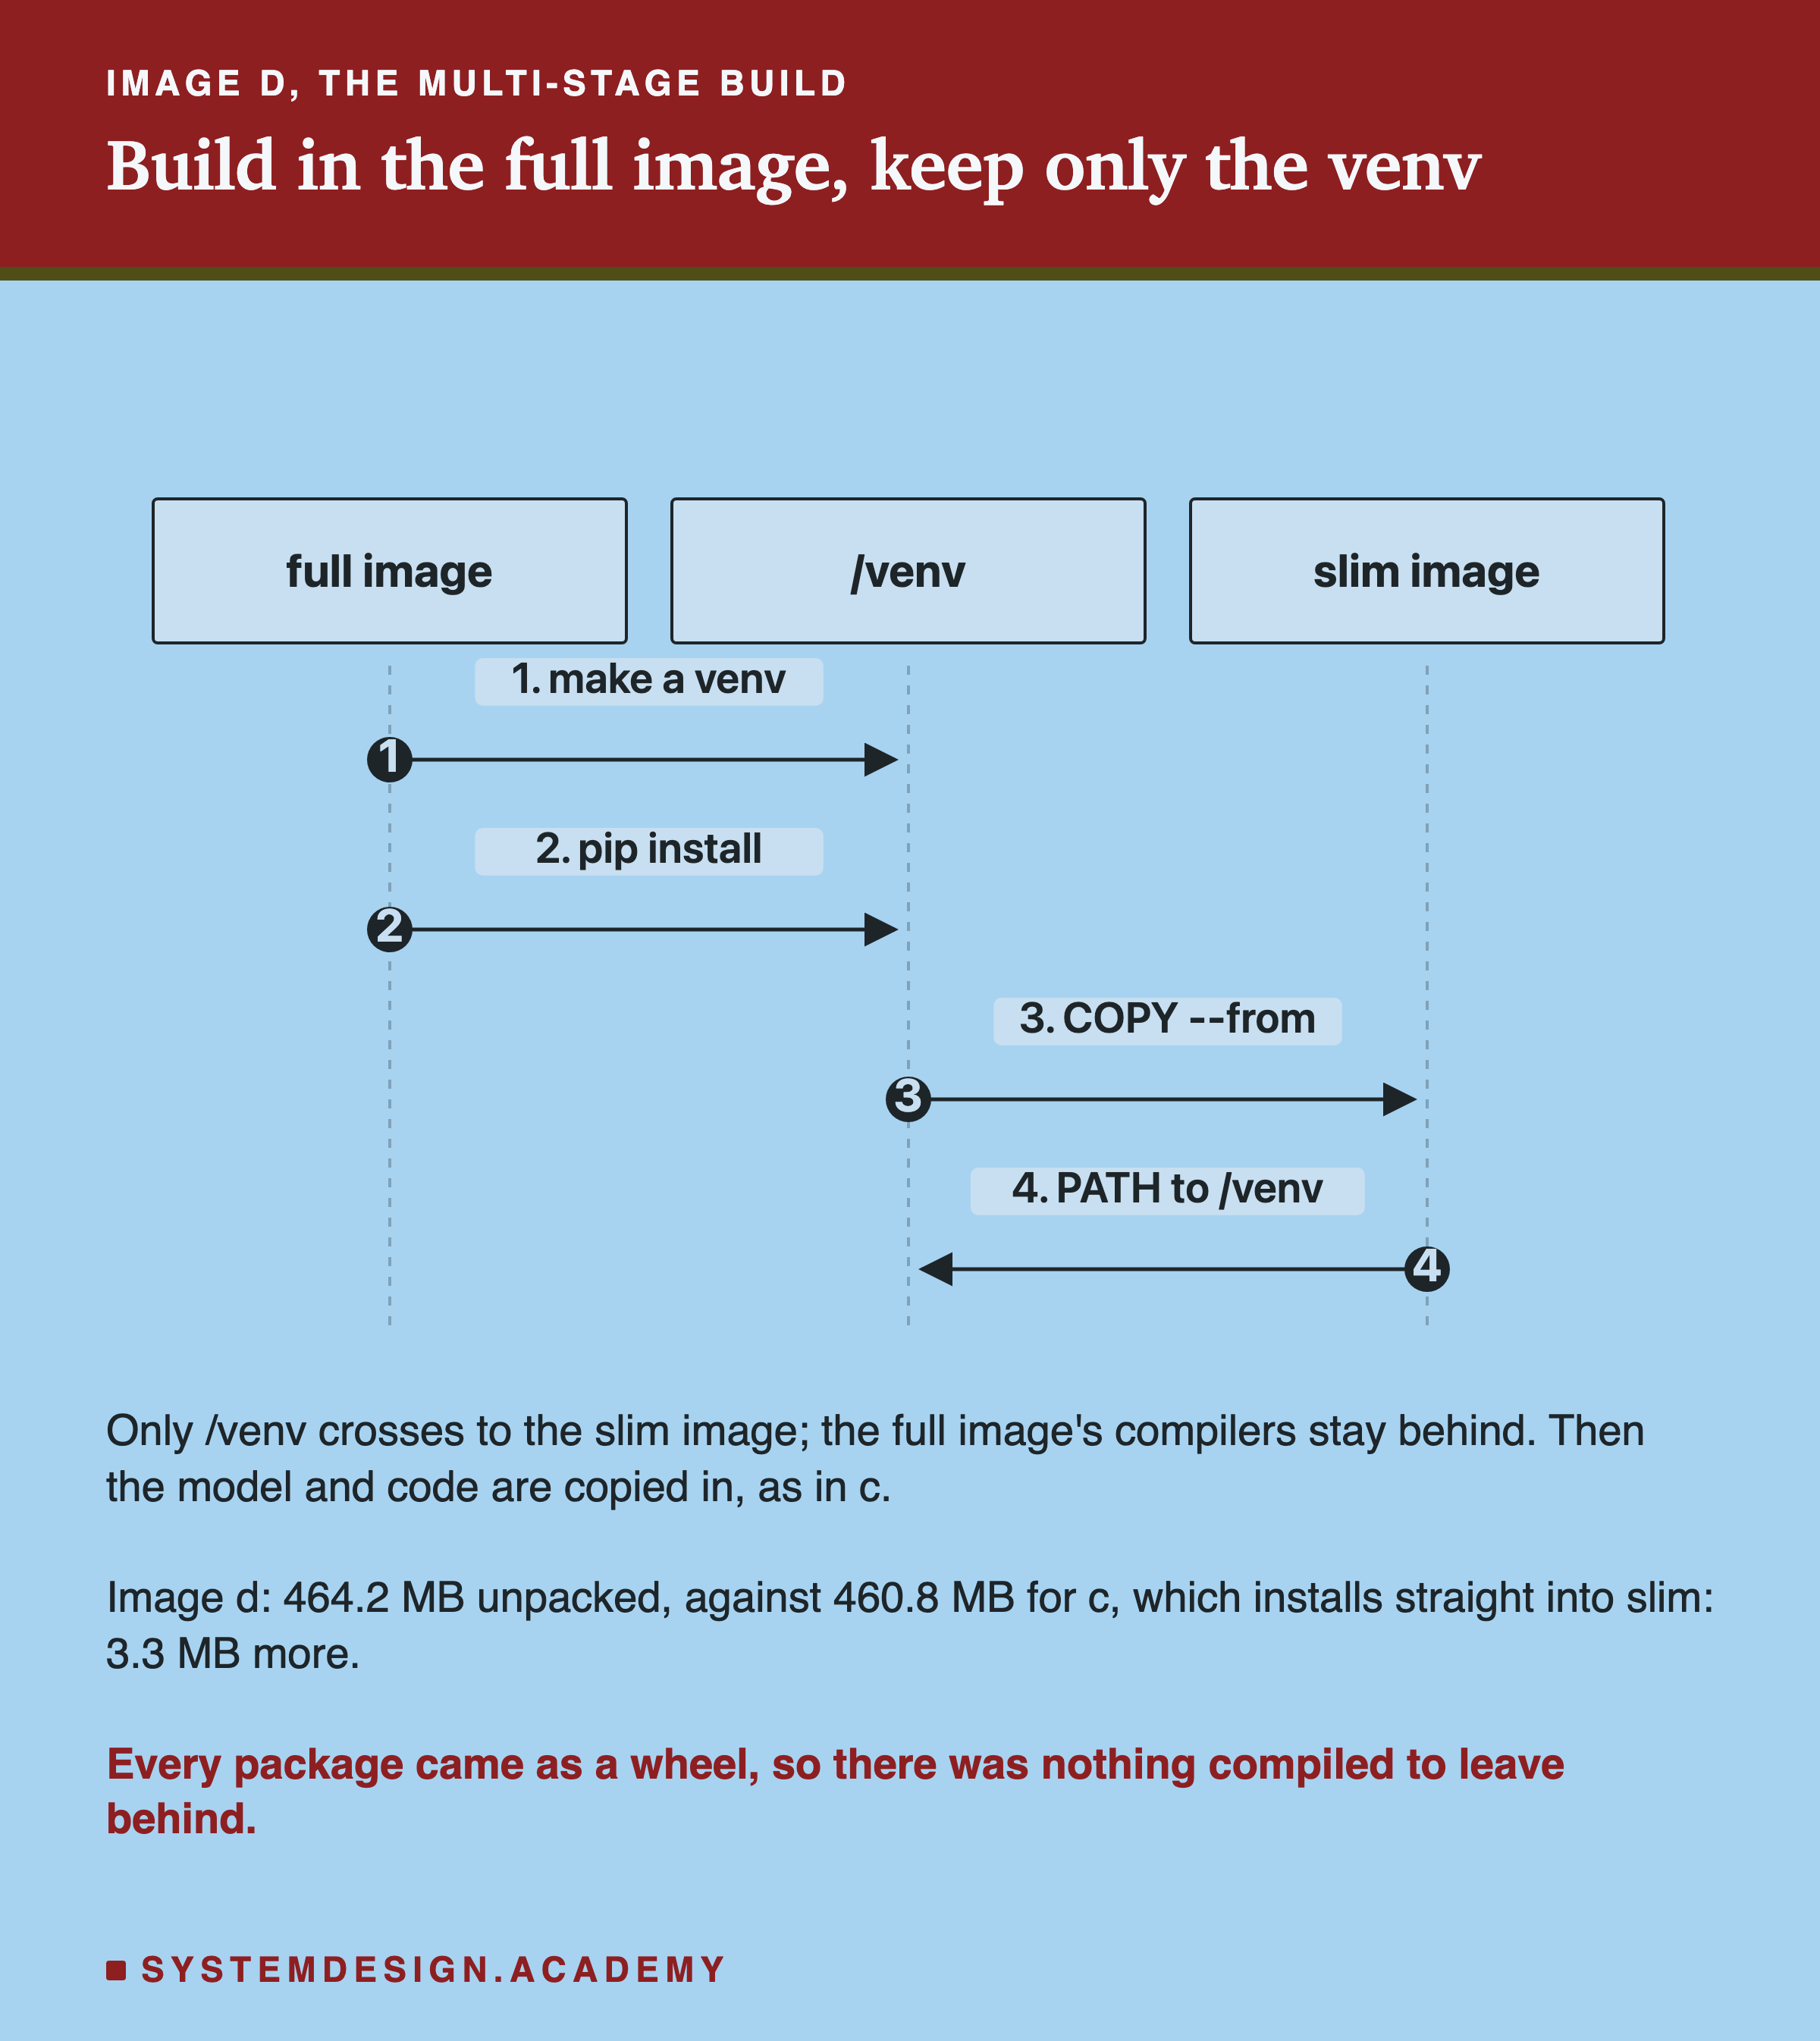
A multi-stage Dockerfile has two FROM lines. The first stage, called build, starts from the full image and installs the libraries into a venv, a folder that holds its own Python packages. The second stage starts from slim and copies only that folder across. Everything else in the first stage, the compilers and headers included, is left behind.
Image d was 464.2 MB, and image c was 460.8 MB. So the multi-stage image was 3.3 MB bigger, not smaller. Both had the same packages at the same versions, as pip freeze inside each one showed.
My guess was that d would be within 5% of c, and it was within 1%. The reason I gave before the run is the likely one. Every package here arrived as a wheel, so nothing was compiled, and there was nothing to leave behind. Image c never had the compilers either, because slim does not have them. The two pips are not the same pip.
In c, the 11.4 MB pip in site-packages is the slim base's own, in /usr/local. Image d still has that base pip, 6.8 MB, untouched, and carries a second pip of 12.6 MB inside /venv. Measured with du, that is 8.0 MB more pip in d than in c, yet d was only 3.8 MB bigger by du. So something else made d about 4.2 MB smaller, and I did not trace what.
A multi-stage build earns its keep when a package must be compiled from source. Here none had to be.
Rebuilding: Which Steps Ran Again
A real model image is built again and again: when the code changes, when the model is retrained, when a library is upgraded. The build cache decides how much work each rebuild does.
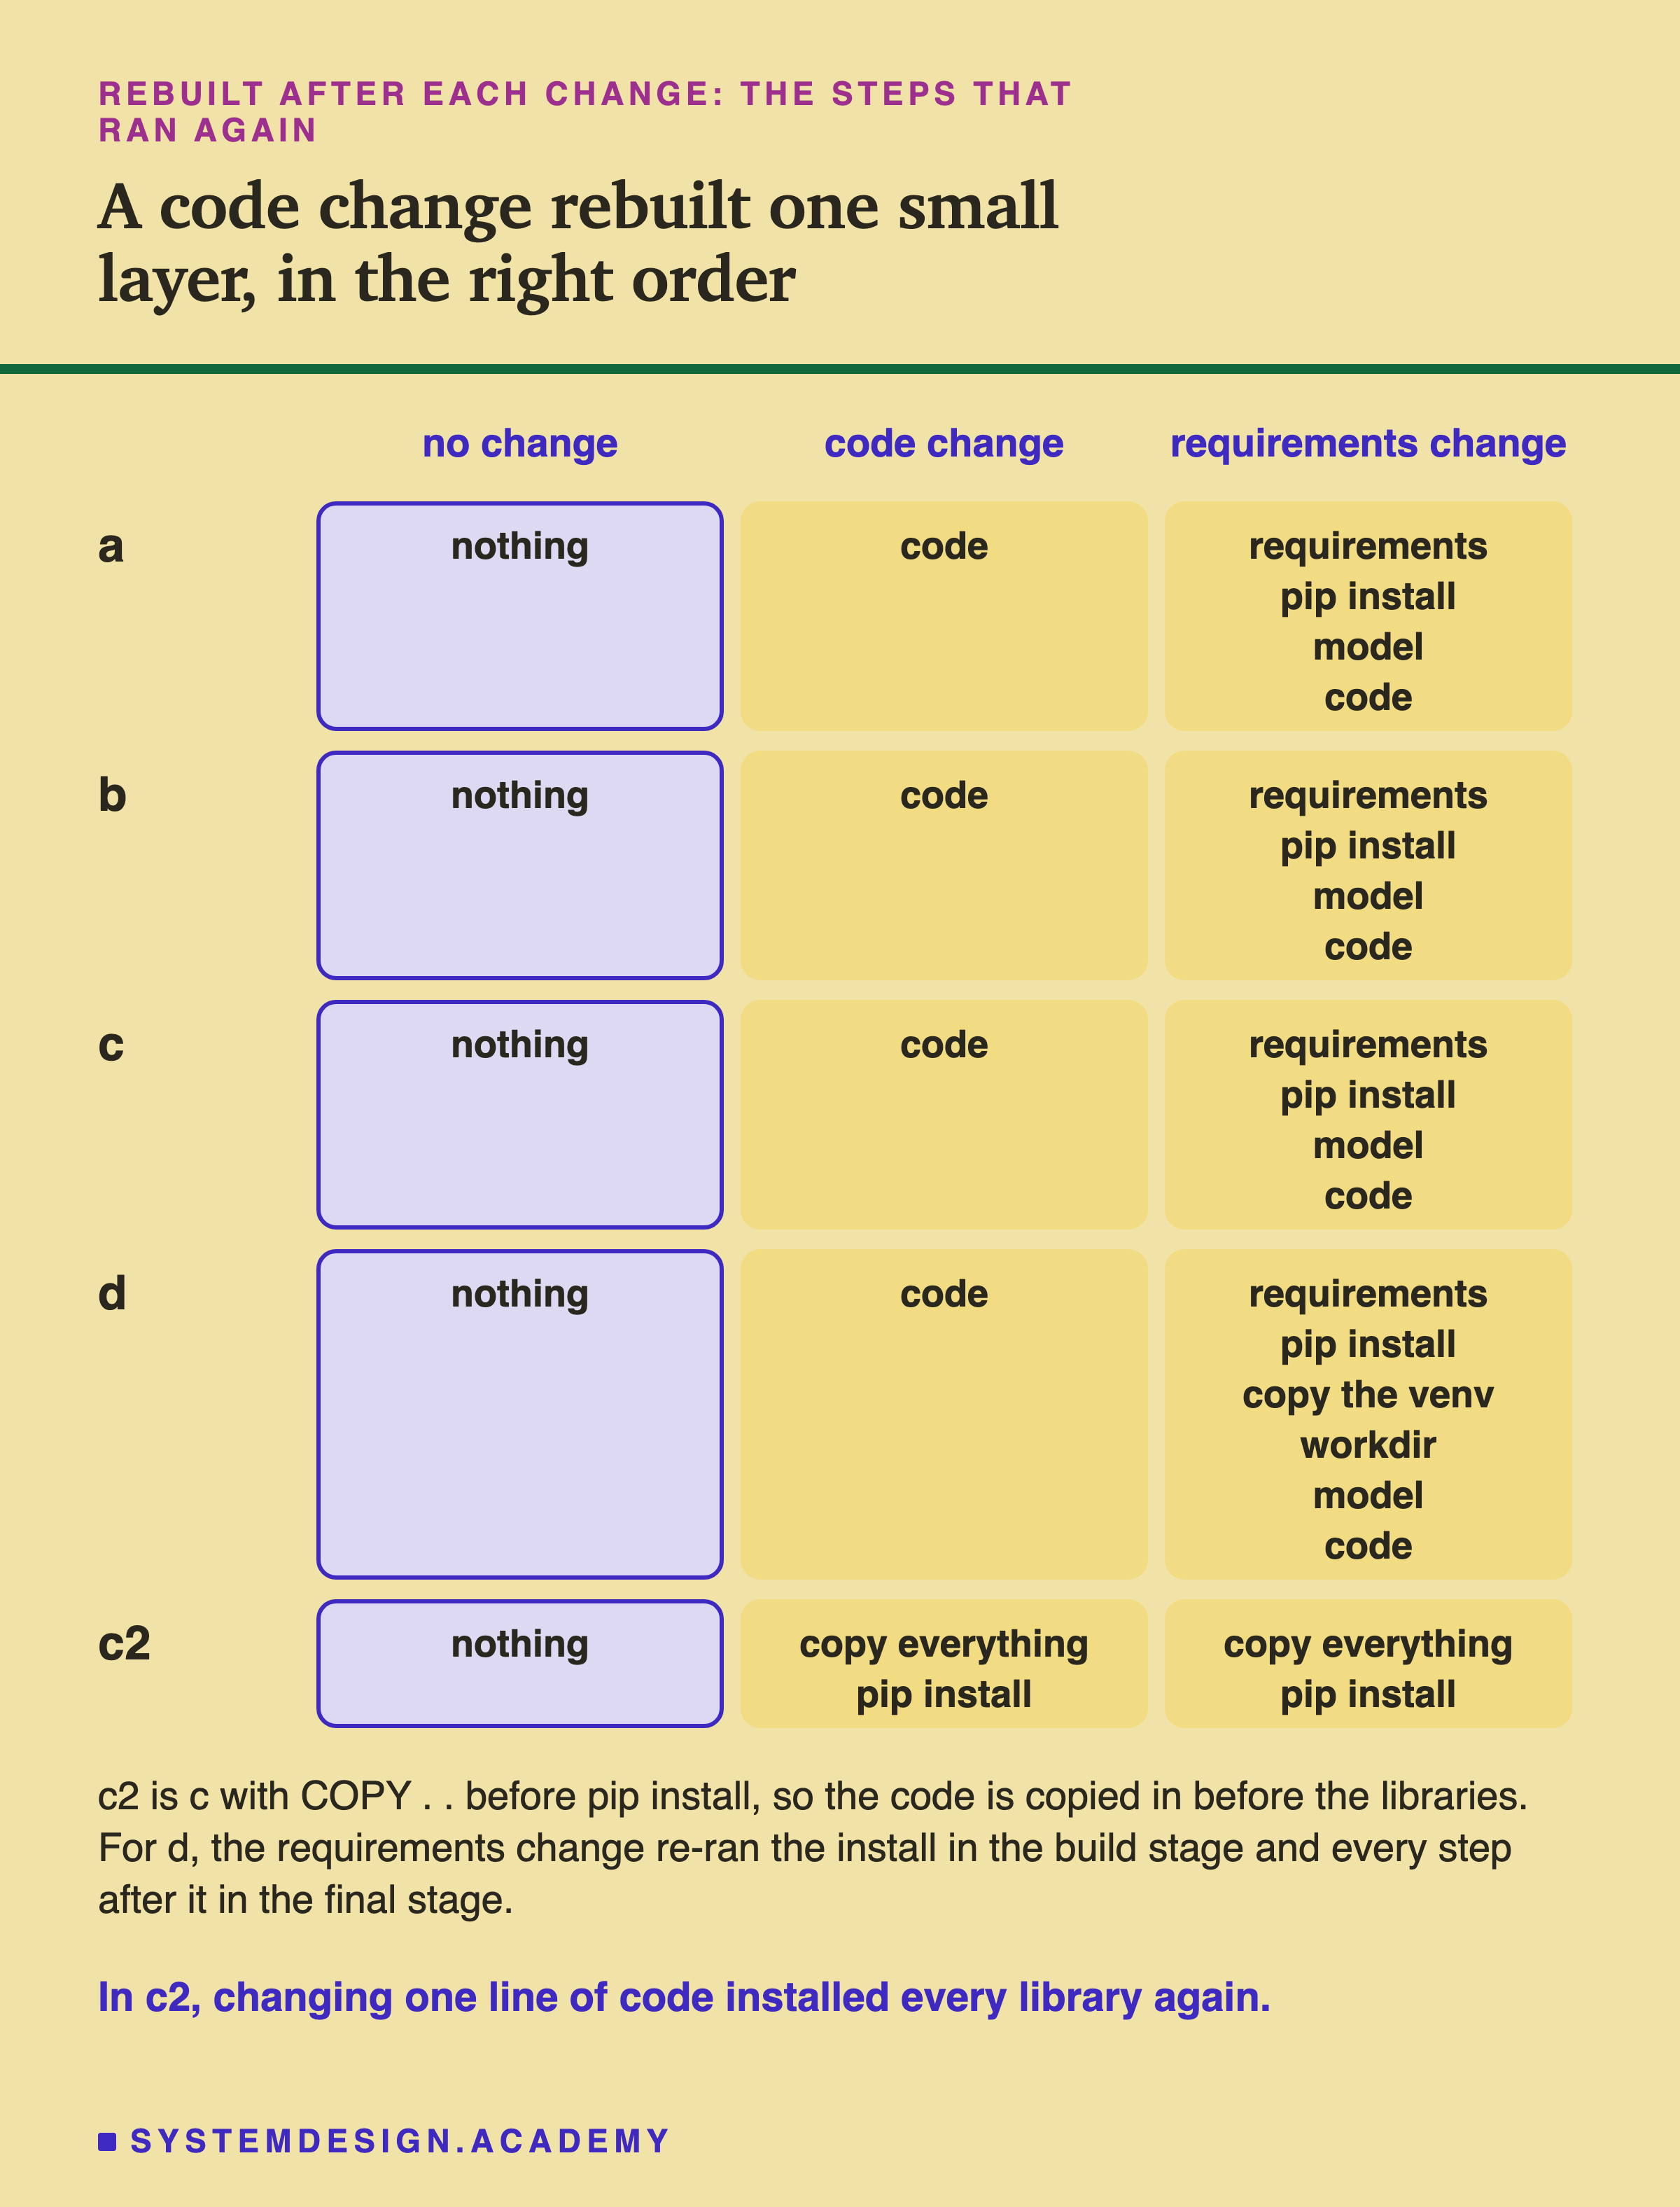
The lab built each image a first time with --no-cache, then three more times, and read every step's line in the build log: CACHED, or run again.
No change: nothing ran. Every step came from the cache.
A code change, one extra line in predict.py: only the last step ran in a, b, c and d. That step copies predict.py, a 12.3 kB layer.
A requirements change: pip install and every step after it ran. I added one comment line to the requirements file. The installed packages did not change. But compares a file's bytes, not its meaning, so a comment counts as a change. This is the build-cache rule from Docker's page, seen for real: once one layer changes, every layer after it is built again.
And c2. I added it only for this test. It is image c with one difference: it copies the whole folder in with COPY . . before pip install, a very common way to write a first Dockerfile. In c2, the code change ran pip install again, every library, for a one-line edit.
Order the Lines by How Often They Change
Here is the difference between c and c2, line by line.
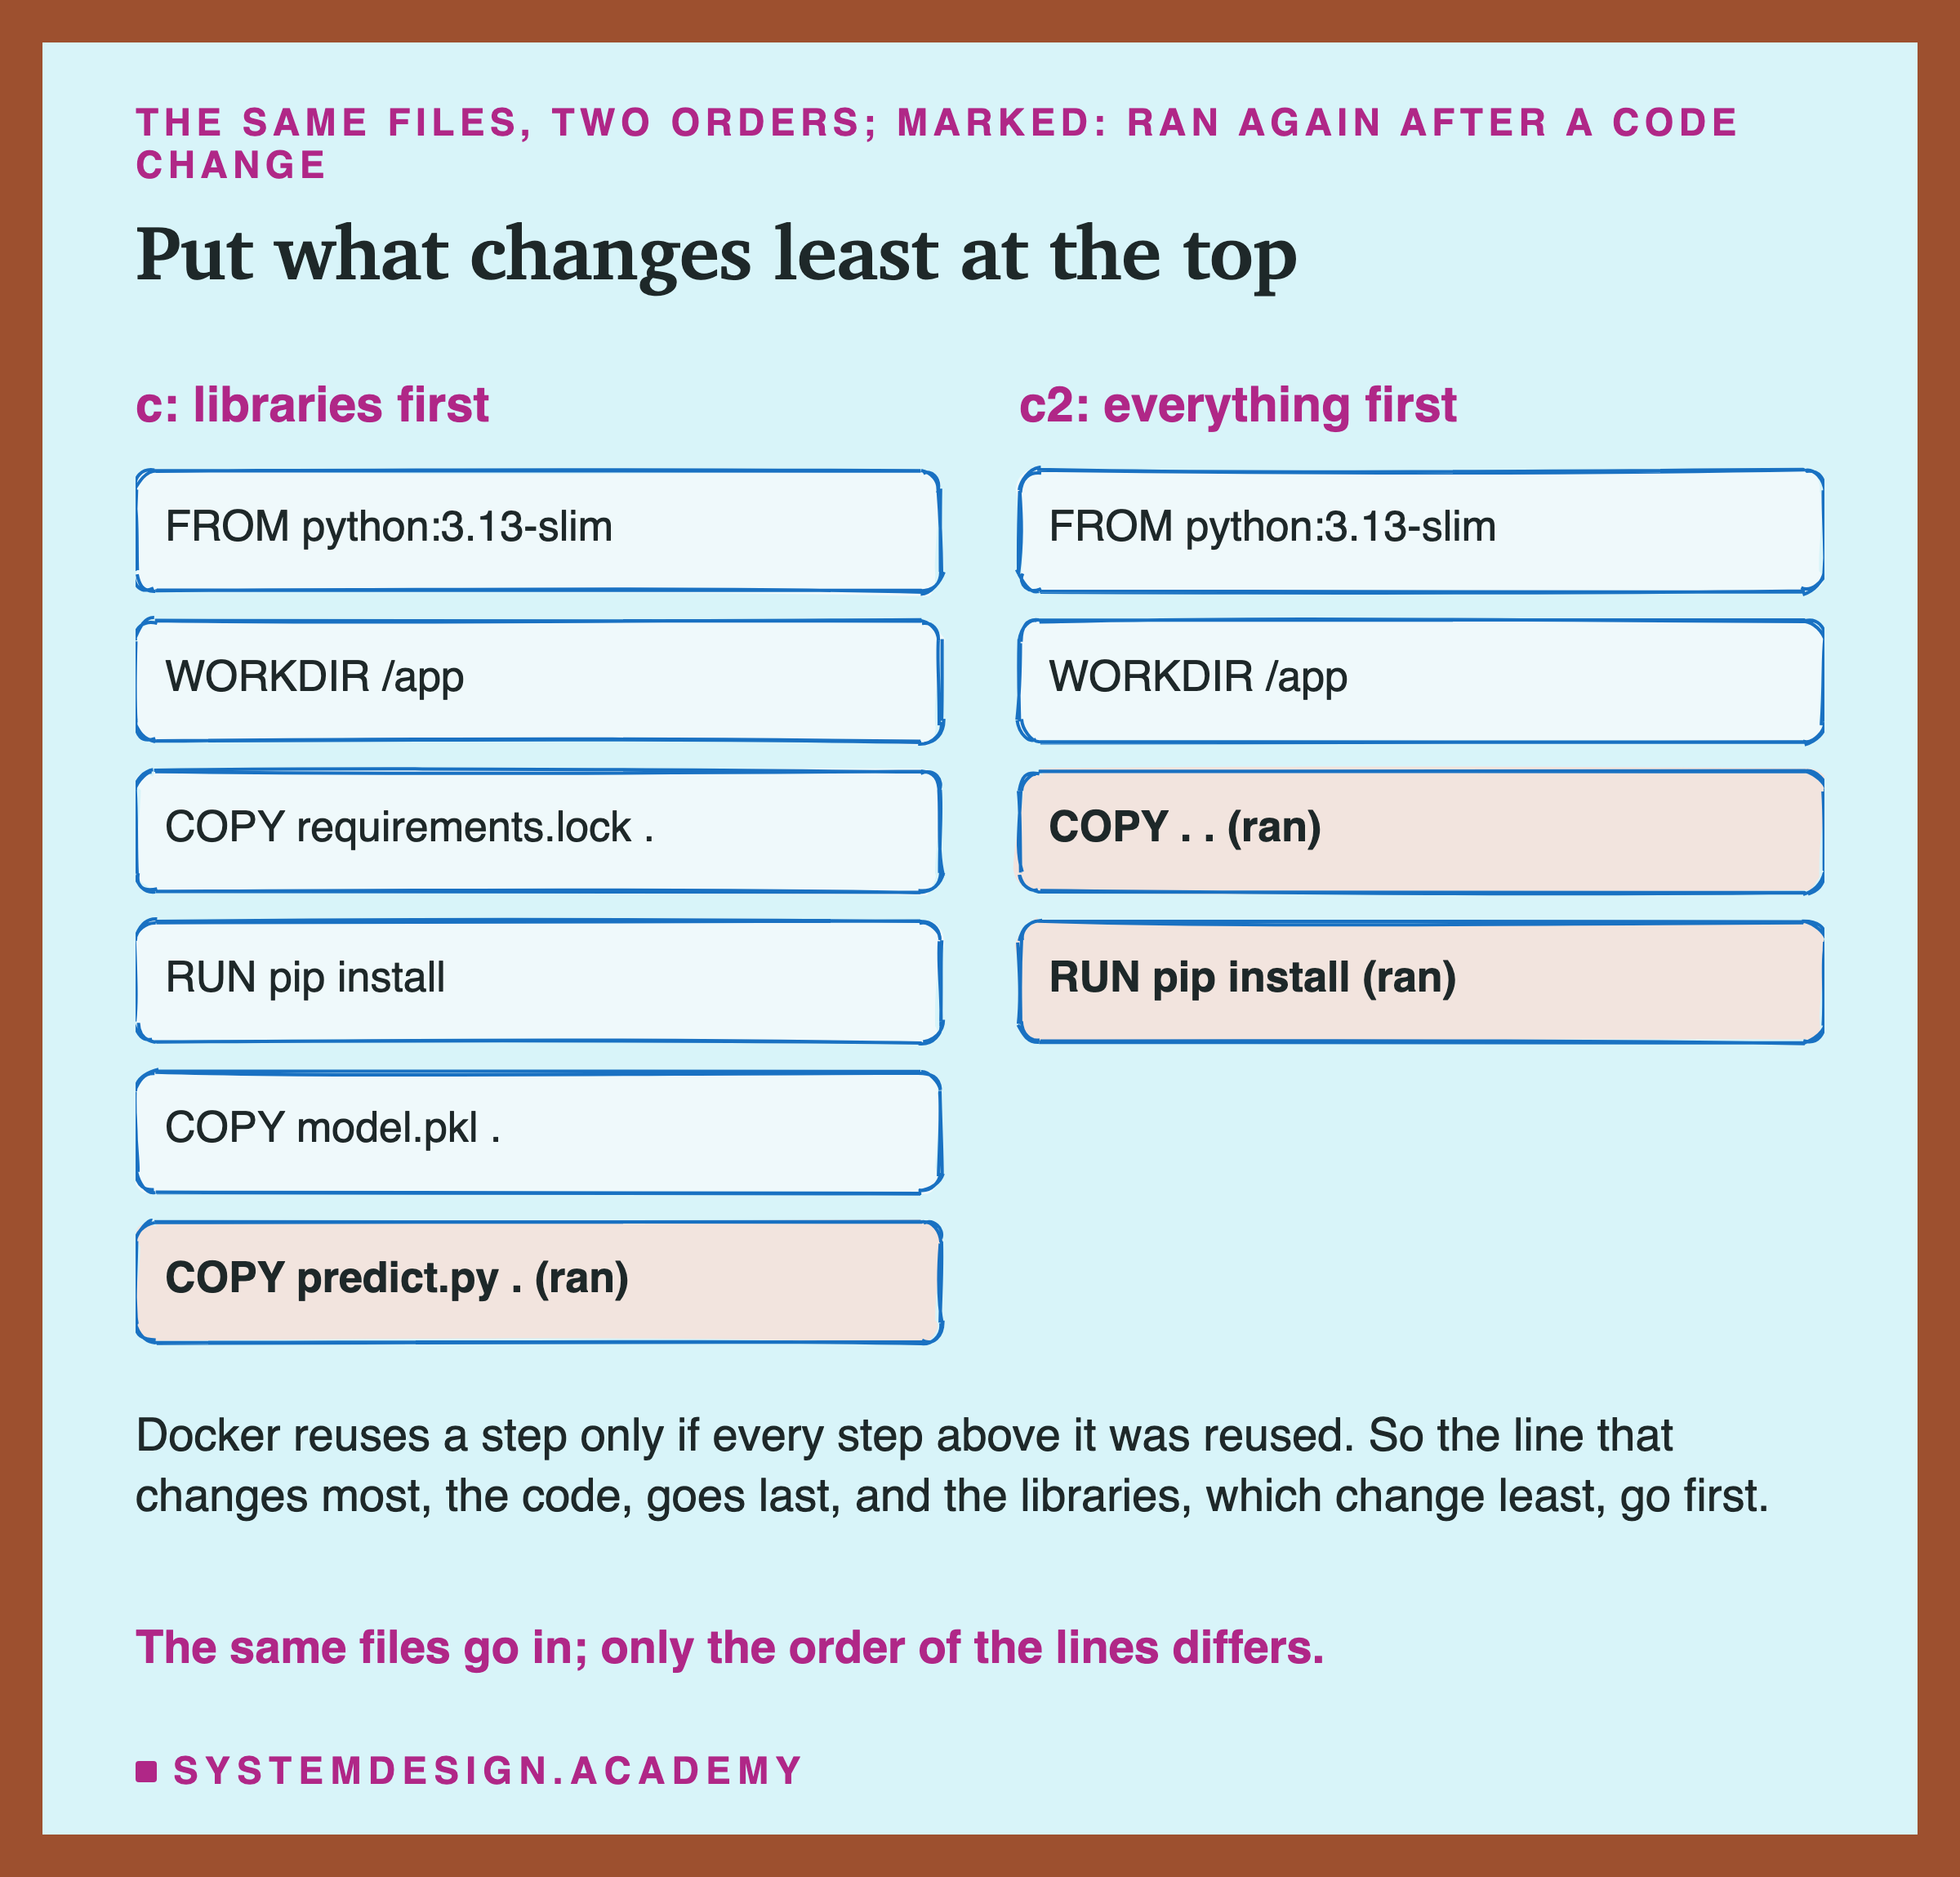
Think of the cache like a stack of plates. If you change a plate in the middle, you have to lift off every plate above it and put them back. works the same way, from the top of the Dockerfile down.
In c, the lines go from what changes least to what changes most. The base comes first, then the requirements and the install, then the model, then the code. A code change touches only the last plate.
In c2, COPY . . puts the code and the requirements in one step, near the top. Any change to any file in the folder changes that step, and so pip install below it must run again.
The two Dockerfiles put the same files into the image. Only the order of the lines differs. On a busy team that rebuilds many times a day, that order decides whether a rebuild copies one small file or installs every library from the internet again.
The Surprise: Not Identical, in the Last Digit
Now the cost side. Did slimming change the model's answers? I guessed that every image would give exactly the Mac's predictions. I was wrong, but not in the way I worried about.
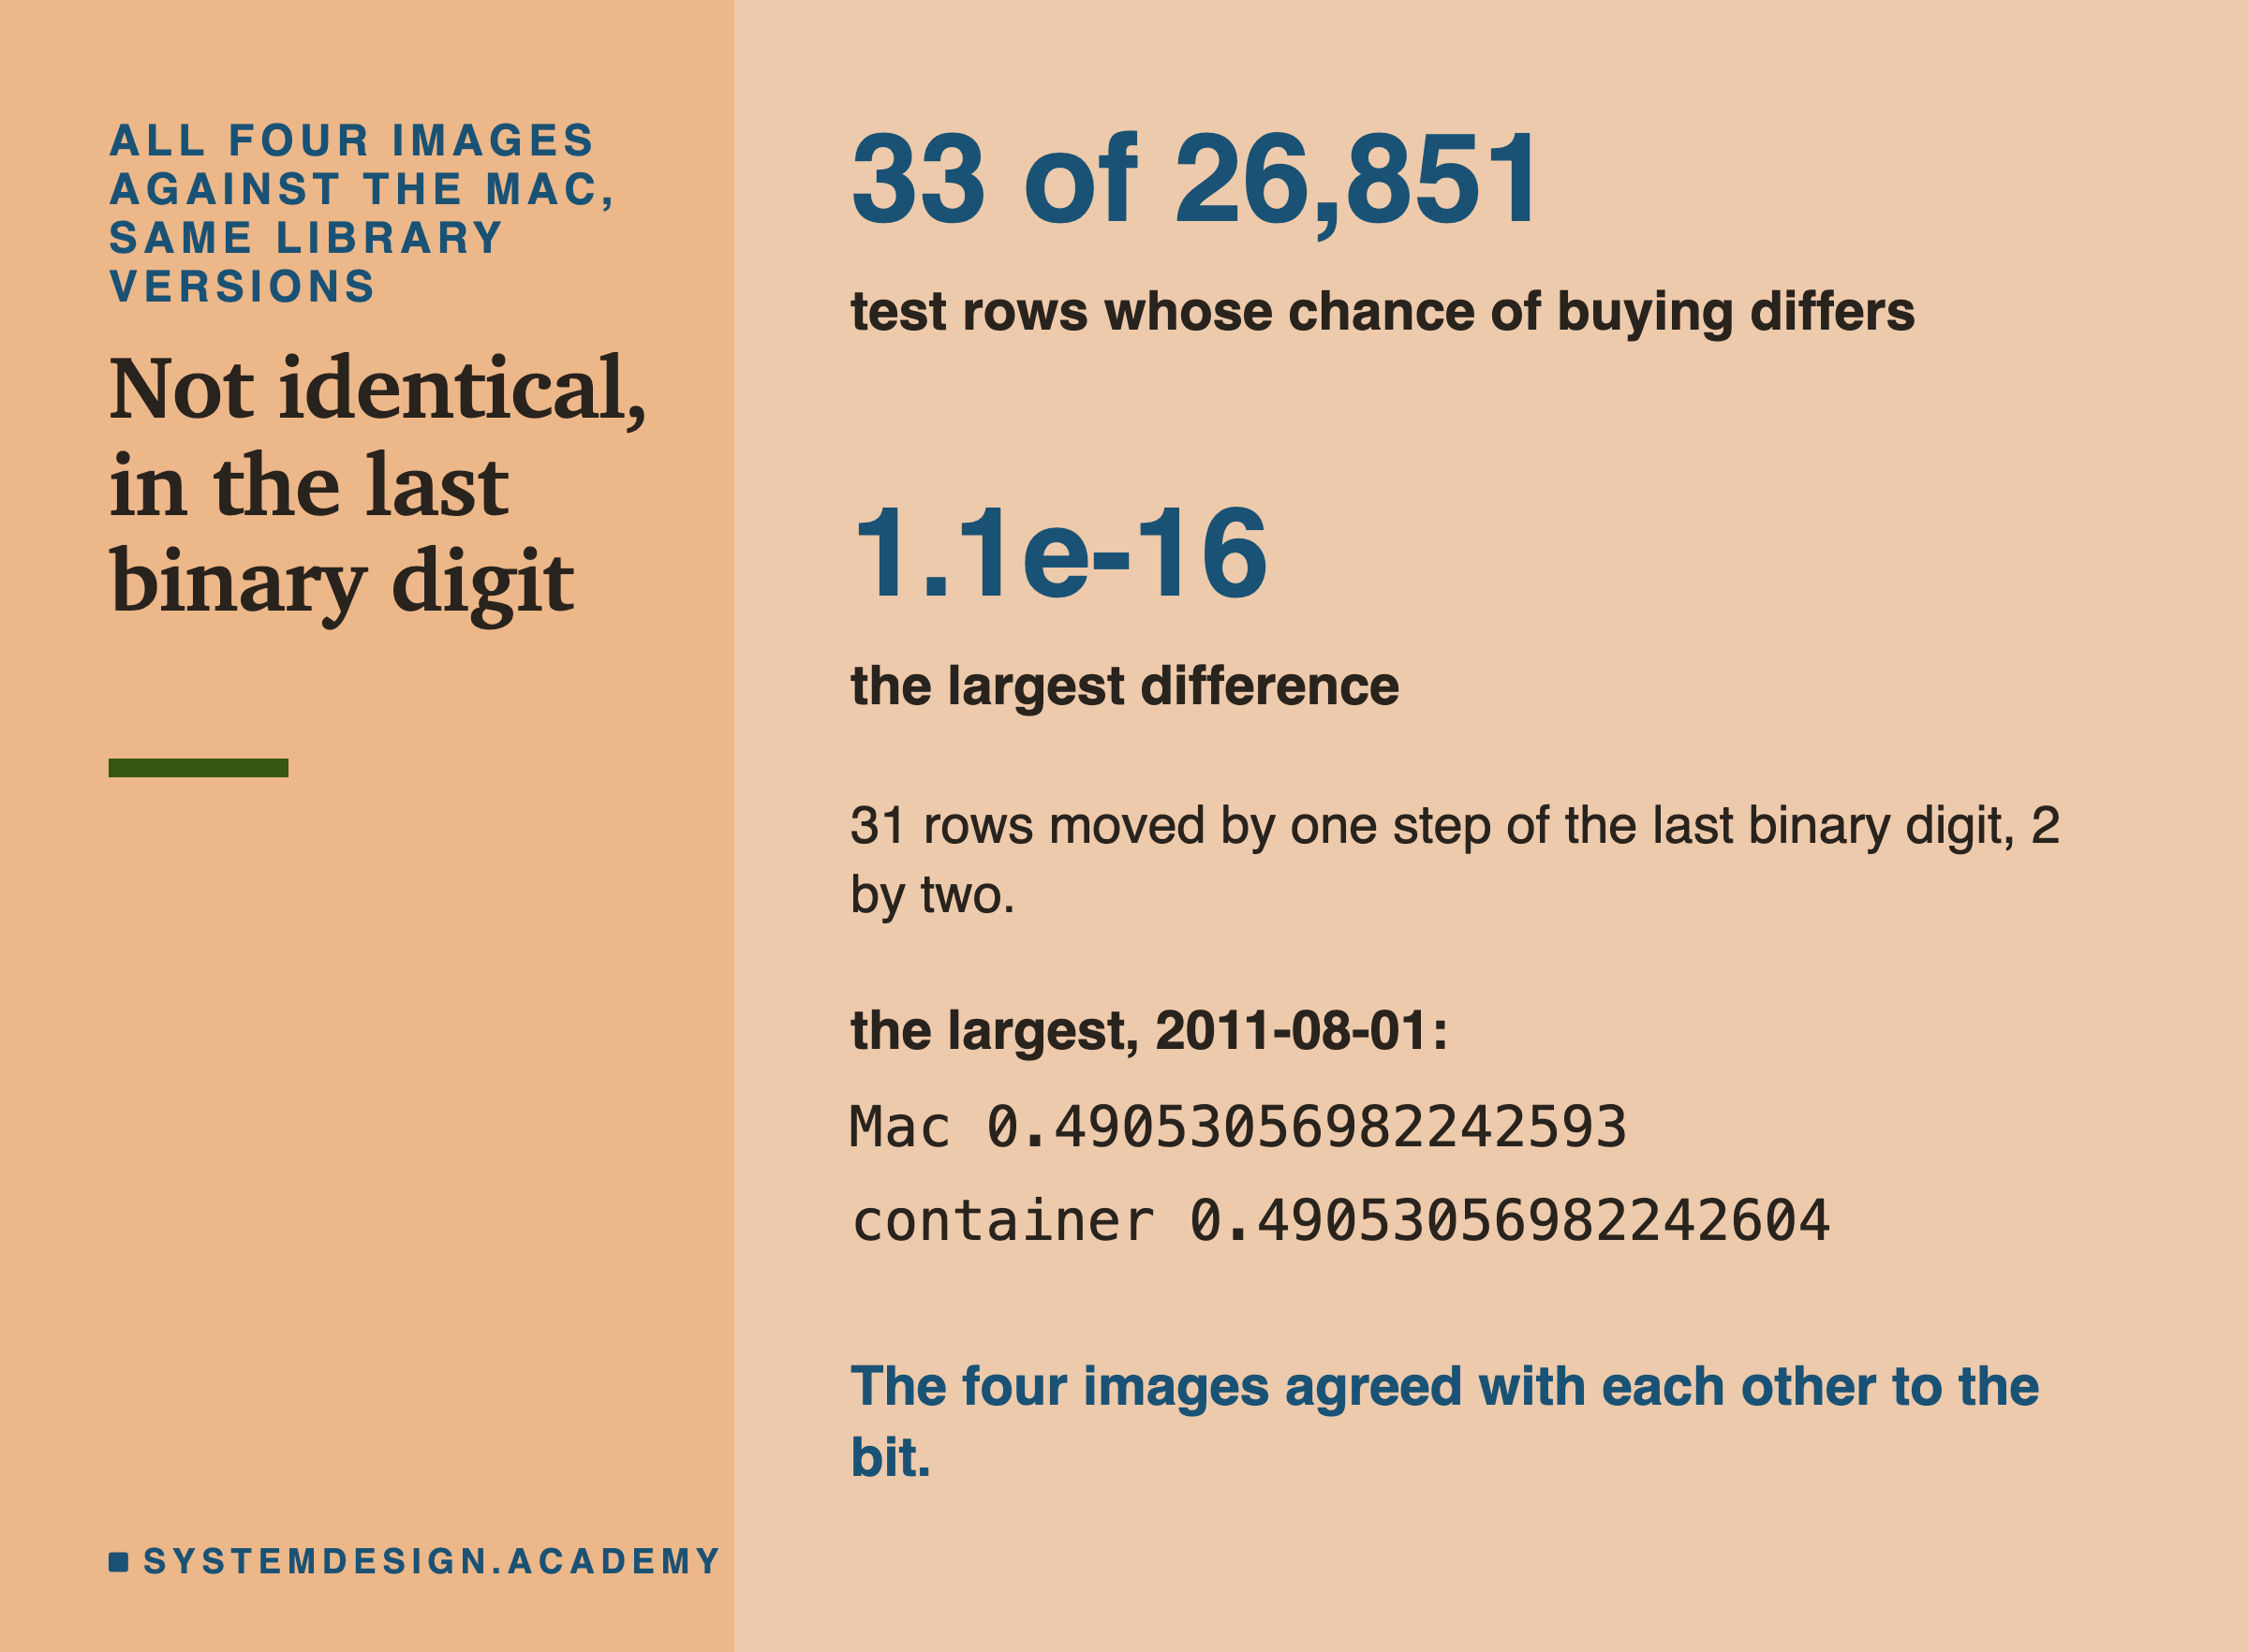
Inside every image, the versions were exactly the Mac's: Python 3.13.15, numpy 2.5.3, scipy 1.18.1, scikit-learn 1.9.1. Yet 33 of the 26,851 predicted chances of buying were not equal to the Mac's. The largest difference was 1.1e-16, which means 0.00000000000000011.
A computer stores each of these numbers in binary, with a fixed number of digits. 31 of the 33 rows moved by one step of the very last binary digit, the smallest change such a number can make. 2 rows moved by two steps. The largest case was a customer at the cutoff of 1 August 2011: 0.49053056982242593 on the Mac, 0.49053056982242604 in the container.
The base image did not matter. All four images, full, slim, slim with the lock, and multi-stage, gave predictions equal to each other, to the bit. So this was not about slimming. It was about running on Linux instead of macOS, with the Linux builds of the same library versions.
Where the Difference Comes From
I asked this question after seeing the result, and the lab labels it as an addition. Which step of the prediction differs?
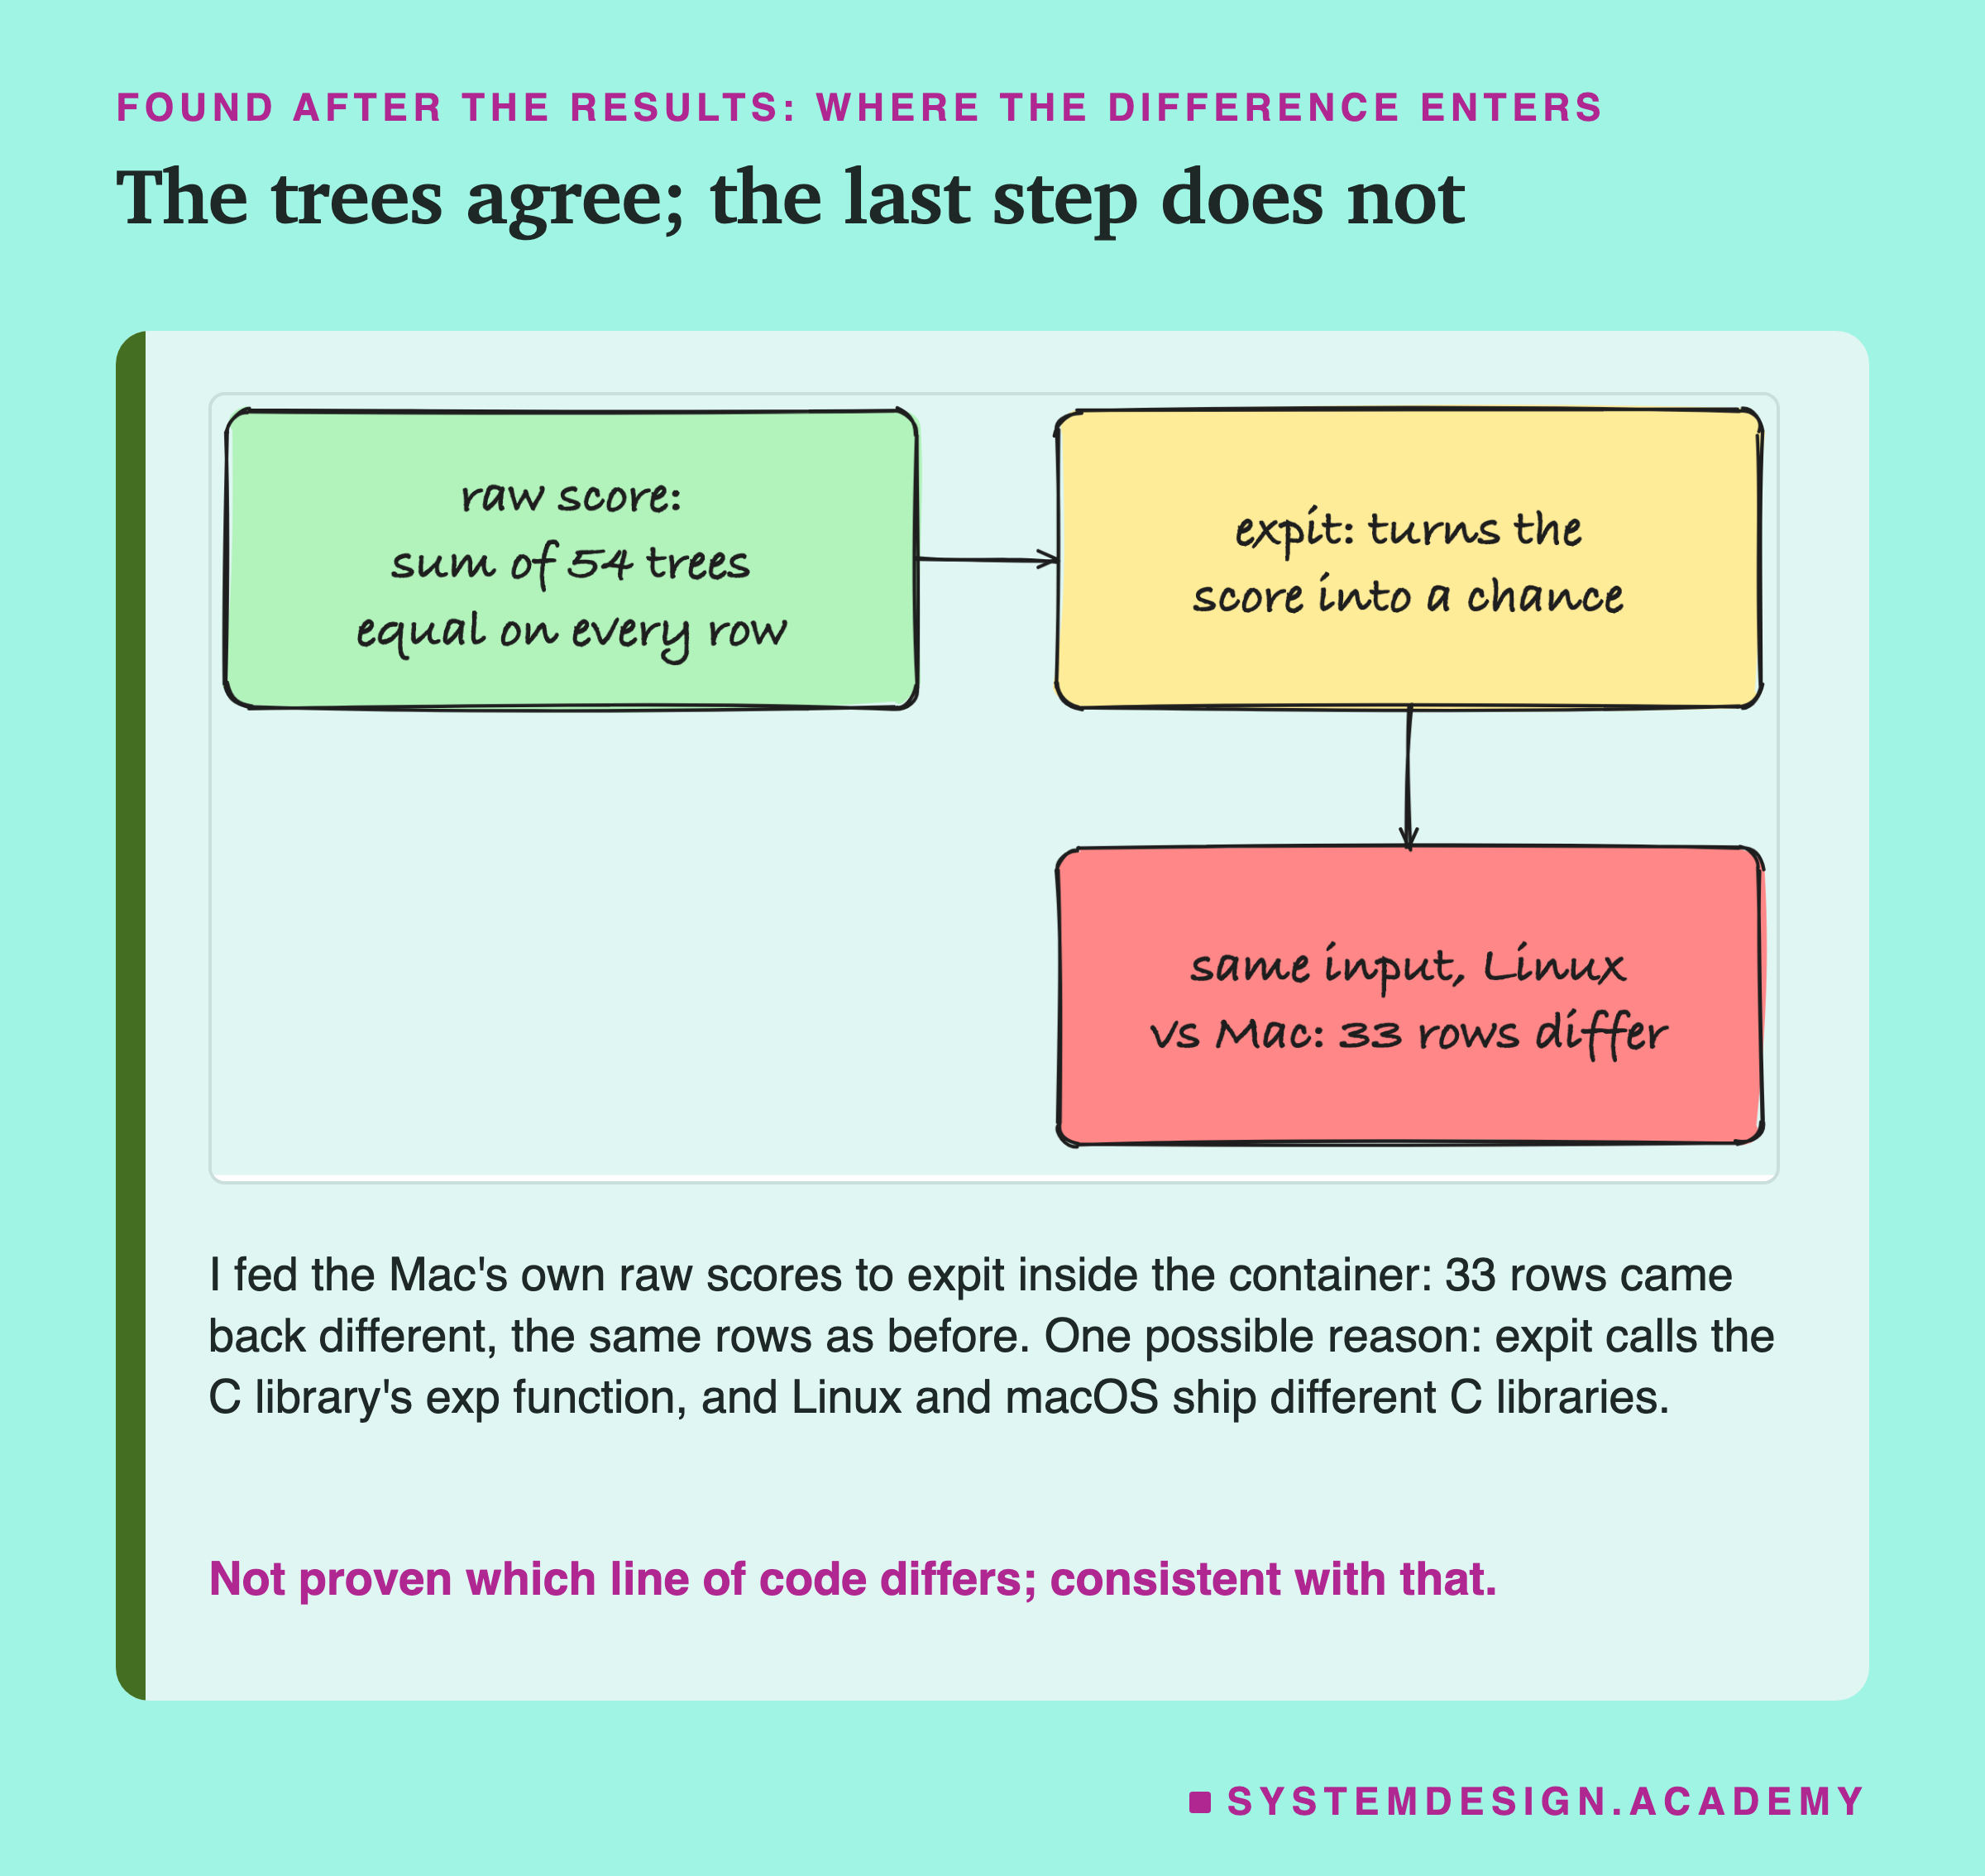
This model makes a prediction in two steps. First it adds up the outputs of its 54 trees into a raw score. Then a function called expit turns that raw score into a chance between 0 and 1.
So I ran the model inside image c again and saved the raw scores too. The raw scores were equal to the Mac's on every row, to the bit. Then I copied the Mac's own raw scores into the container and ran expit on them there. On the same input, Linux and the Mac disagreed on 33 rows, the same 33 rows as before.
So the difference enters at the last step. Here is one possible reason, which I did not prove line by line. expit uses the C library's exp function, and the container uses glibc while macOS uses Apple's own C library. Two correct libraries can round the very last digit differently. A second possible reason: the Mac and the container ran different compiled builds of the same versions. pip installed macOS arm64 wheels of numpy and scipy on the Mac and manylinux aarch64 wheels in the image, built with different compilers and settings. The result is consistent with either, and I did not separate them.
Does One Digit Matter?
A difference of 1.1e-16 sounds like nothing. But a test that checks "equal" cannot tell nothing from something. So I asked, again after the results: did it change anything the model is used for?
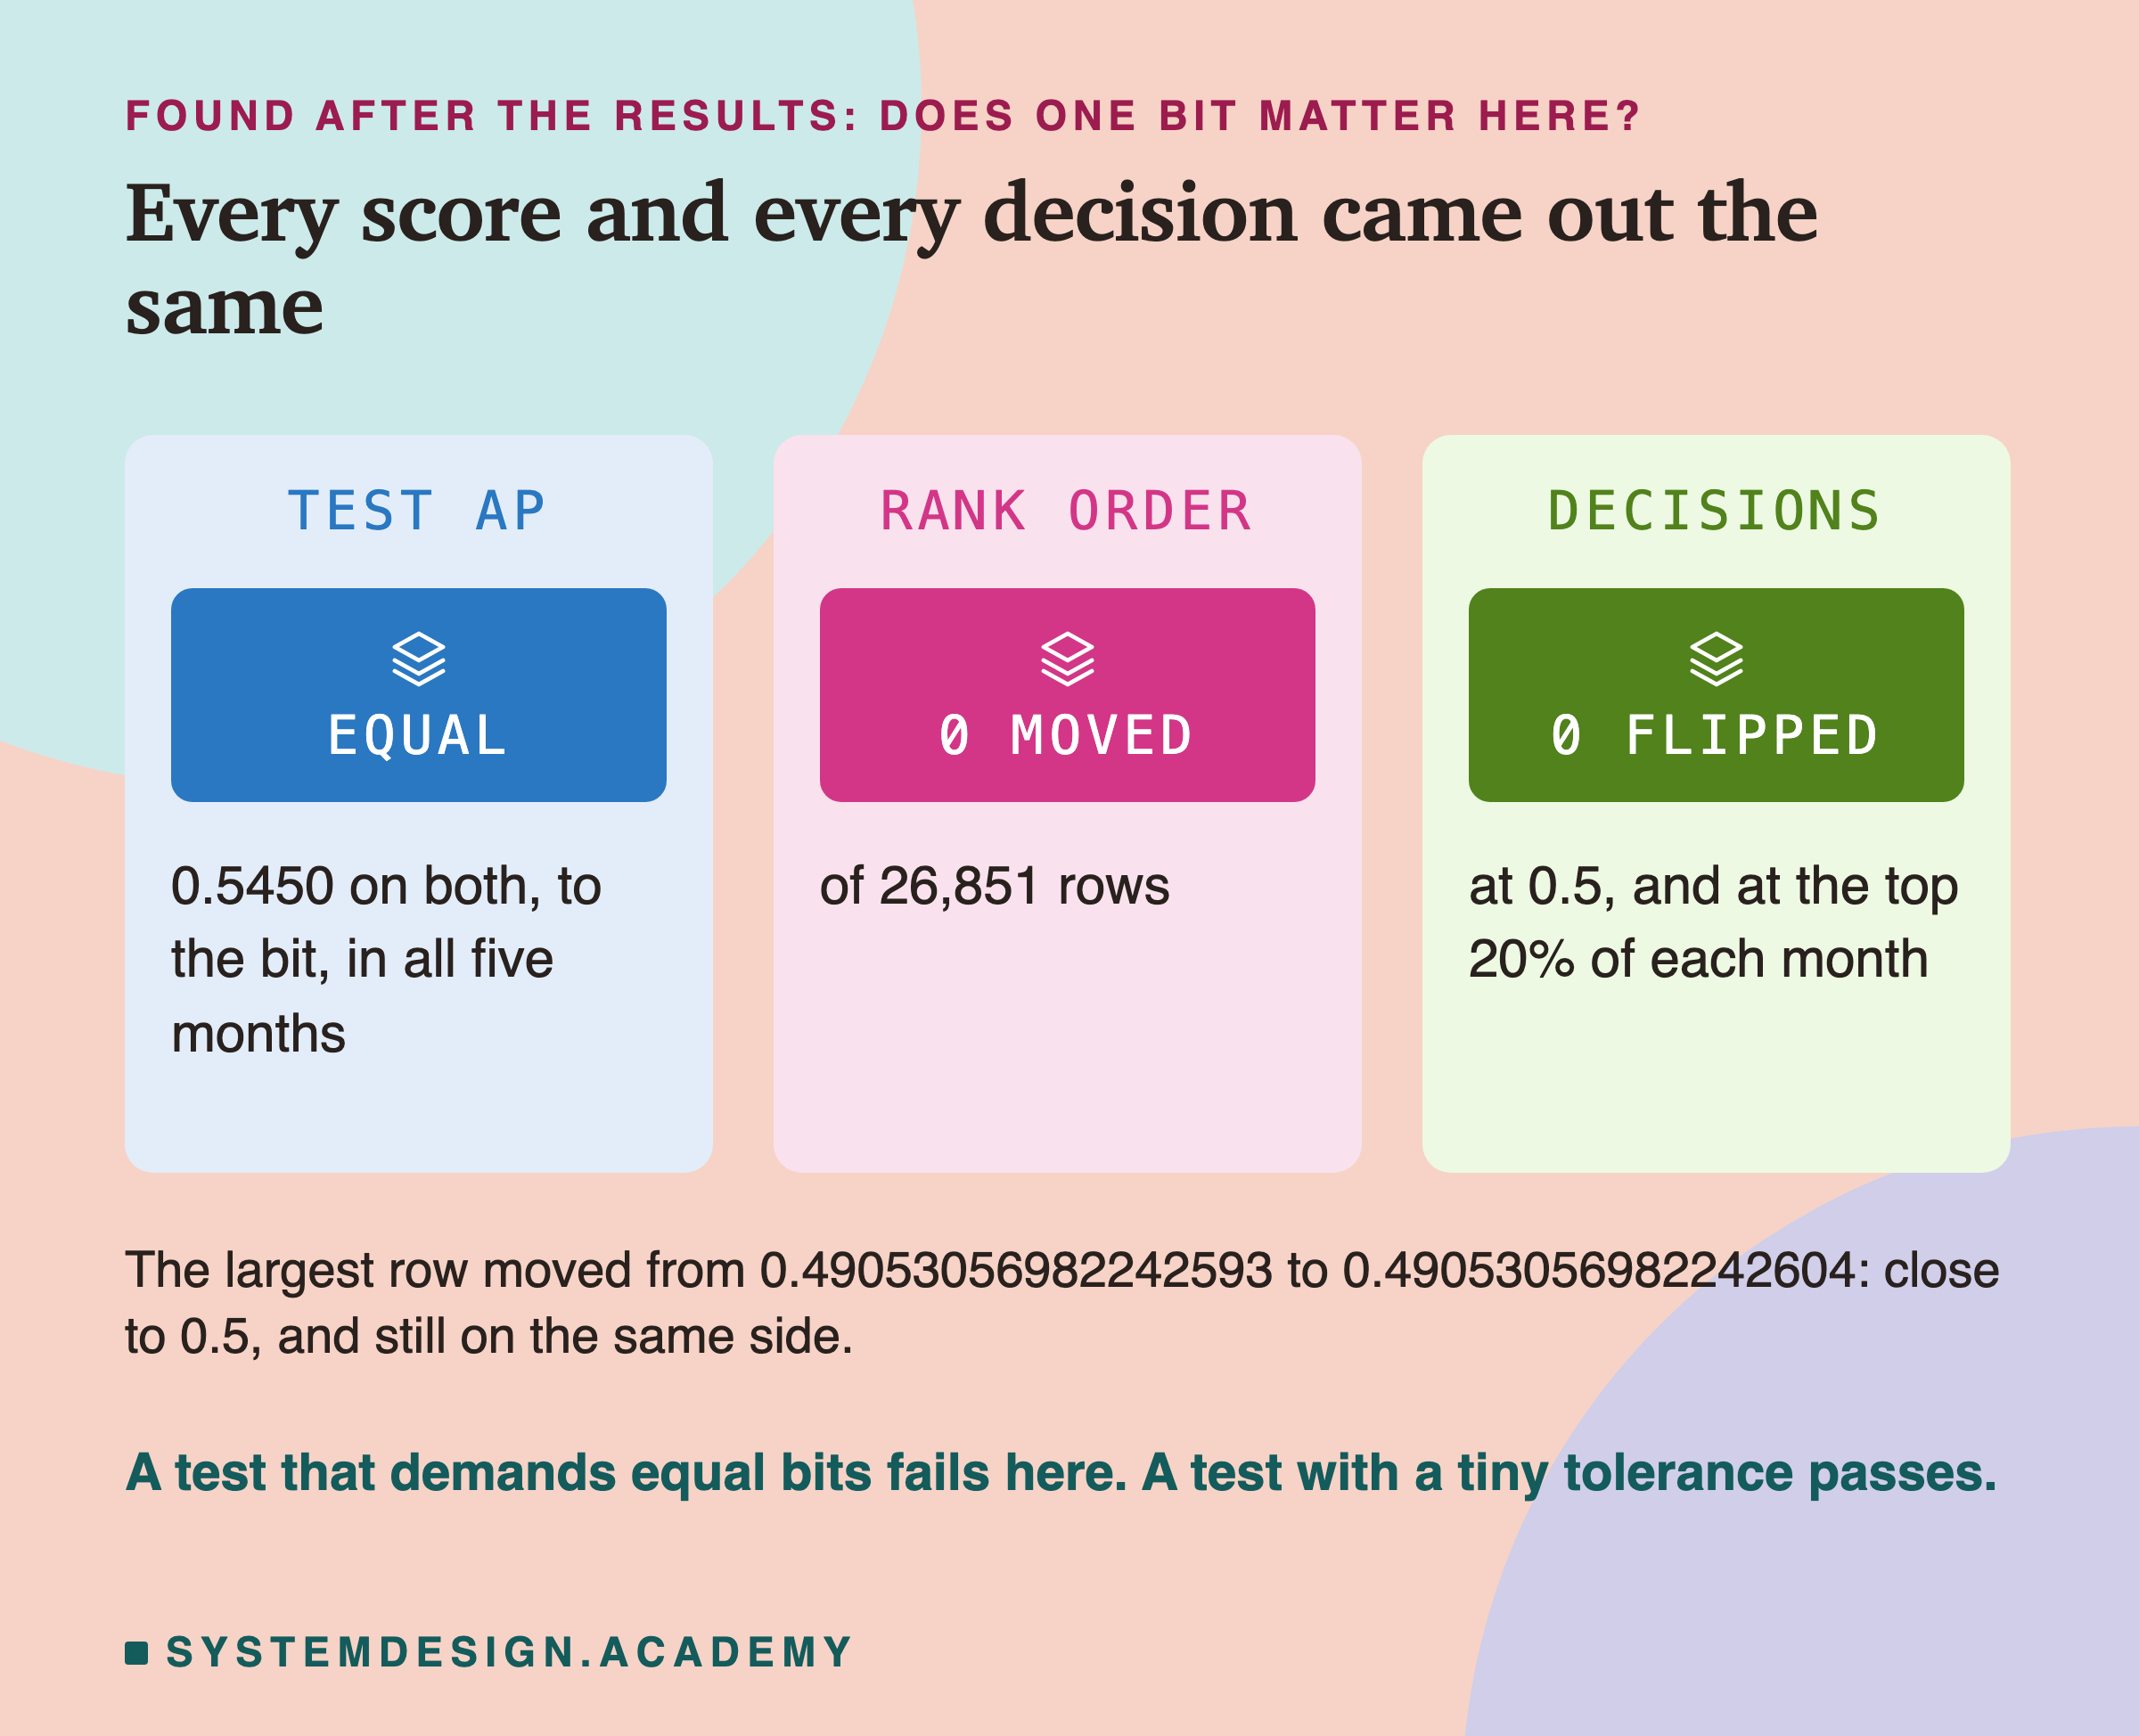
Test AP was equal to the bit, in every one of the five test months. Not one row changed its place in the ranking from most likely to least likely buyer. And no decision flipped, neither at a cut-off of 0.5 nor at "the top 20% of each month". A shop might use a rule like that to pick who gets an offer.
The closest call was the largest difference itself, a chance of about 0.4905. It moved by two steps of the last digit and stayed below 0.5.
So for this model, on these rows, the Linux container and the Mac give the same results in every way that counts. But the practical lesson is about tests. If your deployment check says "the container's predictions must equal the training machine's predictions exactly", it will fail here, every time, for no real reason. Compare with a tiny tolerance, and check the ranking and the decisions too.
Alpine: The Smallest Base Did Not Build
Alpine's base image was the smallest of the three: 56.4 MB unpacked, against 158.2 MB for slim. Image e used it with exactly c's locked install.
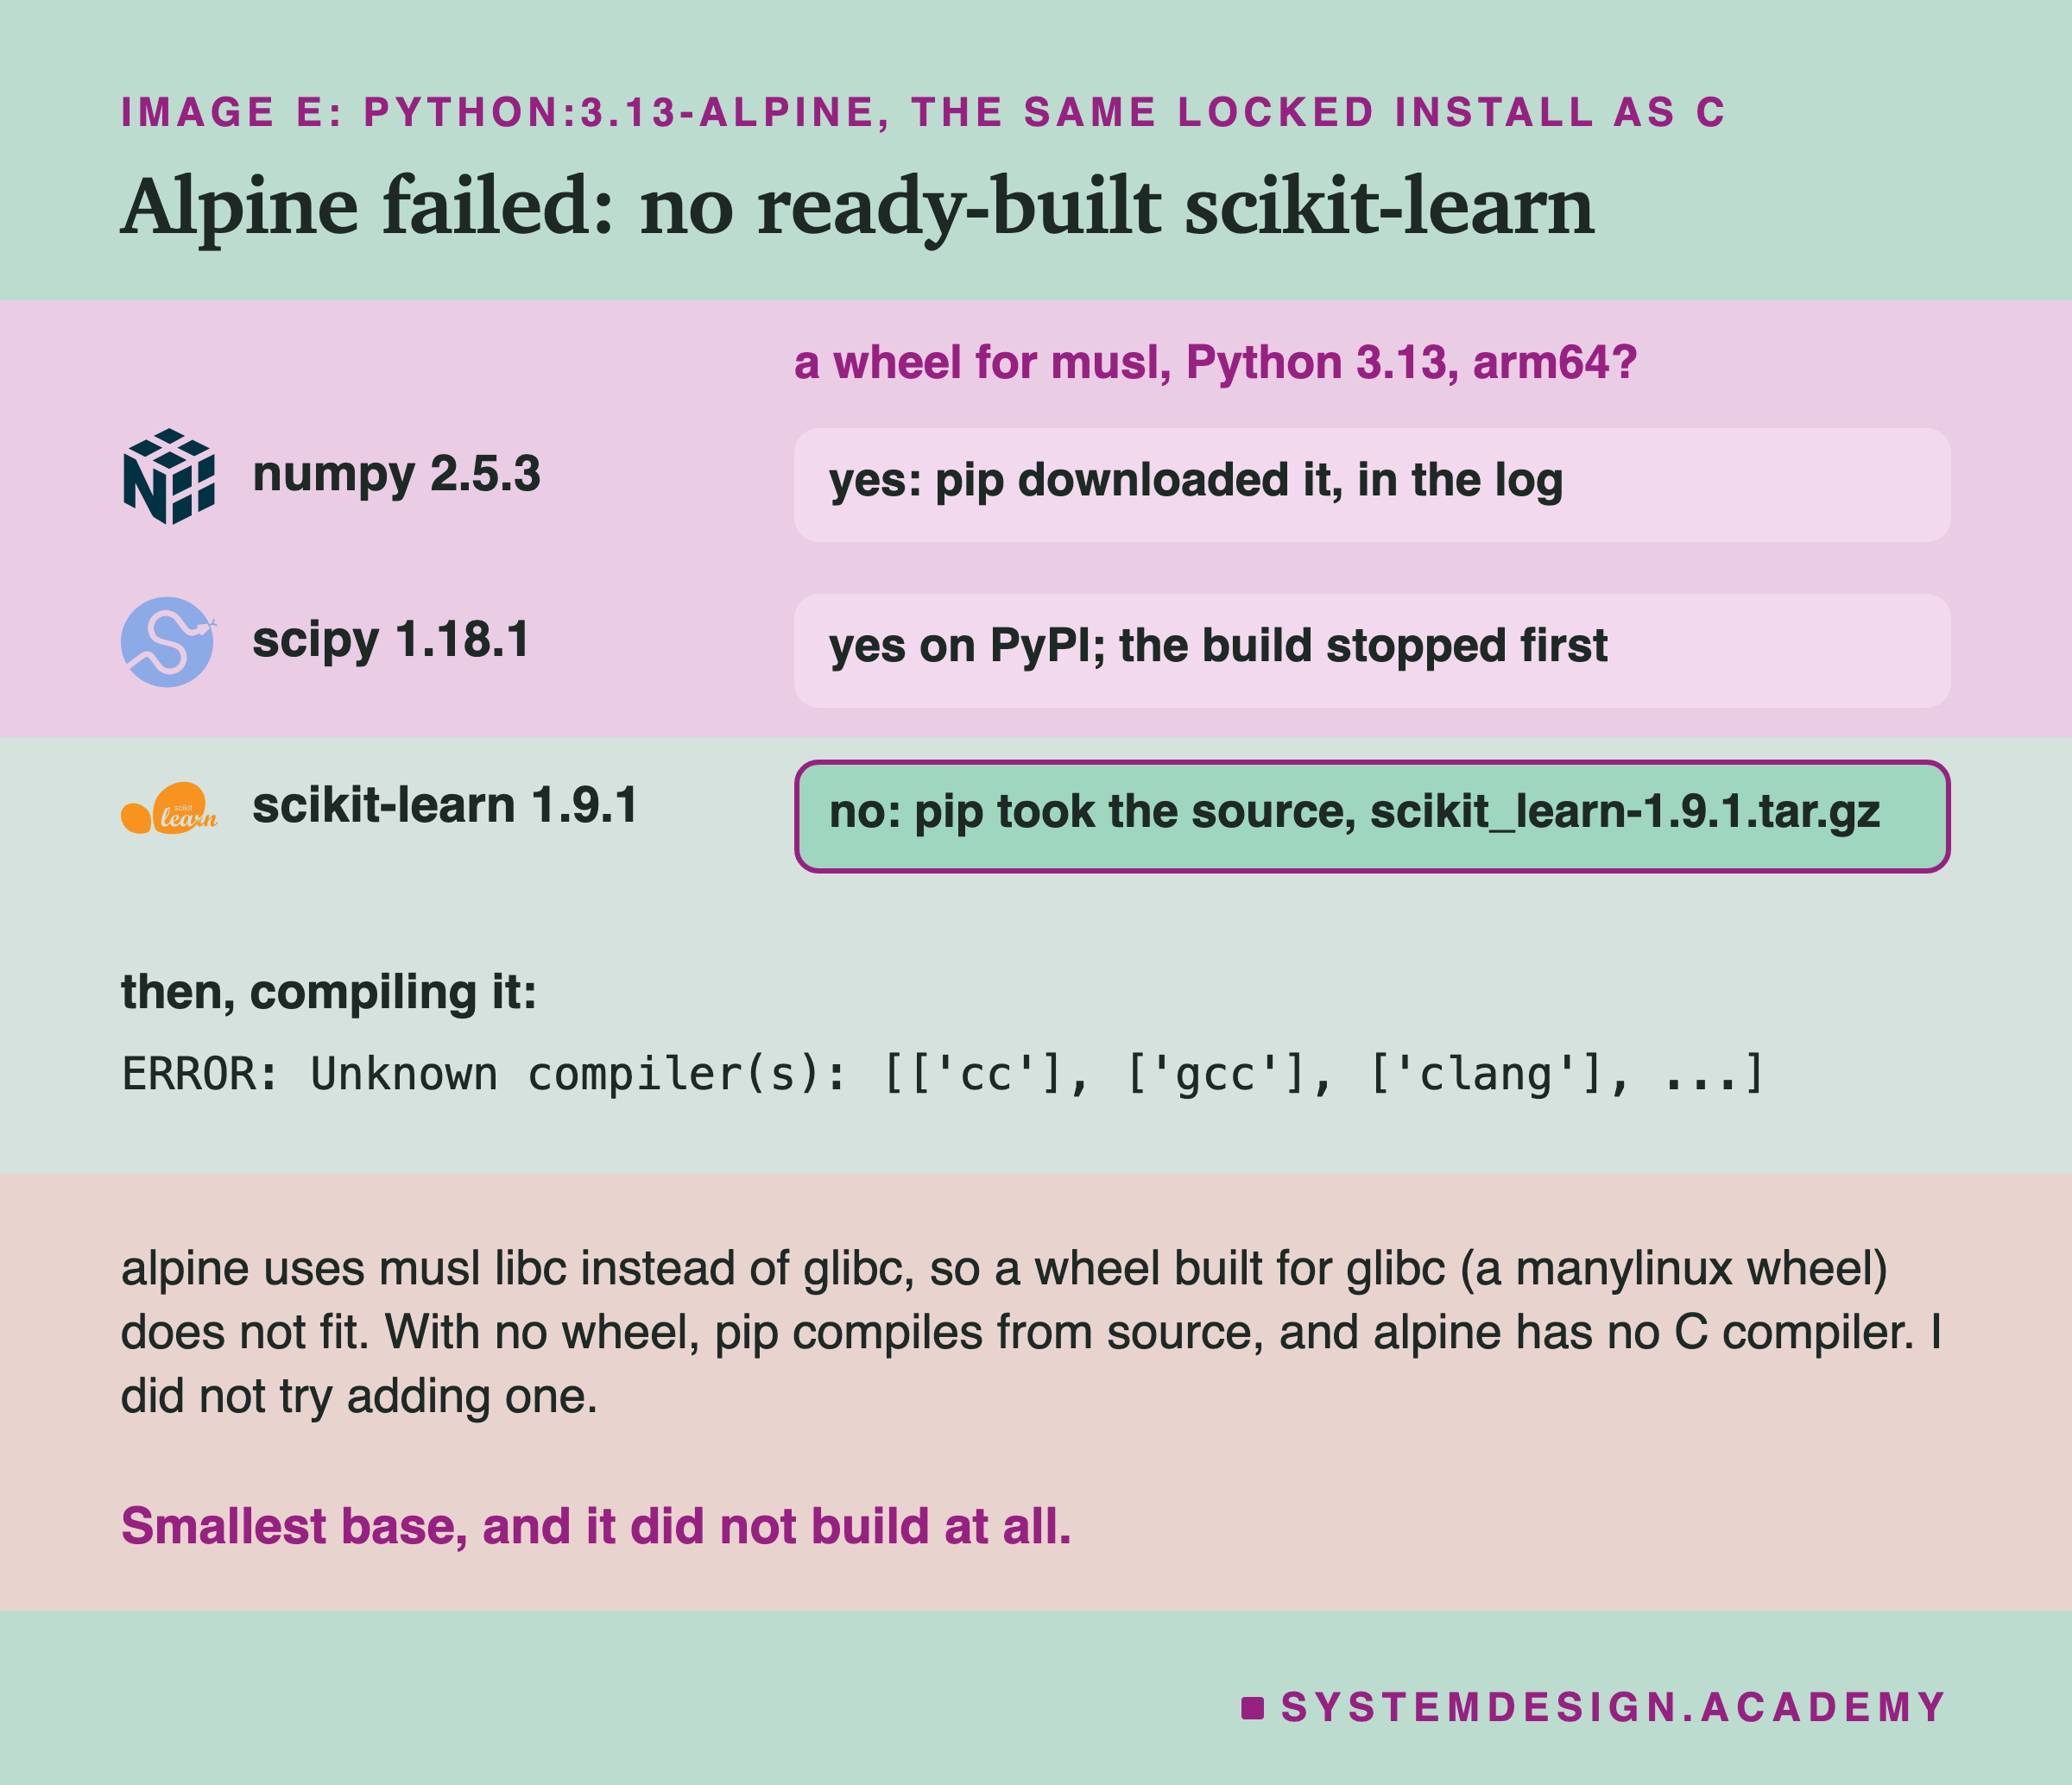
The build failed at pip install. The log shows what happened. pip found a musl wheel for numpy. For scikit-learn 1.9.1 it found none, so it downloaded the source, scikit_learn-1.9.1.tar.gz, and tried to compile it. The compile stopped at its first step: "Unknown compiler(s)", because alpine has no C compiler. The build never got as far as scipy. (Whether scipy has a musl wheel I checked on PyPI afterwards; it does.)
After the run I checked PyPI, the site pip downloads from, as a labelled addition. For scikit-learn 1.9.1 it lists 43 files, and none of them is a musl wheel, for any Python version or any processor. So an alpine image on an Intel or AMD server would hit the same wall. The ordinary Linux wheels it does list are manylinux wheels, built for glibc, which alpine does not have.
My guess before the run was half wrong. I expected numpy and scikit-learn to have musl wheels and was unsure about scipy. In fact PyPI has one for scipy, and scikit-learn has none.
You could add a compiler to alpine and compile scikit-learn. I did not try. It would make the image bigger, and the model would then run on a library I compiled myself, not the one the Mac used. This is the musl warning from the python image's description, in practice.
My Guesses Before the Run, Checked
I wrote seven guesses into the lab before it ran. Here they are against the results.
-
"the full image (a) is the biggest by far, and the base, not my install, is most of it." Right: 1,569.1 MB, and the base was 77% of it.
-
"the pip install layer is about the same size in a and b (the same wheels), and scipy is its biggest package." Right: the two layers were the same size, 363.5 MB, and scipy was the biggest folder.
-
"b minus c is about the size of pip's cache, which is about the size of the downloaded wheels." Right on the first part: 61.1 MB against a 59.7 MB cache. I did not measure the downloads separately.
-
"the multi-stage image d is within 5% of c." Right: d was 3.3 MB bigger than c.
-
"every image that builds predicts exactly the Mac's numbers, to the bit." Wrong: 33 rows differed in the last binary digit, in all four images. AP was equal.
-
"alpine (e): numpy and scikit-learn have musl wheels; I do not know about scipy. If one is missing the build fails." Half wrong: scikit-learn was the missing one, and the build failed.
-
"cache: in a, b, c, d and e a code-only change reruns only the last COPY; a requirements change reruns pip install and every step after it; in c2 a code-only change reruns pip install." Right for a, b, c, d and c2. Image e never built, so it had no rebuilds.
Try It Yourself
The full lab builds five images and rebuilds them many times. I wrote a small demo that builds one, image c's kind, and checks it.
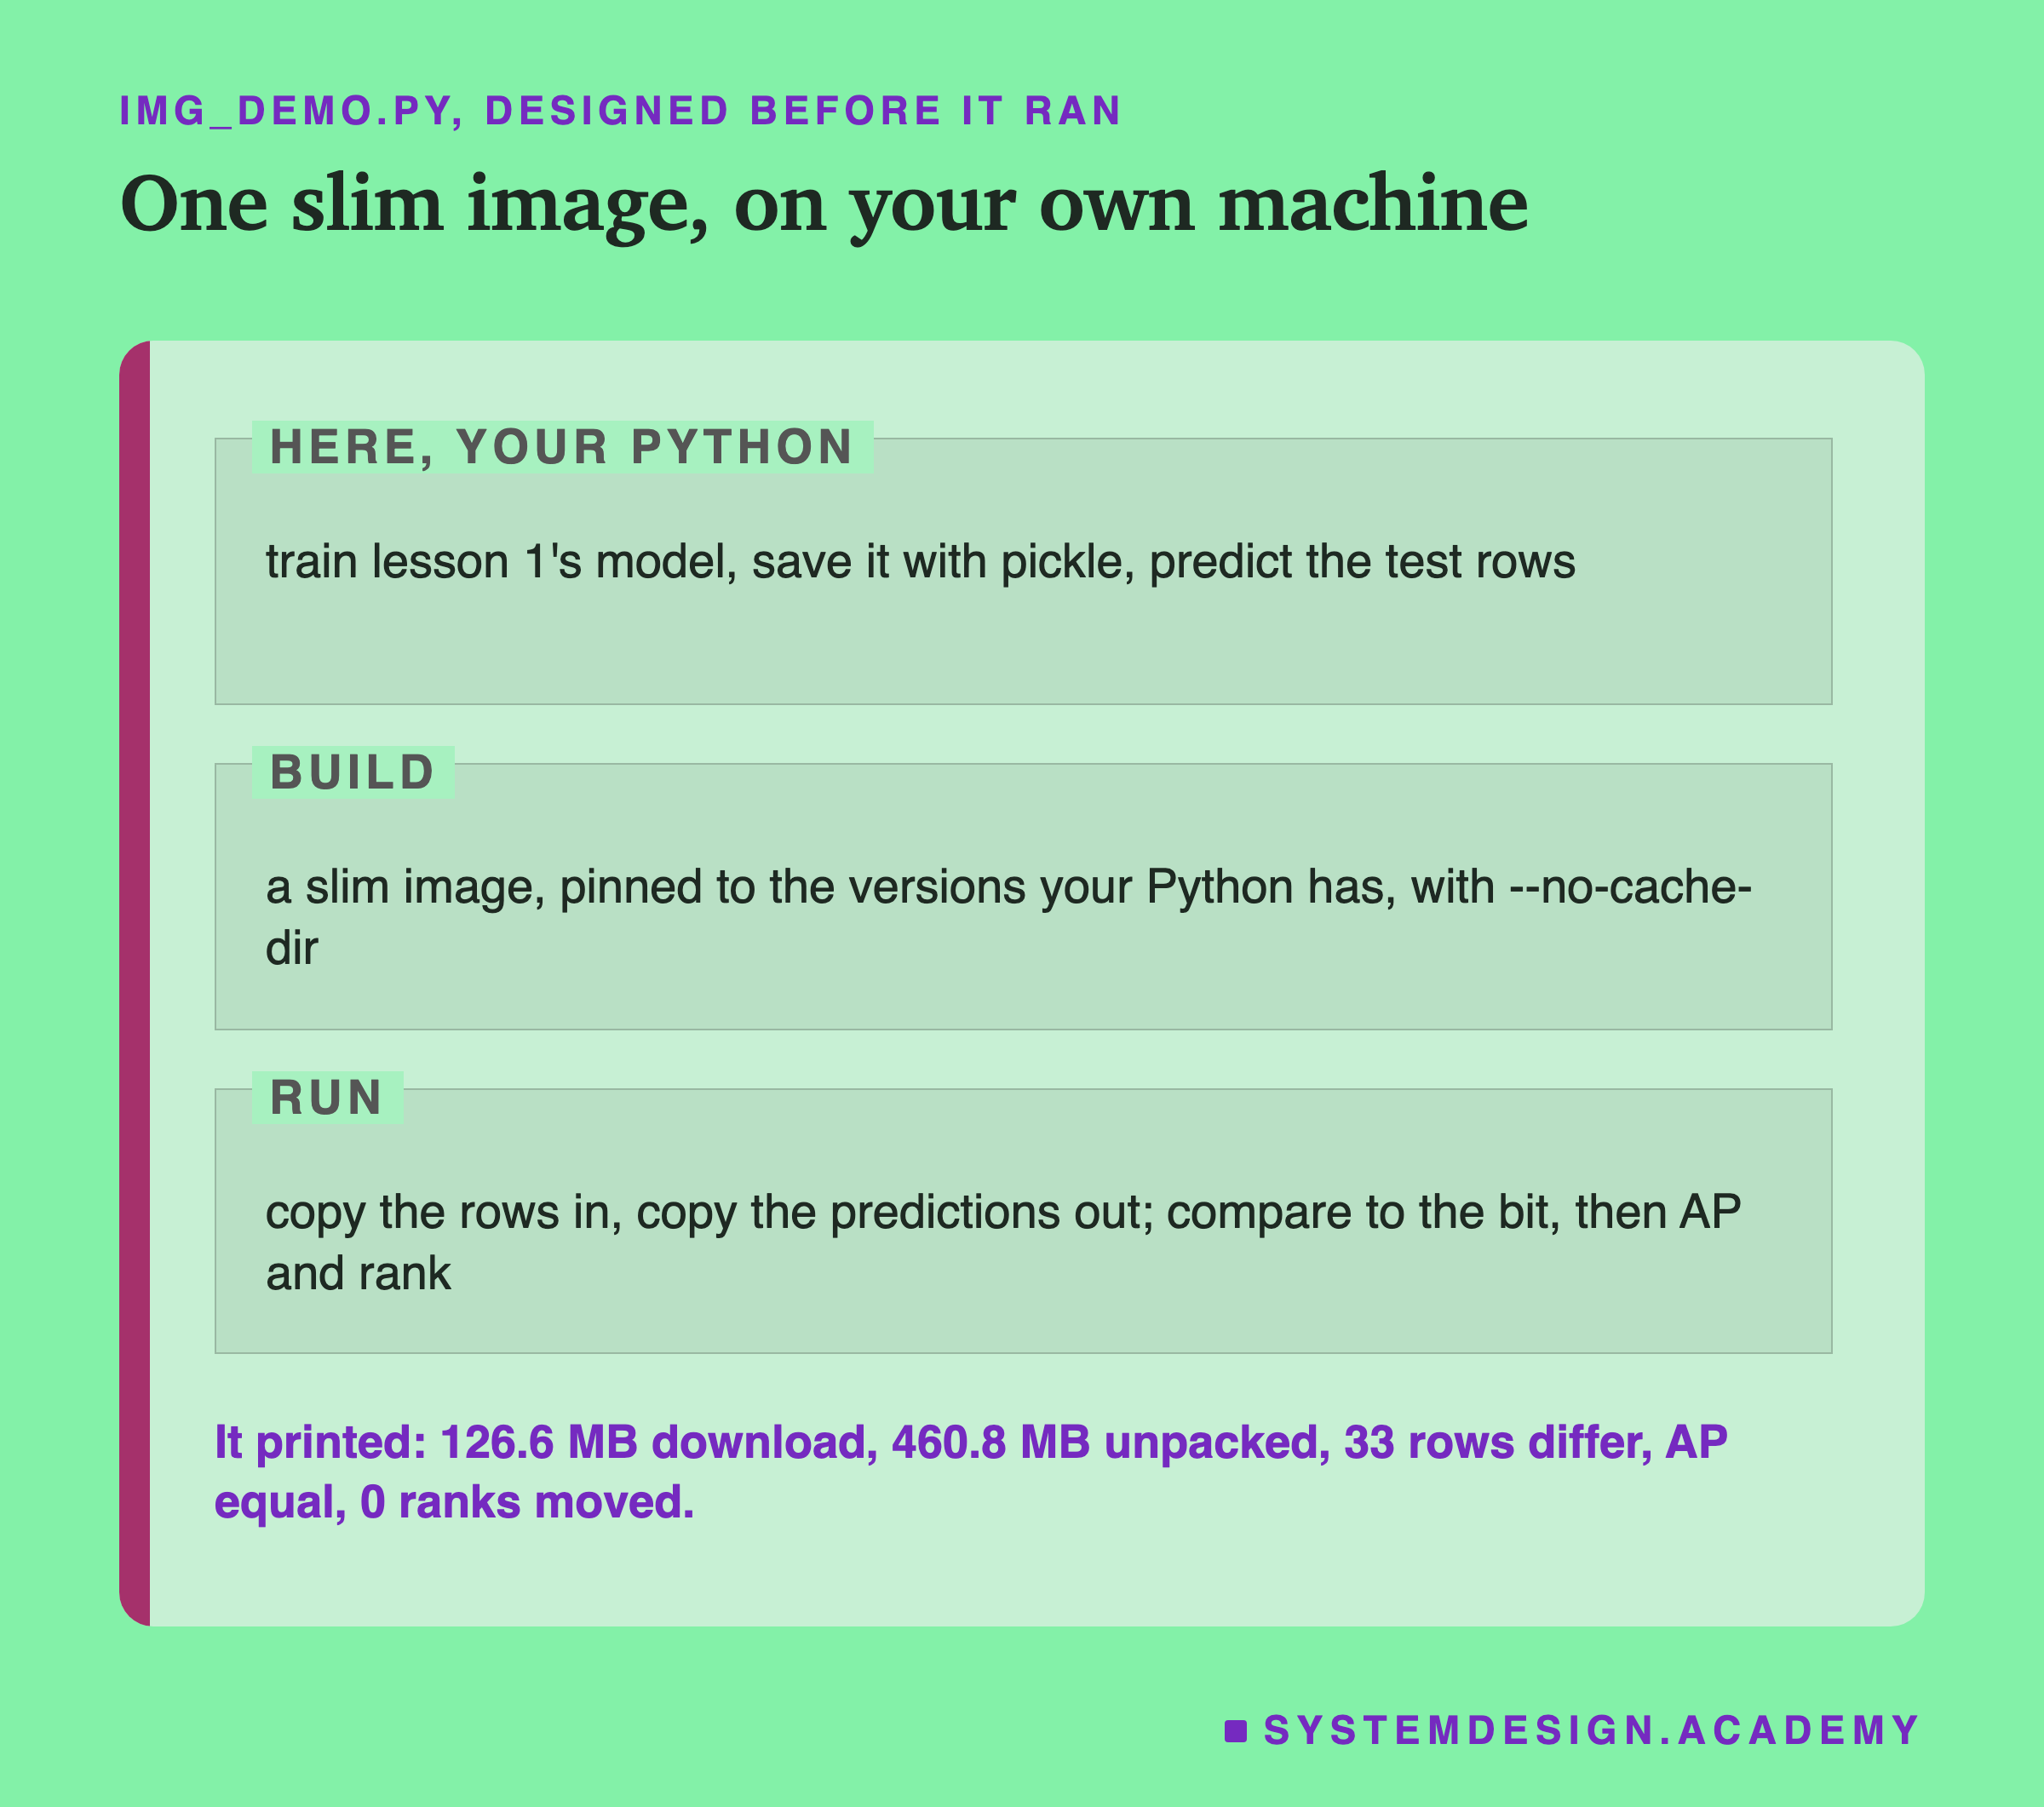
I wrote the demo's design into its docstring after the lab had run and before the demo first ran. After its first run I changed two small things, and the docstring says so. It now prints the test AP and the rank check, and the layer names are no longer cut mid-word. The first run printed the same sizes and the same 33 rows.
The demo trains the model with your own Python. It writes a requirements file that pins numpy, scipy, scikit-learn and their helpers to exactly the versions your Python has. Then it builds one slim image with --no-cache-dir. Then it runs the image, copies the predictions out, and compares. At the end it removes the container and the image it built. The base image and 's build cache stay on your disk; docker builder prune frees the cache.
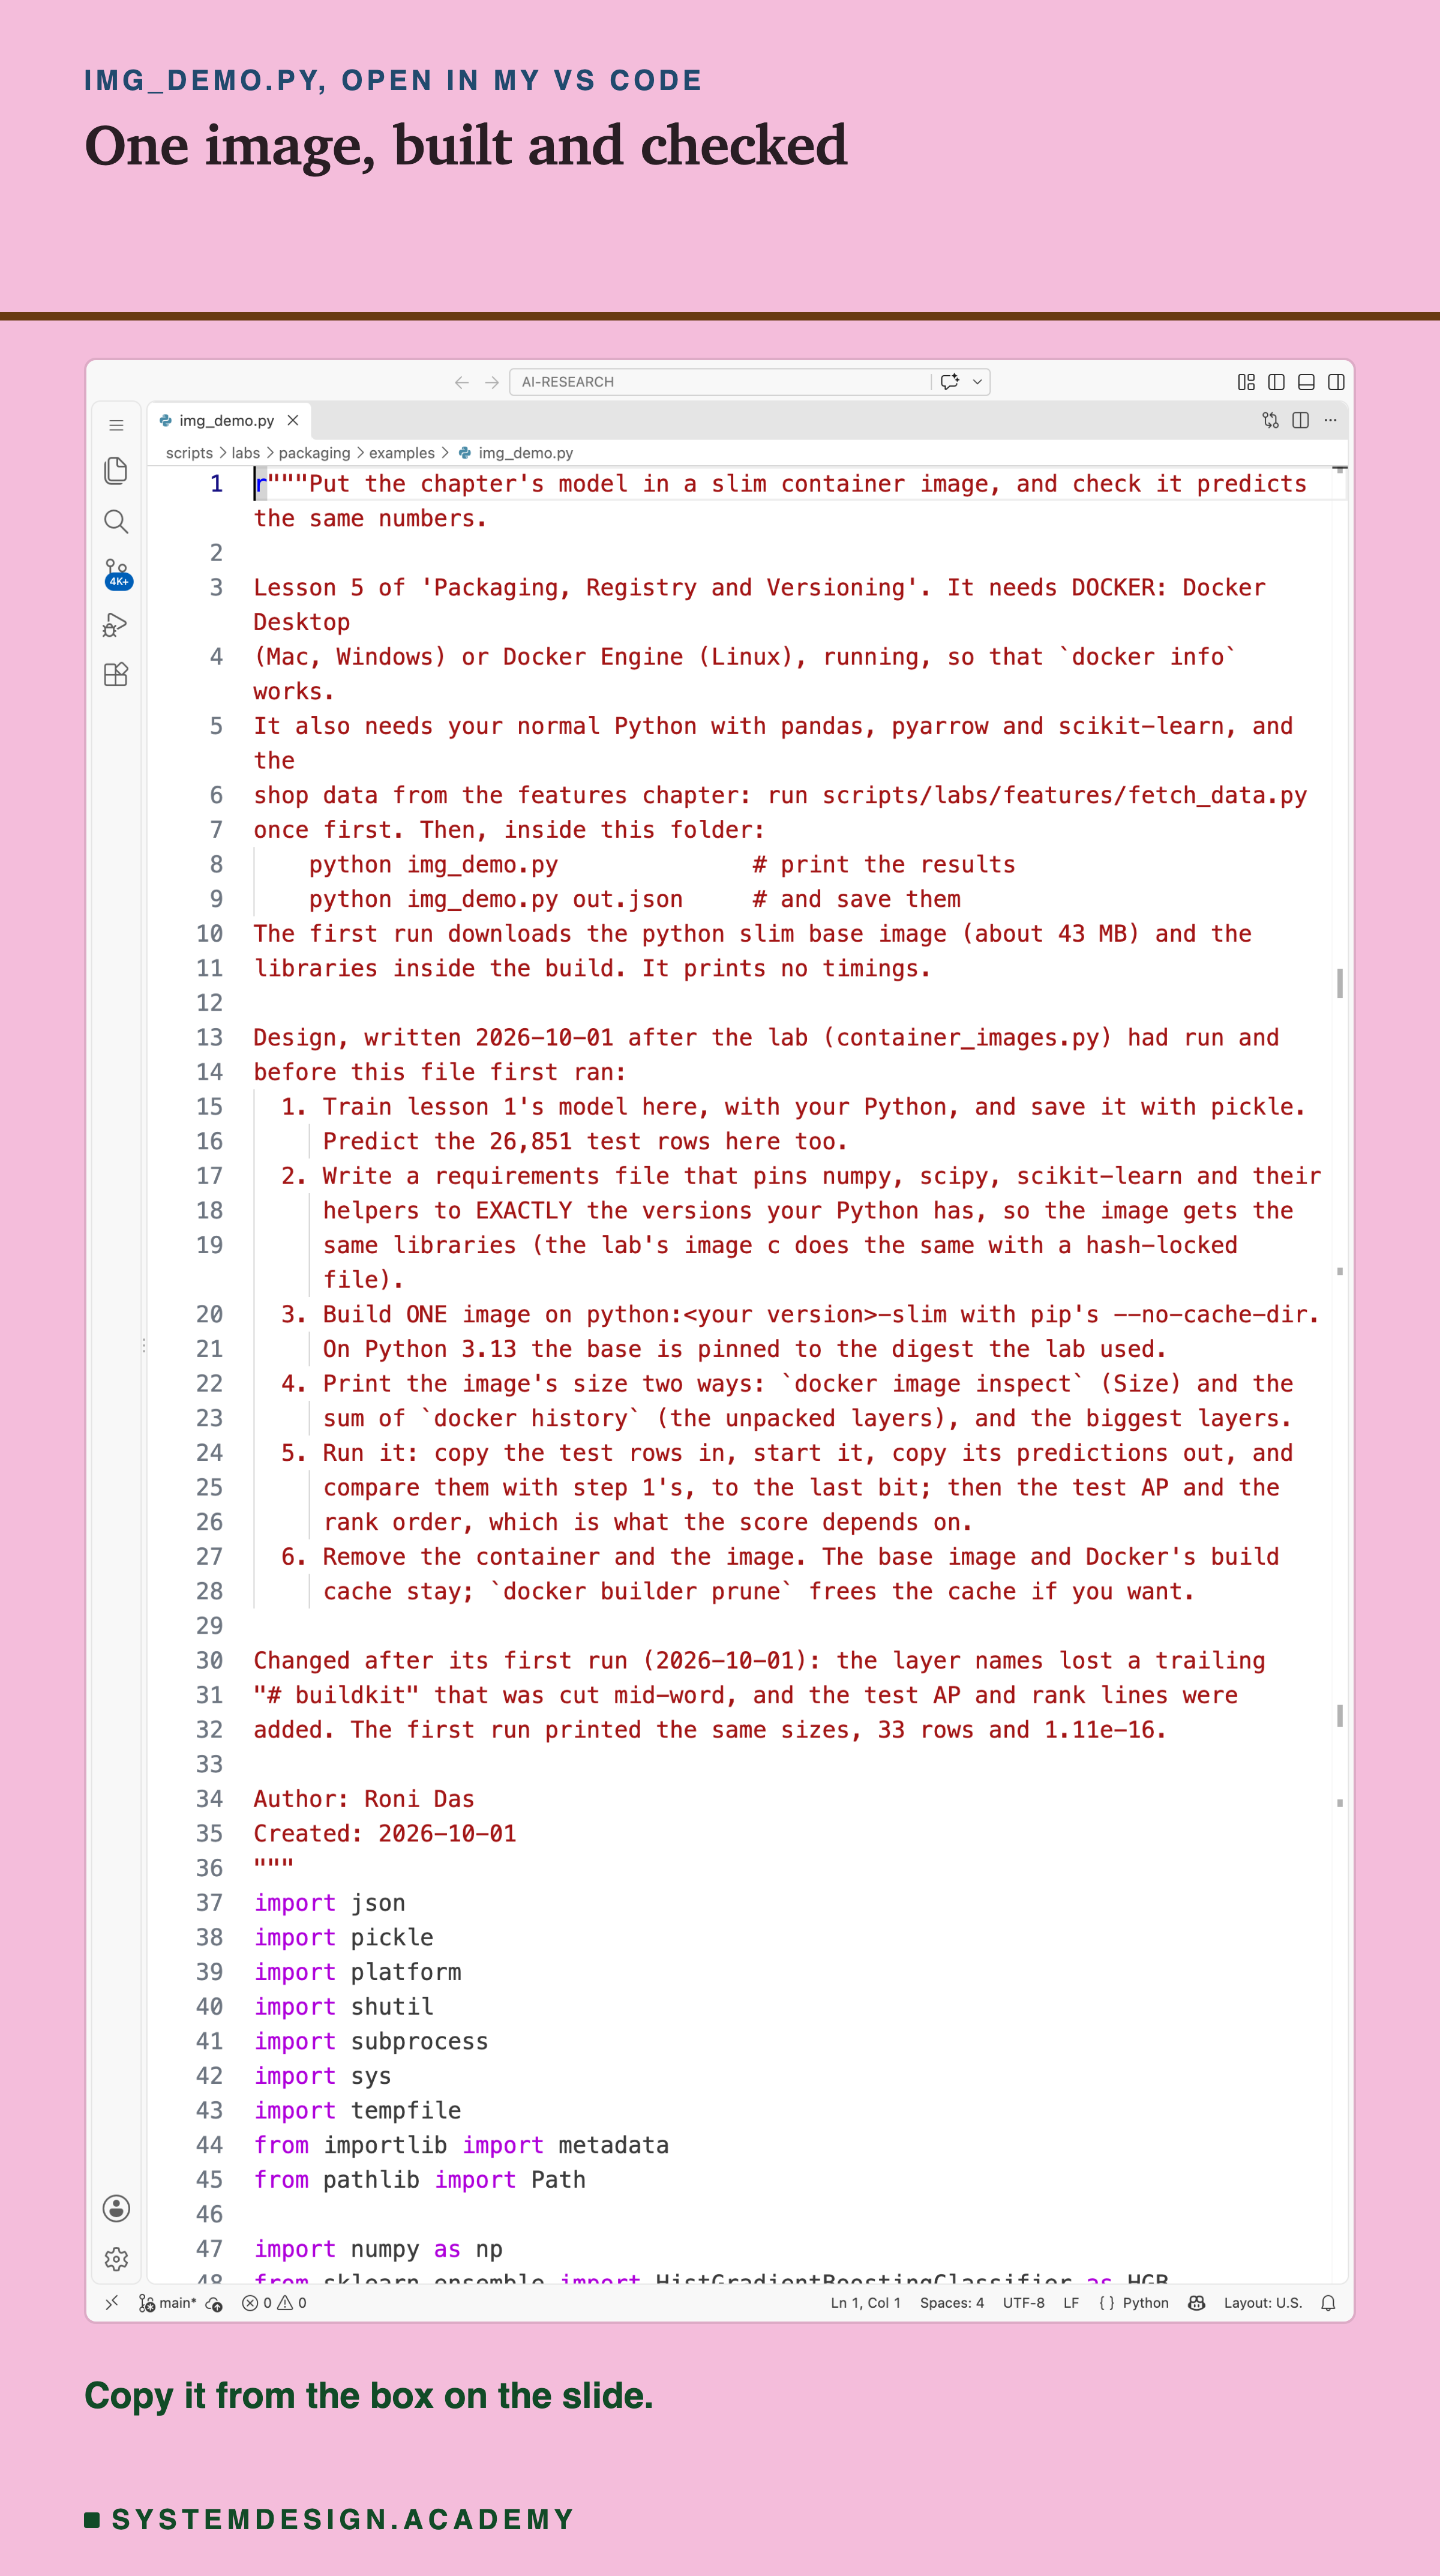
Before you run this lab. You need Docker, running: Docker Desktop on a Mac or Windows, or Docker Engine on Linux, so that docker info works in a terminal. You also need Python 3 with pandas, pyarrow and scikit-learn: pip install pandas pyarrow scikit-learn openpyxl. First run python fetch_data.py from the scripts/labs/features folder; it downloads the shop data once, about 46 MB. The first run of the demo also downloads the python slim base image and the libraries inside the build.
Look Up Any Image Yourself
This box holds the real sizes and rebuild results from the lab. It needs nothing but Python, so it runs in your browser. It builds no image.
Press Run. It shows image c's sizes, its biggest packages, and which steps ran again after a code change. Change IMAGE to "a", "b" or "d", and CHANGE to "again" or "reqs", and run again.
The report script writes this box from the lab's stored results, runs it for every image and every change, and checks what it prints against the lab. Try CHANGE = "code" and look at the line for c2: the only image where a one-line code change installed every library again.
The Lab's Code, Piece by Piece
The lab is one file, scripts/labs/packaging/container_images.py, and the Dockerfiles sit next to it in img_files/.
make_model runs in my main Python. It imports lesson 1's own feature code and trains the model, and it stops if the test AP is not 0.5450. Then it saves the model with pickle, the test rows and the Mac's predictions.
build runs one docker build with plain output, so every step prints a line, and stores the whole log. parse_steps reads that log and marks each step CACHED or ran. make_ctx makes the folder each build reads from; for the rebuild tests it adds one line to predict.py or one comment line to the requirements file.
measure collects everything about one image. It reads docker image inspect, the layer list from docker history, and the manifest from docker save. It runs du and pip freeze inside a container. creates a container, copies the test rows in with , starts it, and copies the predictions out.
How to Build a Model Image
Here is how I would build an image for a model like this one, using only what this lab measured.
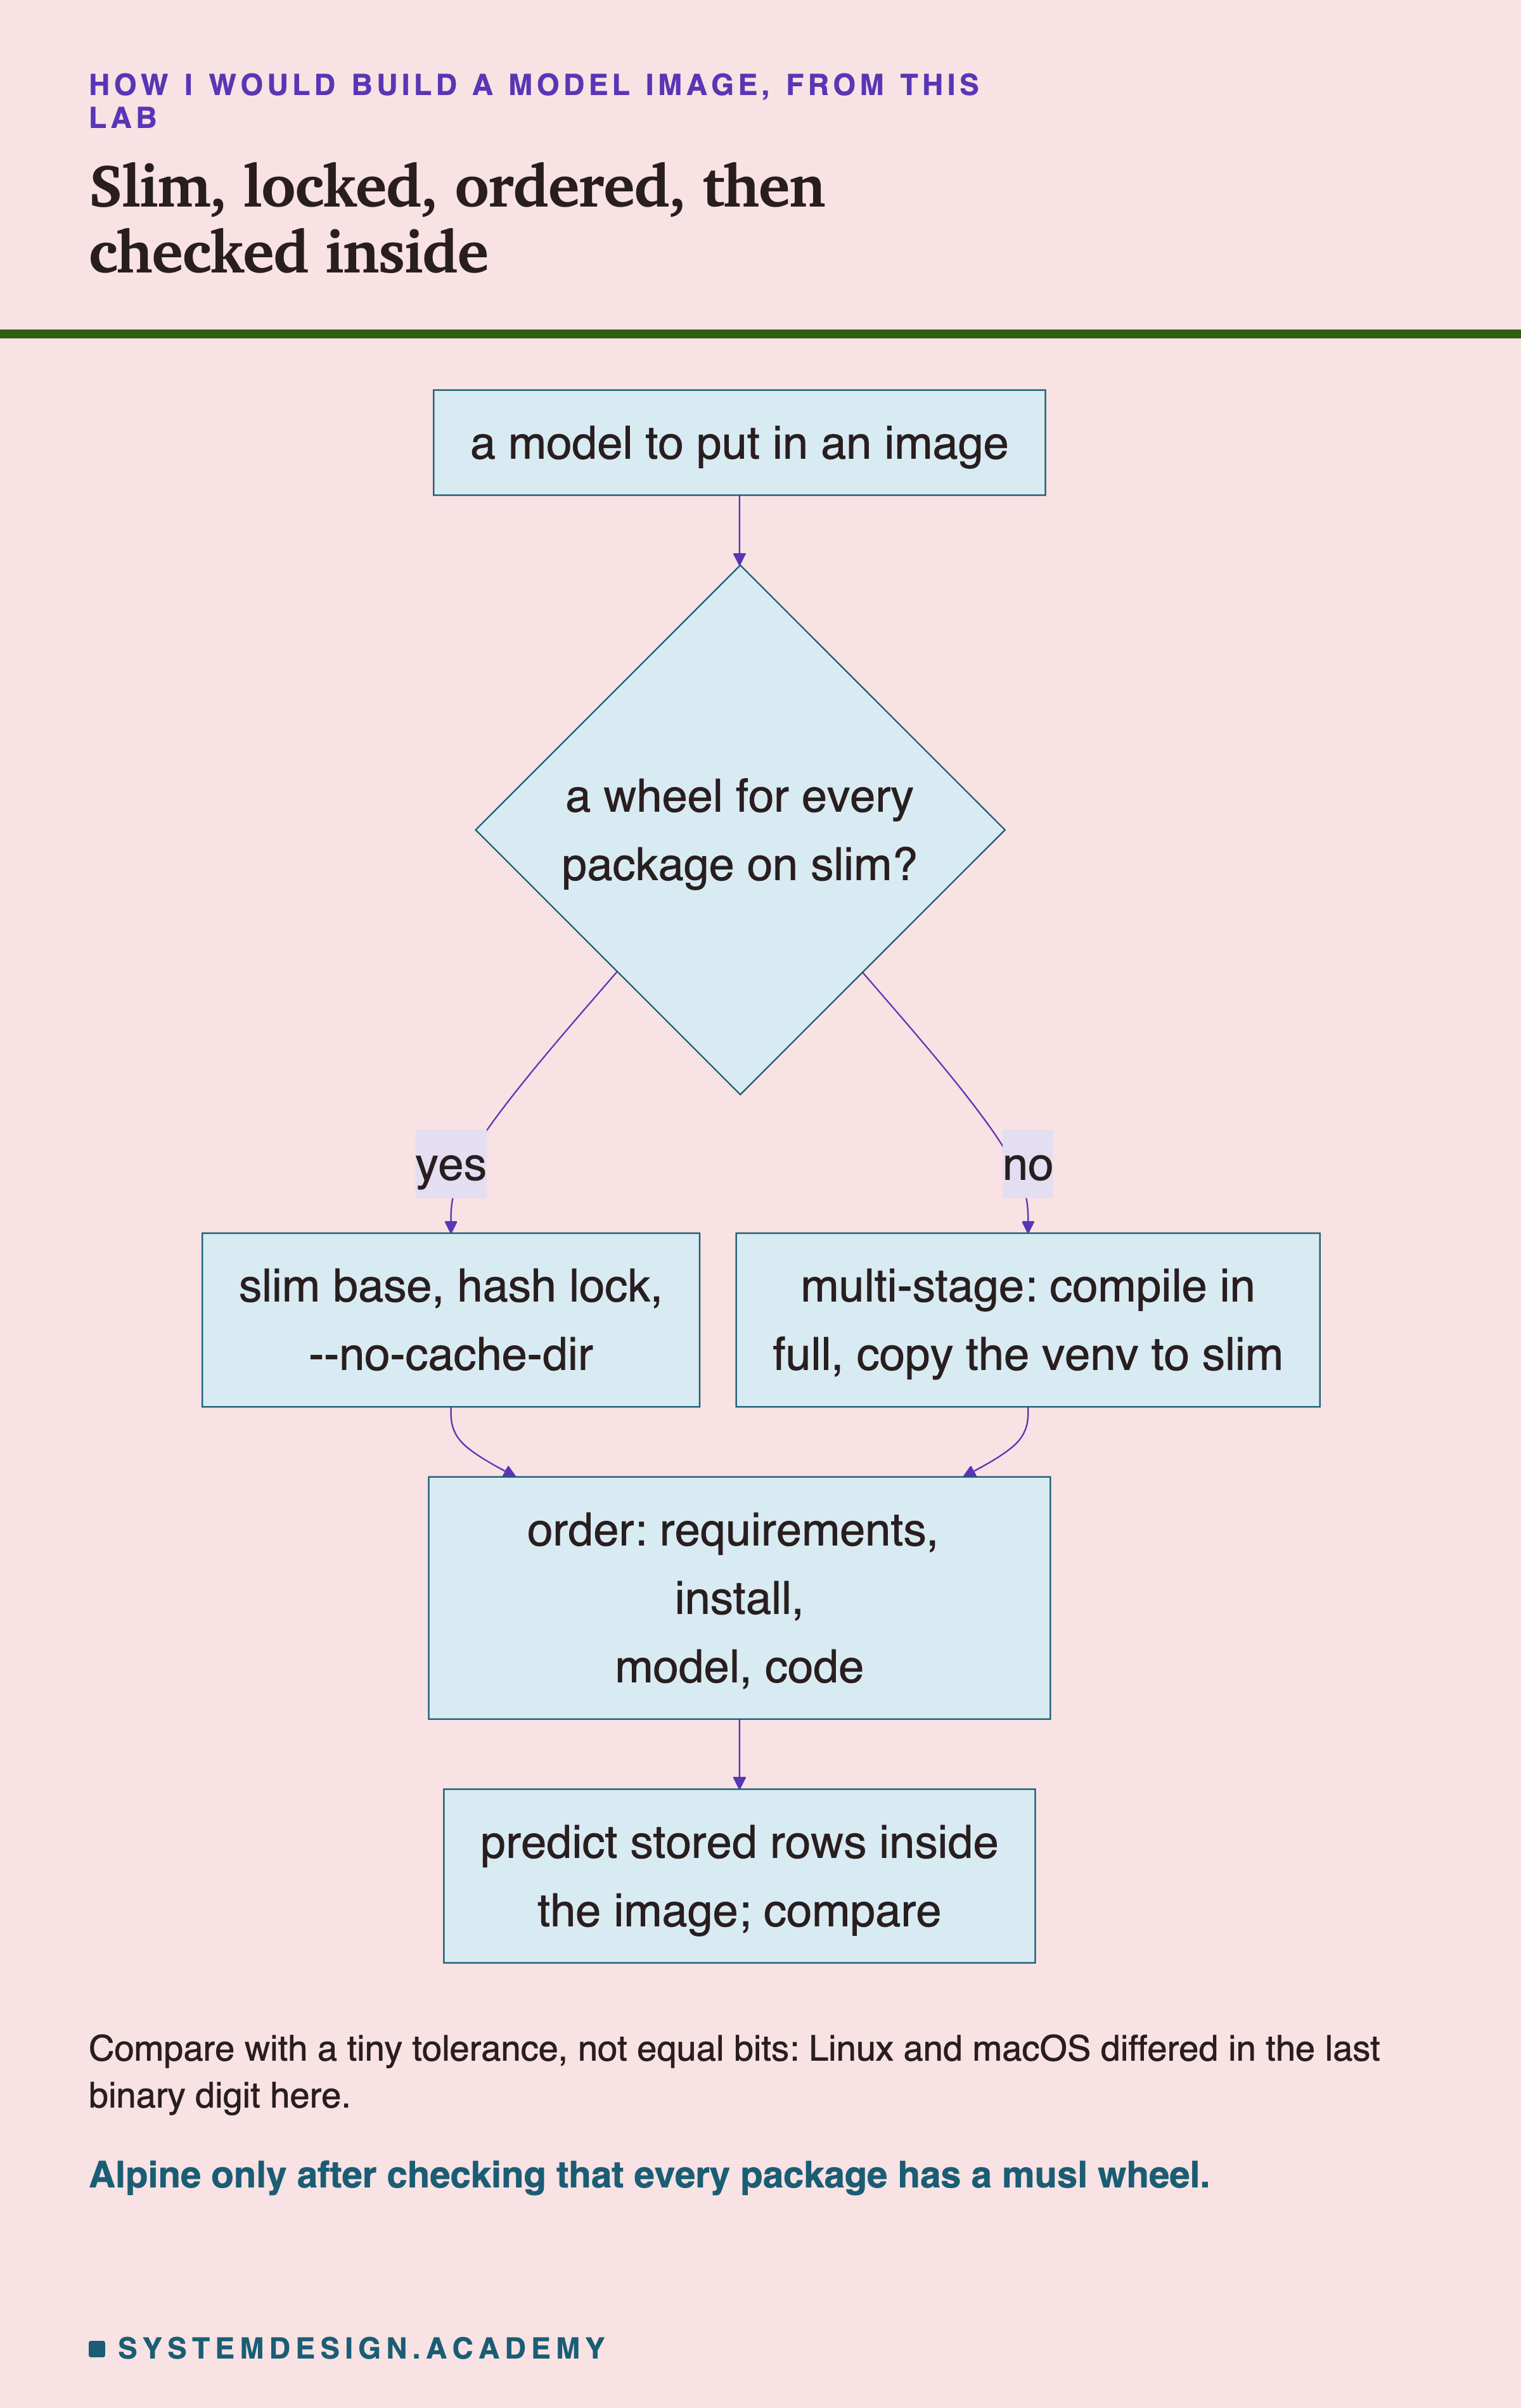
The chart starts from one question: does every package have a wheel for the slim base? Here are the same steps in words, each with the number from this lab behind it.
-
Start from slim. Here it cut the image from 1,569.1 to 521.9 MB on its own. First check that every package you need has a wheel for it; pip prints "Downloading ... .whl" for a wheel and a
.tar.gzname for source. -
Install from a lock with hashes, the exact versions that trained the model. Lesson 4 of this chapter shows how to make one.
-
Add
--no-cache-dir. It saved 61.1 MB here and costs nothing in an image that only predicts. -
Order the lines from what changes least to what changes most: requirements, install, model, code. Never
COPY . .beforepip install. -
Use a multi-stage build only when something must compile. Here every package was a wheel, and the multi-stage image was 3.3 MB bigger. Copying a venv across works only under two conditions. Both stages must have the same Python at the same path. And the compiled packages must need no system library that slim lacks. Here both stages used Python 3.13.15 in .
When to Slim, and When Not To
Use slim for a model that only predicts, when every package has a wheel. Here it gave the same predictions as the full image, to the bit, at a third of the size.
Use the full image while you are still building and testing, or when a package must compile and you do not want a multi-stage Dockerfile yet. The python image's own description recommends the default image when you are unsure. A smaller image that fails to build helps nobody.
Do not choose alpine for scientific Python without checking first. Here the smallest base did not build at all, because one package had no musl wheel. It may work for a different set of packages, or in another release.
Do not expect a multi-stage build to shrink every image. It removes what the build stage needed and the final stage does not. When nothing is compiled, there is little to remove.
Do not judge an image by one size number. The same image was 126.6 MB to download and 460.8 MB unpacked. The download decides how long a new server waits to start, minus any layers it already has. The disk a server needs is closer to both added together, because the containerd store keeps the compressed layers and the unpacked files.
Do not test containers for bit-equal predictions against a laptop. Here the base did not change a single bit, but the move from macOS to Linux changed the last digit of 33 numbers.
What This Lab Cannot Tell You
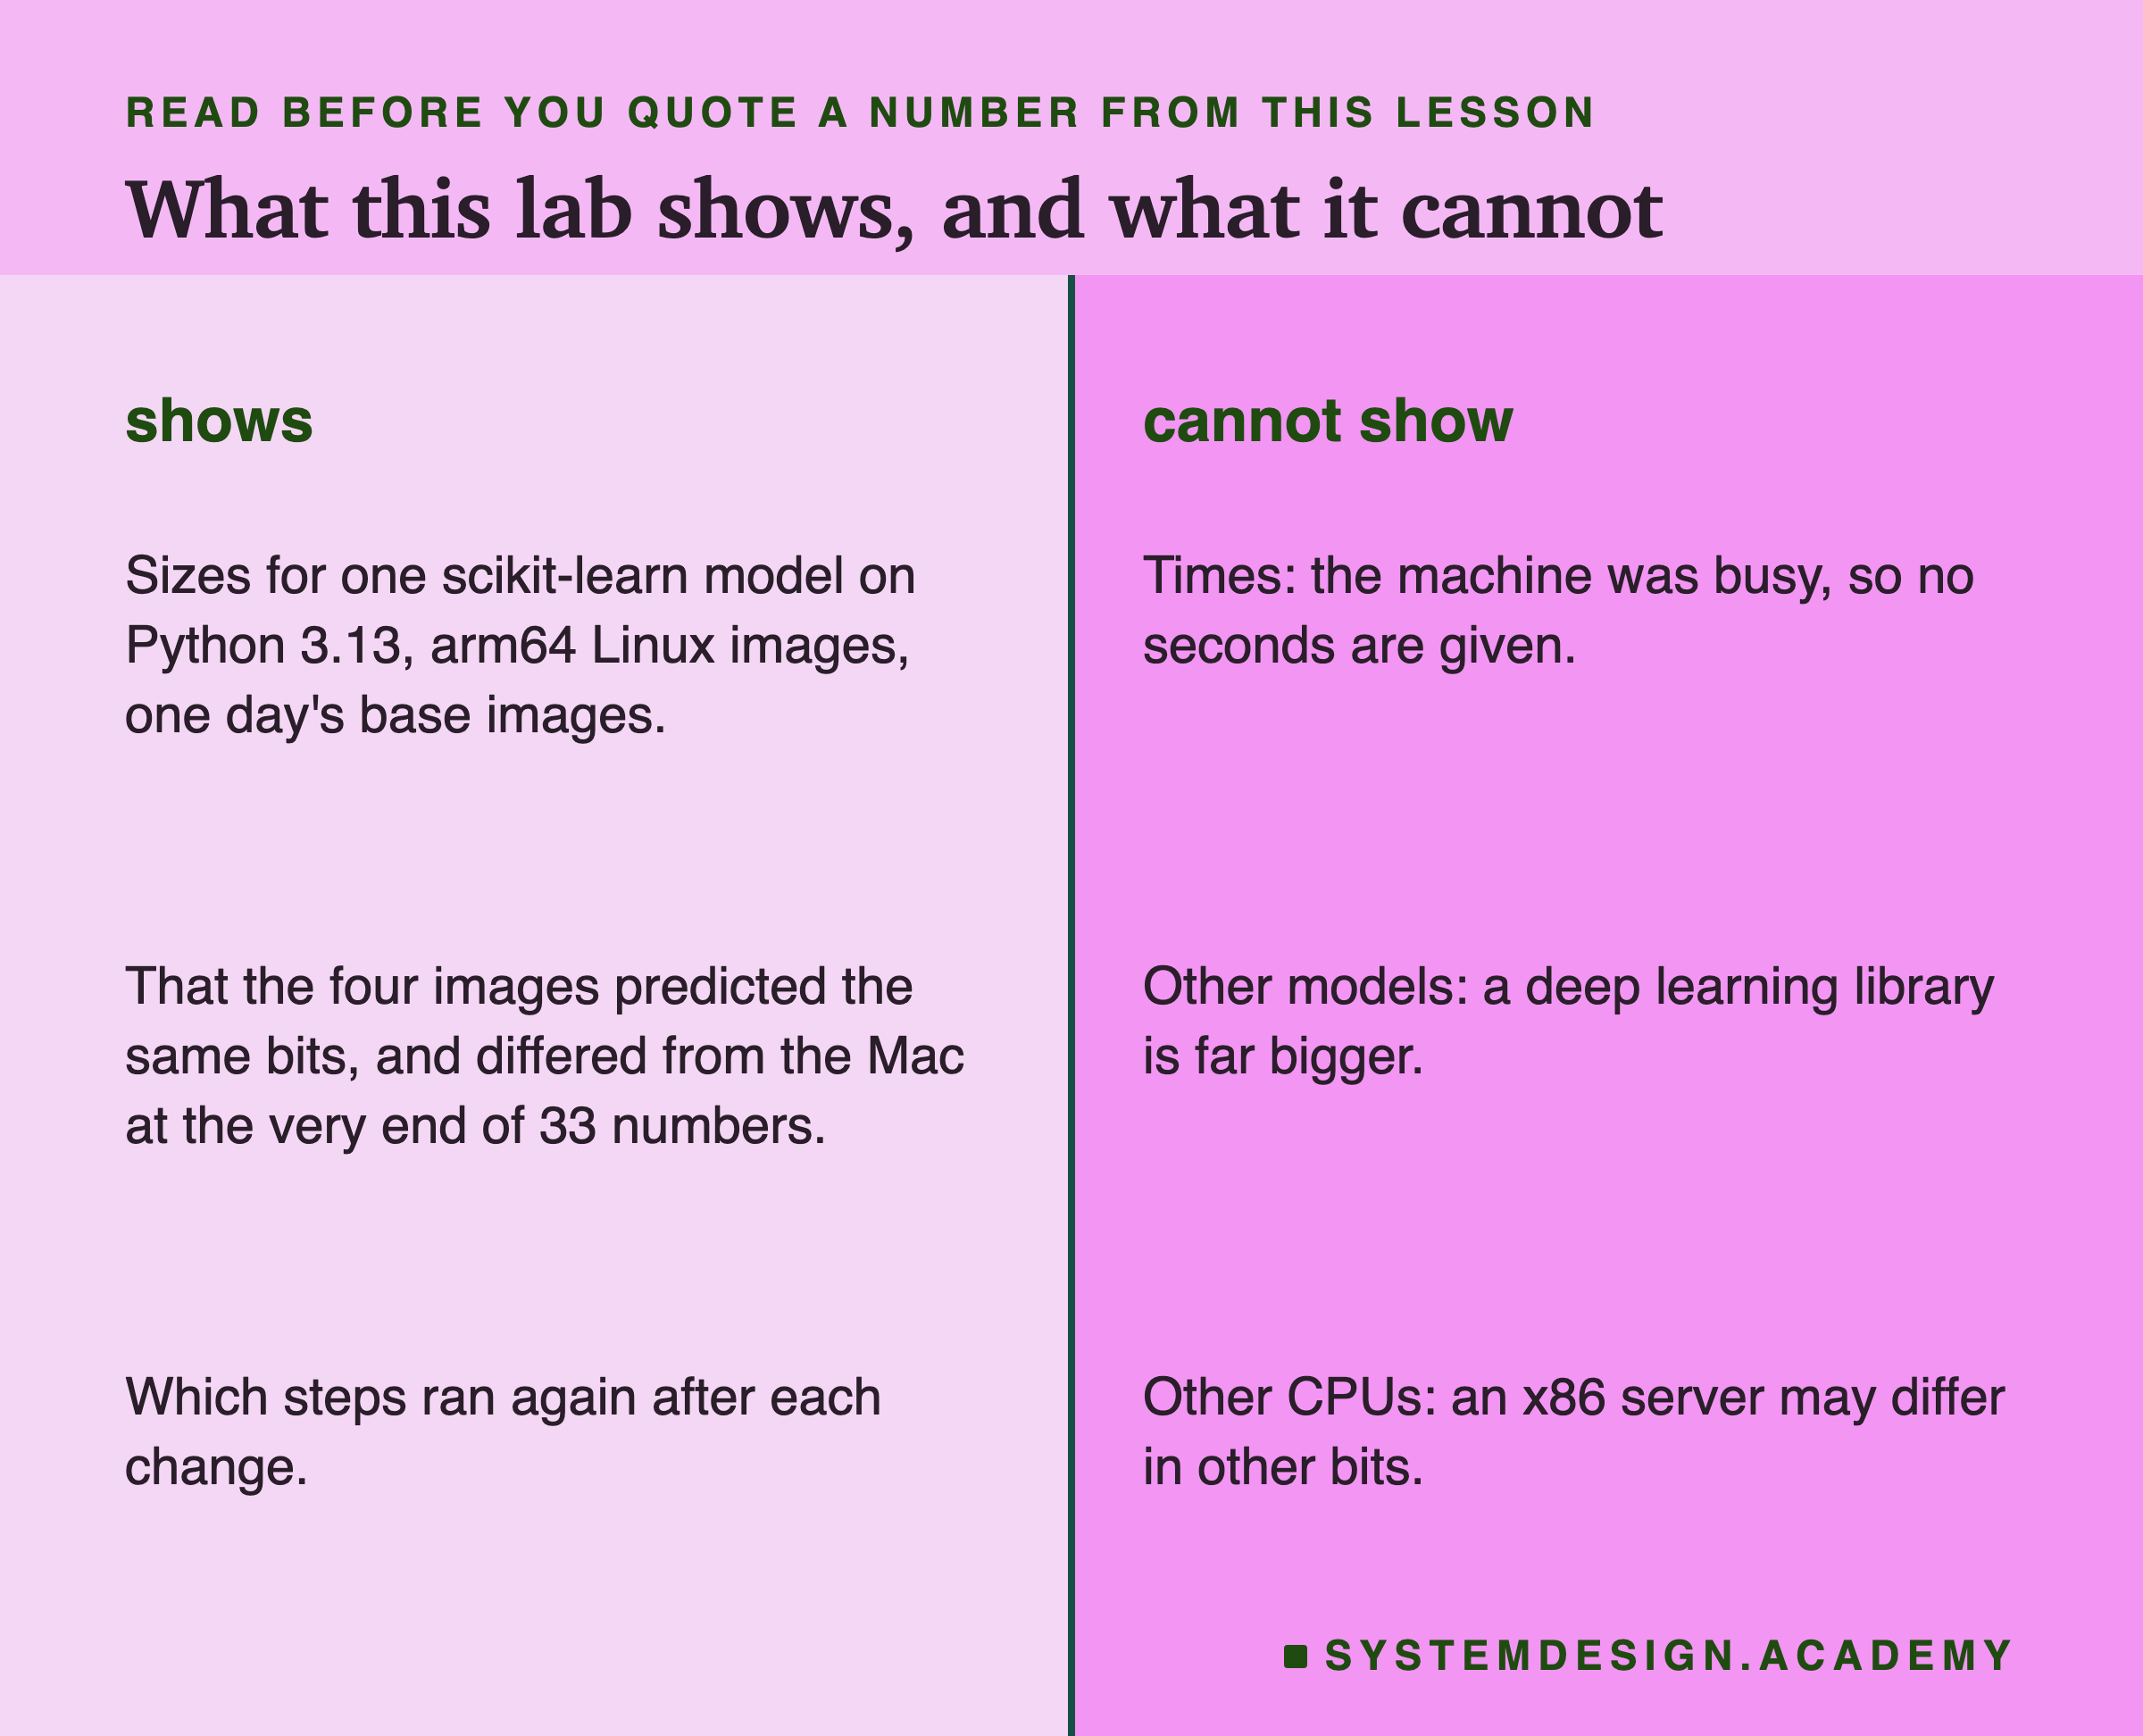
One model, one set of libraries. Every size here is for scikit-learn 1.9.1 with numpy and scipy. A model that needs a deep learning library would be a different story, and I did not build one.
One day's base images, on one Mac. The base images were pinned by digest on 1 October 2026, and they were arm64 Linux images, because this Mac has an Apple processor. An x86 server would pull other images with other sizes. Its maths libraries could differ in other last digits, or in none.
No timings. The laptop's load average went as high as 24.01 during the builds, because other work was running. So I report which steps ran, never how long they took.
One kind of change each. The code change was one extra line, and the requirements change was one comment line. A real upgrade would change the installed packages too. The cache rule would be the same, but I did not measure the sizes after such a change.
Alpine was not pushed further. I did not add a compiler, so I cannot say how big a working alpine image would be.
Labelled additions. Five questions were asked after the main results. They are whether the images agree with each other, where the last-digit difference enters, and whether it moved the ranking or a decision. The other two are which wheels PyPI lists for musl, and which tools each base holds. All are labelled in the lab, the report and here.
What to Do on Monday
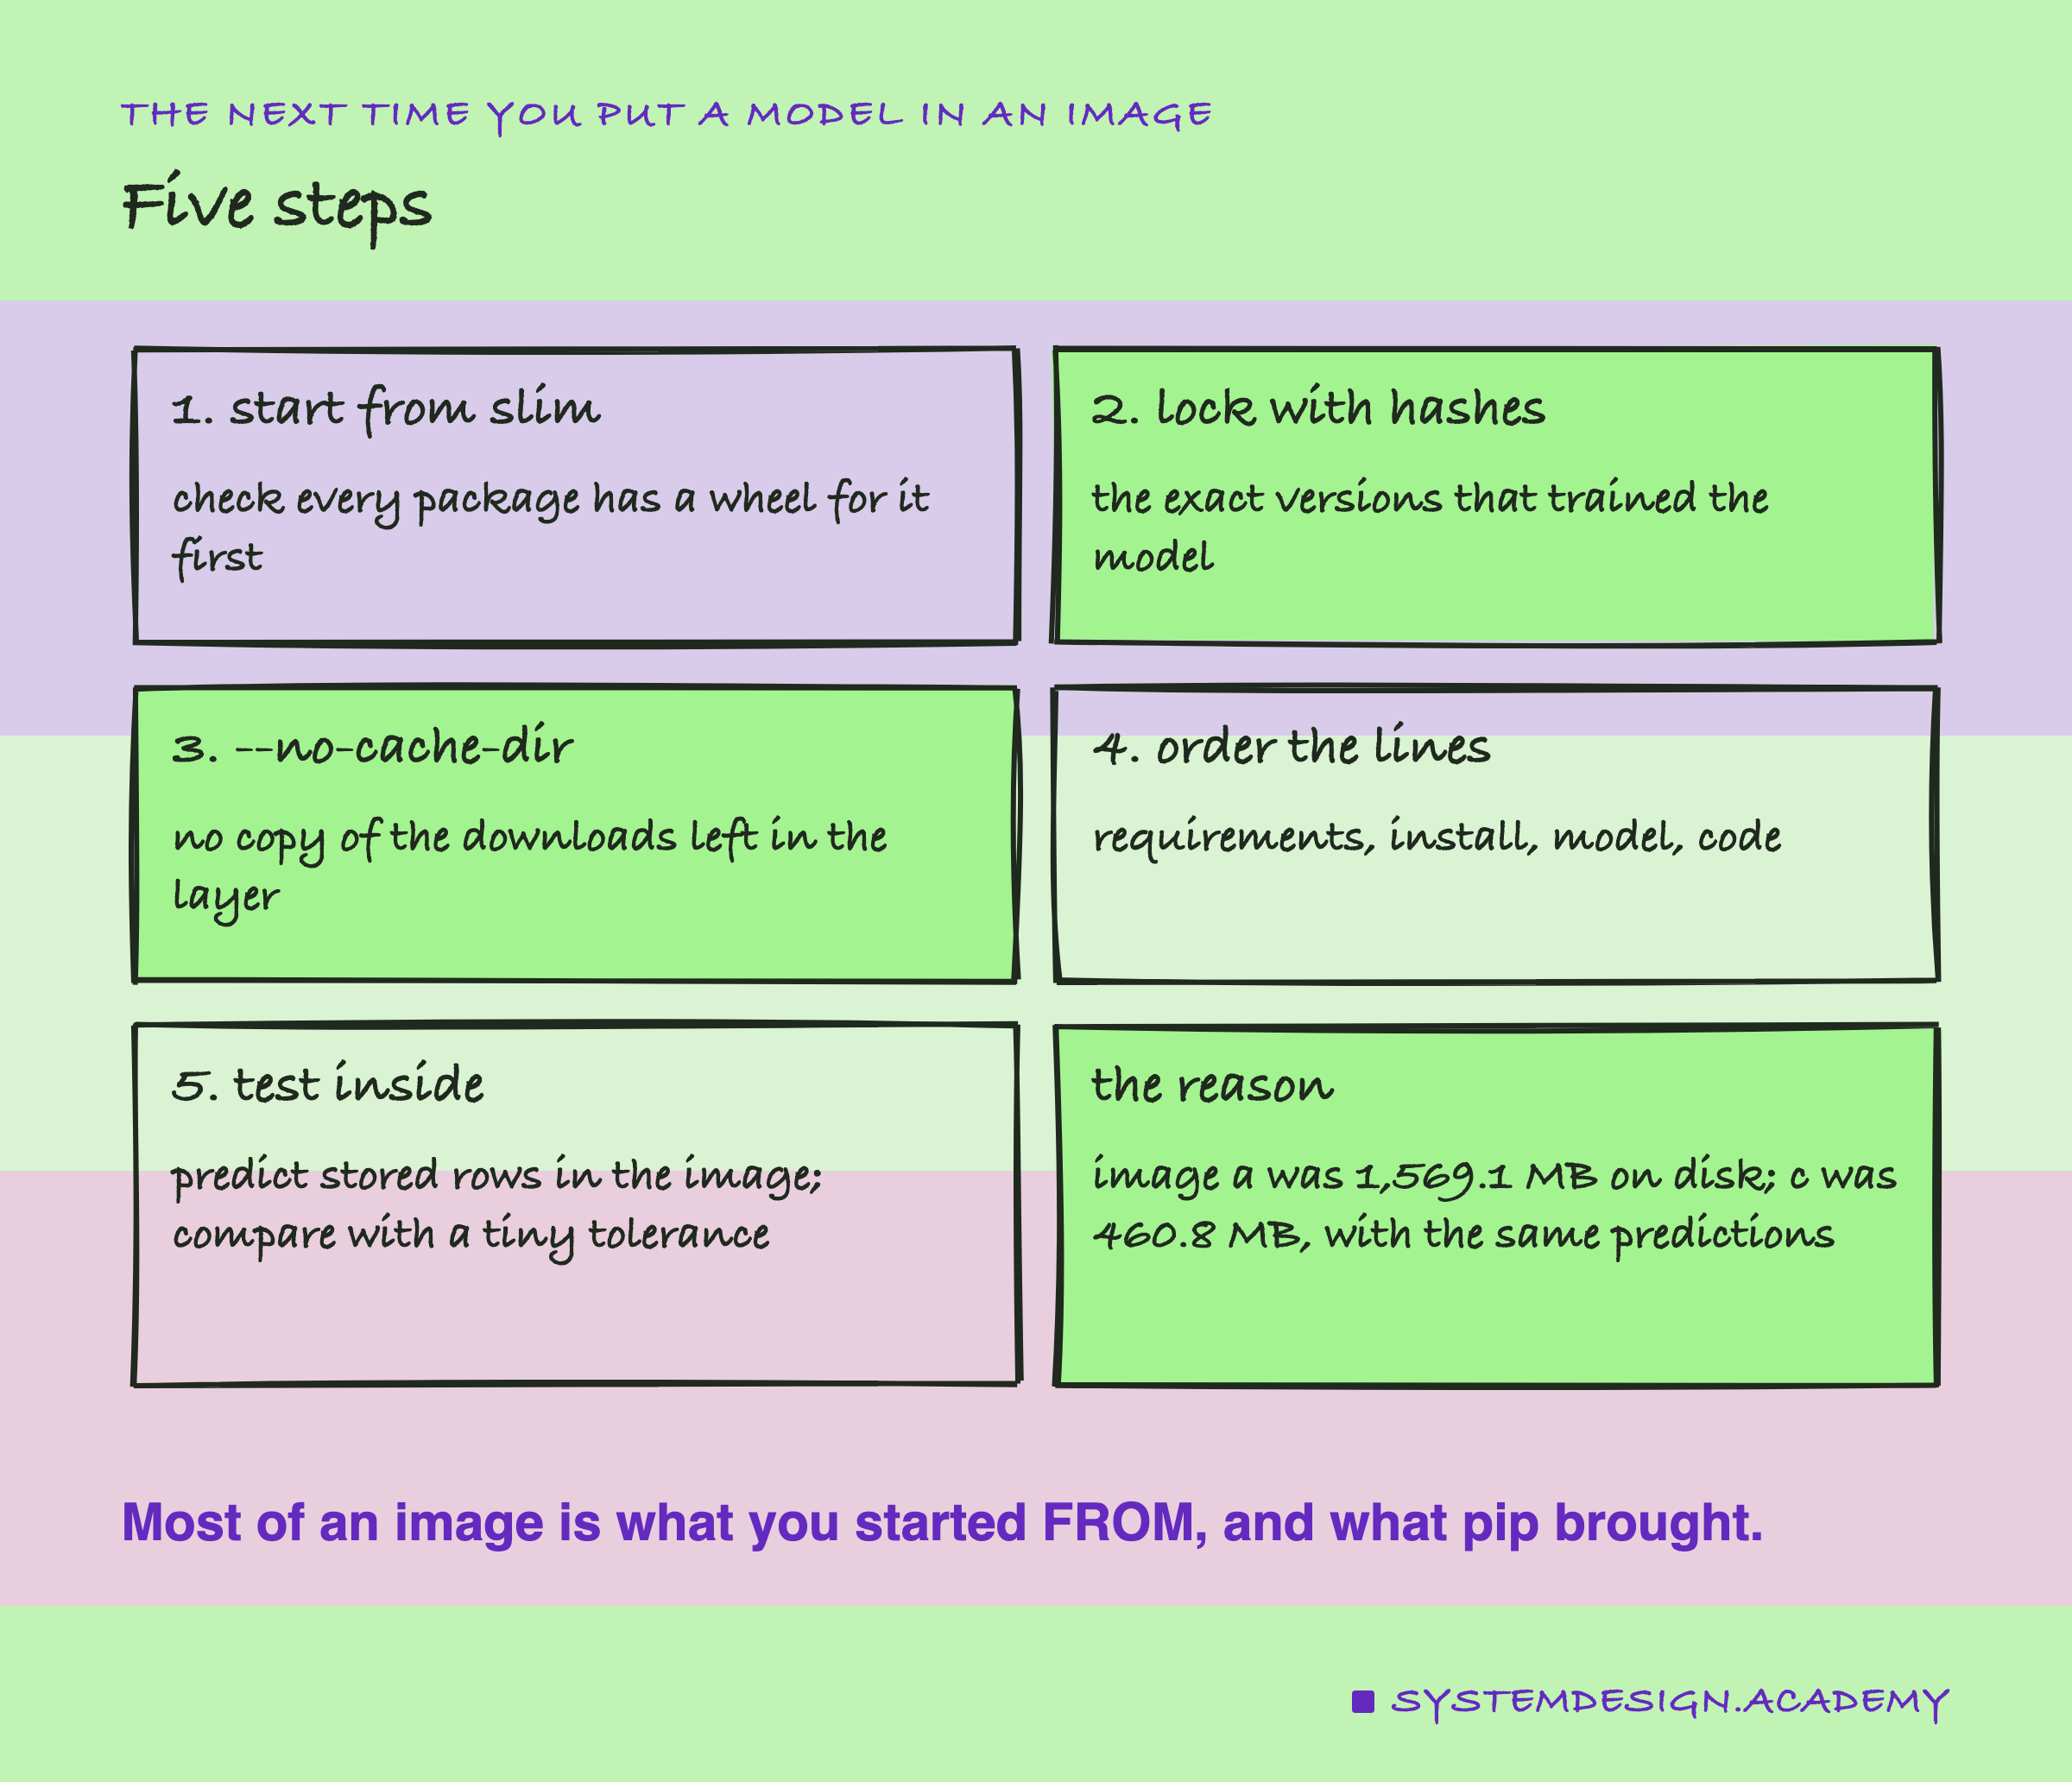
If you take one thing to work on Monday, open the Dockerfile that serves your model and read its first line. If it says FROM python:3.x with no -slim, build a slim version beside it and compare the two with docker history. Look at which layer is the biggest. In my lab it was the base, then pip install, and the model itself was close to nothing.
Then look at the order of the lines. If COPY . . comes before pip install, move the code copy to the end. Every rebuild after a code change will then reuse the library layer instead of installing everything again.
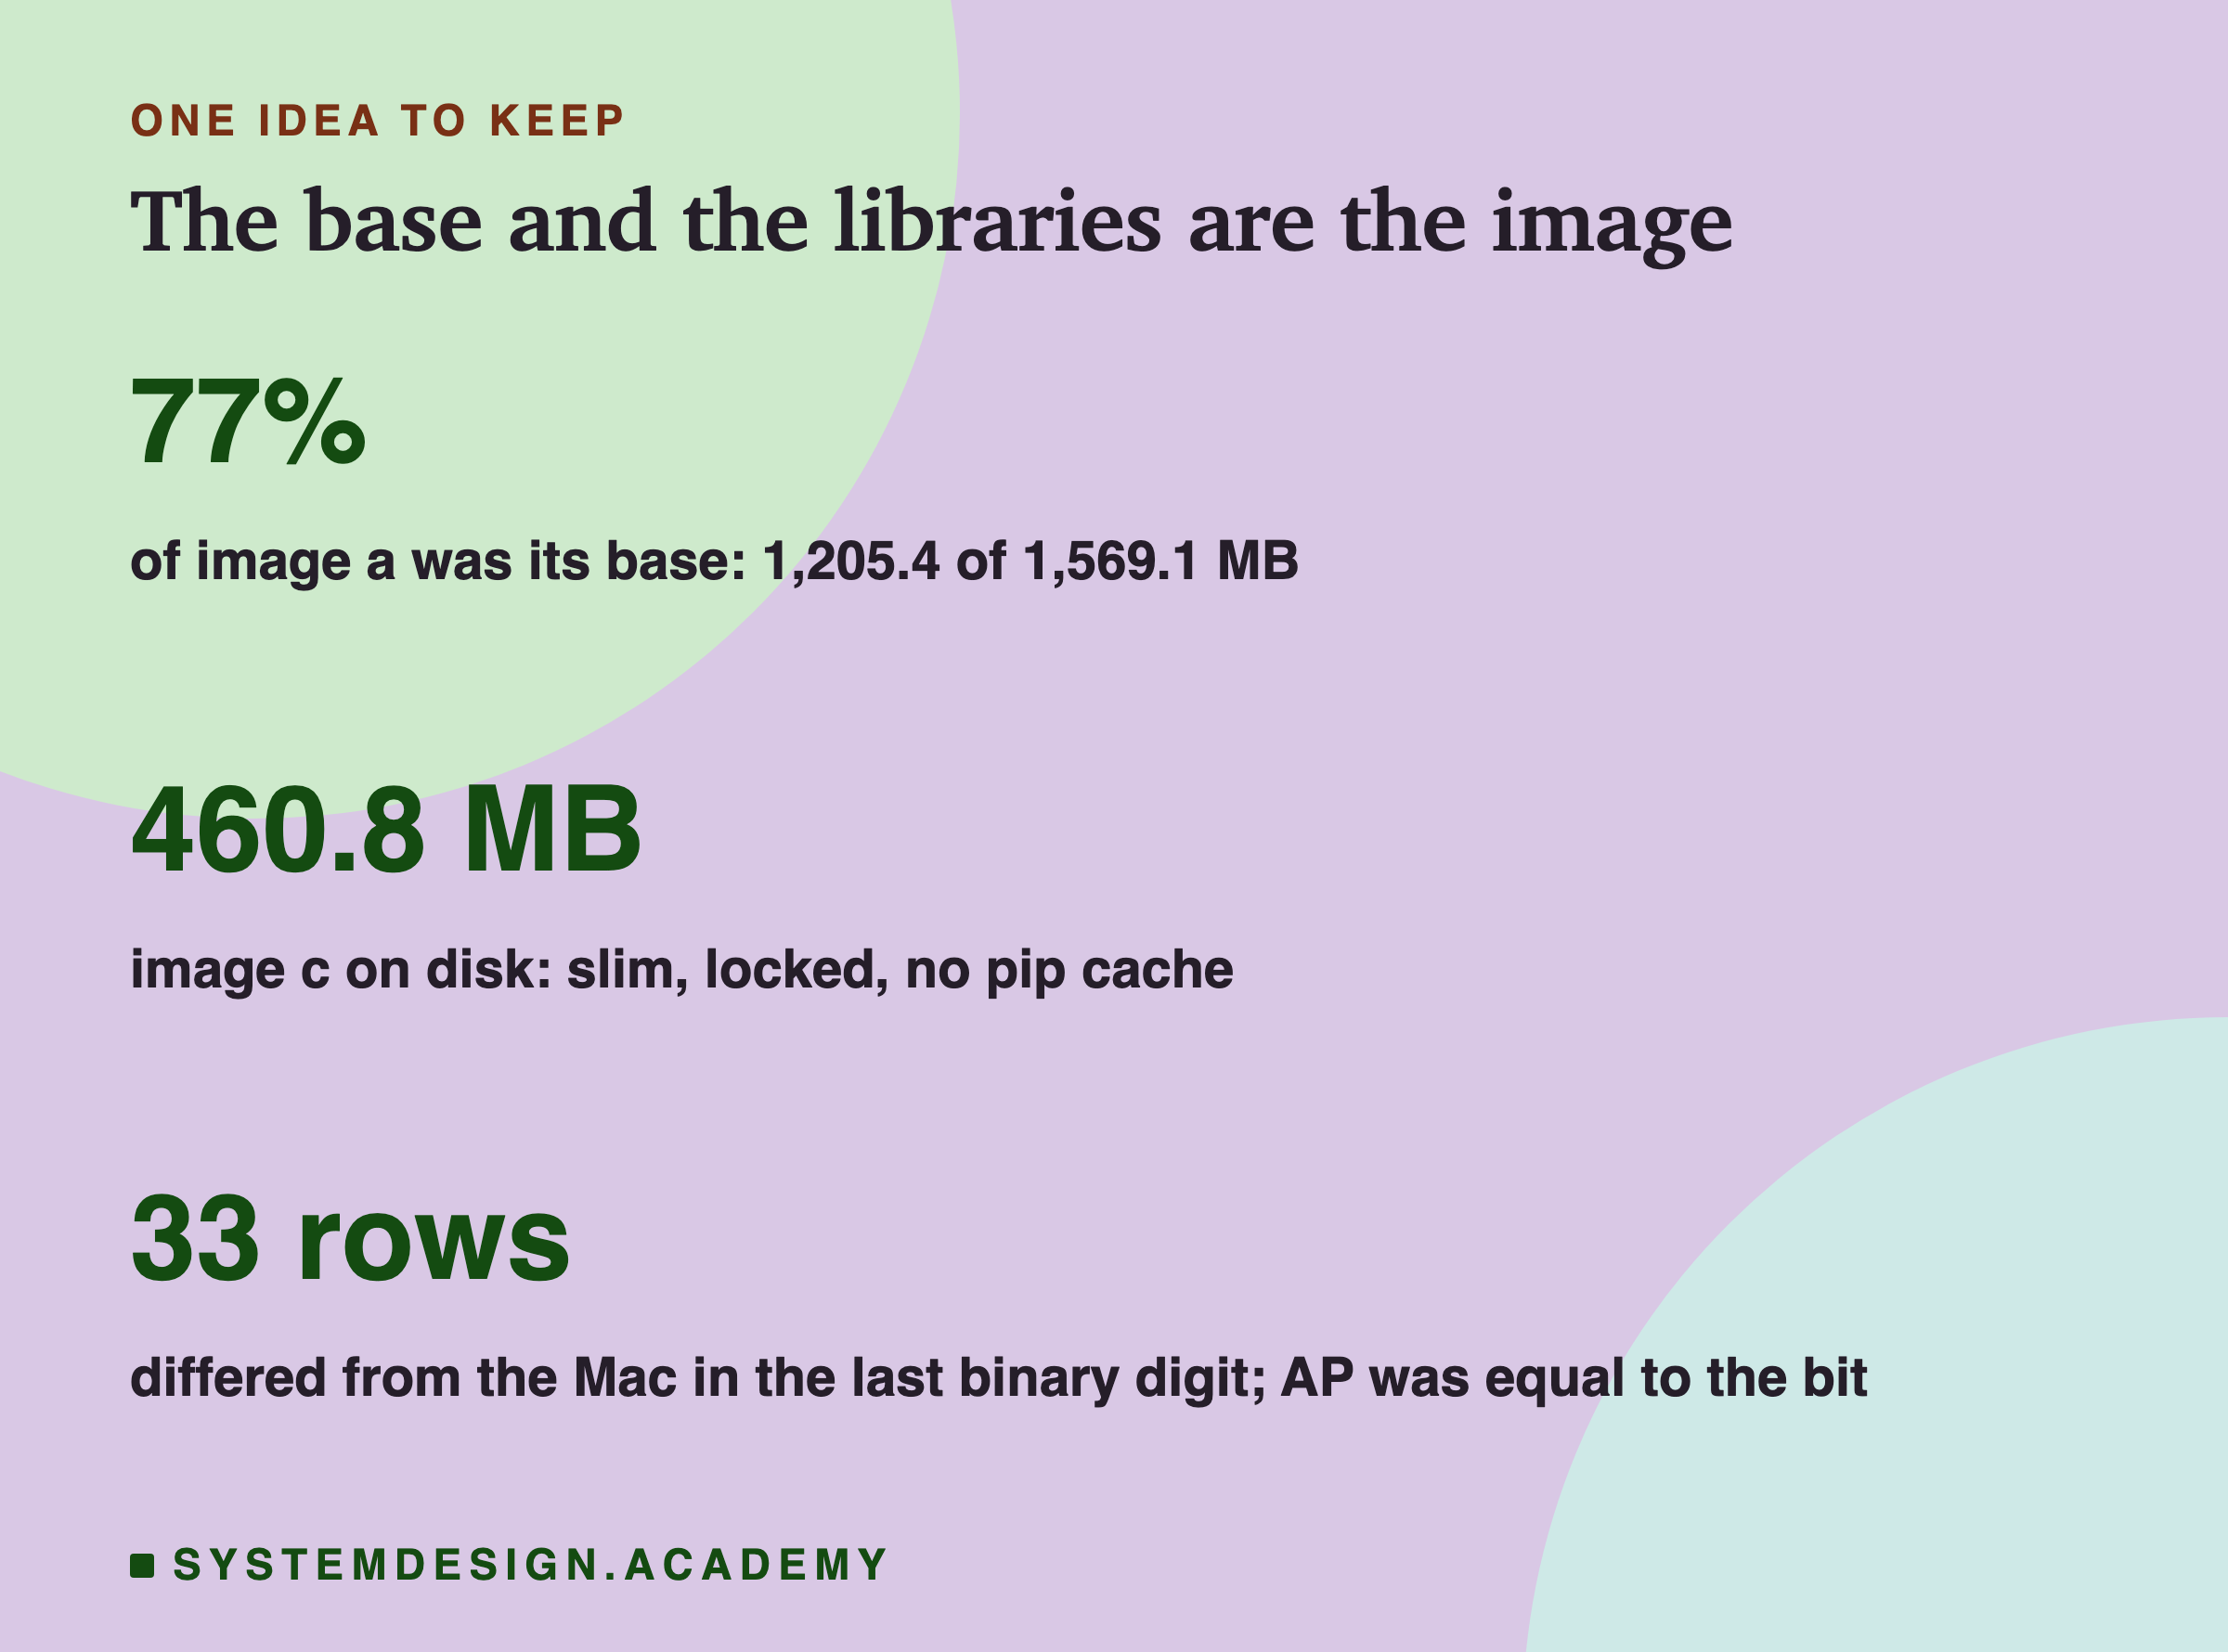
The one idea to keep: a model's image is mostly not the model. Here it was the base image first and the libraries second, and the model was 0.2 MB. Slimming the base, turning off pip's cache and ordering the lines made the image smaller and the rebuilds cheaper, and none of it changed a single predicted bit. What did change the last digit was moving from macOS to Linux, so test inside the image, with a tolerance.
Knowledge Check
Knowledge Check
4 questions - Score 80% to pass
Image a used the full python:3.13 base and was 1,569.1 MB on disk. What was most of that size?
The multi-stage image d was 464.2 MB, and image c was 460.8 MB. Why did multi-stage not help here?
In image c2, the Dockerfile ran COPY . . before pip install. What happened after a one-line code change?
All four images gave predictions that differed from the Mac's on 33 rows. What did the lesson find?