Contents Start here
Start here
Before you start: what you should already know, and a one-screen setup checklist
The Python, terminal and Git basics this course assumes, and the four tools to install before the first agent.
Free page Download this page’s code zip
About 30 minutes to read, and about 25 minutes for the hands-on lab.
AIOps on AWS, Start here.
Download the page files: lesson-before.zip. It holds START-HERE.md, which is the setup checklist on one screen with every check command and its expected output, our answer to the self-check (lab/above_100.py), the page's diagrams as PNG files (figures/), and this whole page as a PDF.
This course starts directly with generative AI, AI agents and LangGraph. It does not teach Python, the terminal or Git from the beginning. So this page tells you exactly what the course expects you to know already, and it gets four tools onto your computer before the first agent. At the end you run four short checks, one for each tool, and a small self-check, and each one tells you plainly whether you are ready.
After this page you will be able to:
- say whether your Python, terminal and Git skills are enough for this course, by doing a ten-minute self-check;
- say what each of the four tools is for: Python, uv, VS Code and Docker Desktop;
- install them on a Mac, or on Windows 11 with Ubuntu inside WSL2;
- check each tool with one command, and read what that command printed;
- say where your course folders should live on Windows, and why.
Time: about 30 minutes to read and check, plus the time the installers take.
Cost: nothing. This page makes no calls to a model.
The problem: a course that stops at the first command

Cooks have a name for the hour before a restaurant opens: mise en place, which means "everything in its place". Before the first order comes in, every knife is sharp, every pan is out and every vegetable is chopped. Then, during service, the cook only cooks. Nobody stops in the middle of an order to look for a knife.
A course is the same. Most people who give up on a technical course do not give up on the hard idea in chapter five. They give up on the first evening, when a command prints command not found and they cannot tell whether the problem is the course, their computer or themselves.
So this page is our mise en place. We check what you know, we install the tools, and we prove that each one works before any agent appears. When something goes wrong later in the course, you will know it is not your setup.
What you should already know
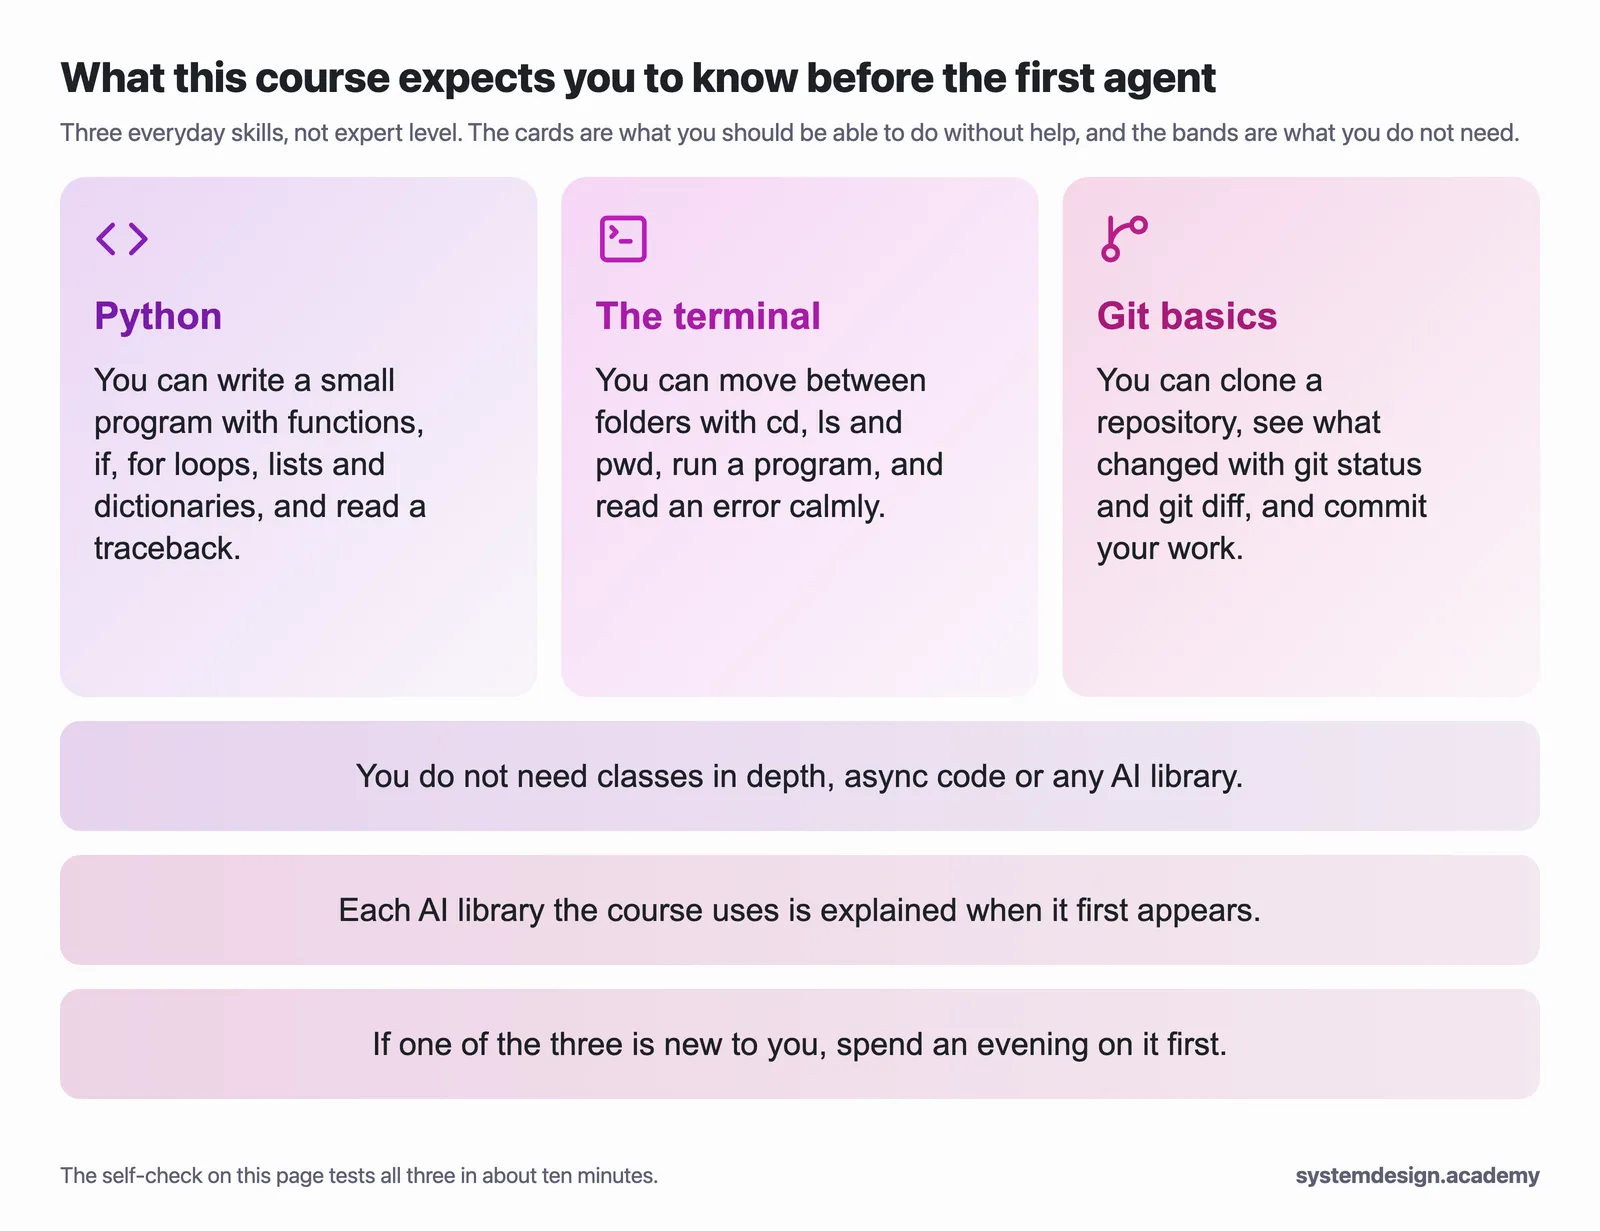
You do not need to be an expert. You need to be comfortable with three things.
Python. You can read and write a small Python program without looking everything up. In practice, that means:
- functions,
if,forloops, lists and dictionaries; - importing a library and calling it;
- reading a traceback and finding the line that failed;
- running a script from the terminal, for example
python3 app.py.
You do not need classes in depth, async code or any AI library. Every AI library the course uses is explained when it first appears.
The terminal. You can open a terminal, move between folders (cd, ls, pwd), run a program, and read an error message calmly instead of closing the window. On Windows, the course runs in Ubuntu inside WSL2, so every command is the same as on a Mac. The section "Installing the tools on a Mac or on Windows 11" below sets that up.
Git basics. You can clone a repository, see what changed (git status, git diff), and commit your work. Branches and pull requests come up later in the course, and the idea is explained when it matters.
A quick self-check. If you can do these three things without help, you are ready:
- Write a Python function that takes a list of numbers and returns only the ones above 100.
- In the terminal, make a folder, go into it, create a file and run it with Python.
- Make that folder a Git repository and commit the file.
Try them once the tools are installed. Step 5 of the hands-on below shows how we did them, with our real output, so you can compare. If one of them is new to you, spend an evening on it first. Python's own tutorial, https://docs.python.org/3/tutorial/, and the first two chapters of the Git book, https://git-scm.com/book/en/v2, cover everything this course assumes.
The four tools, and what each one is for
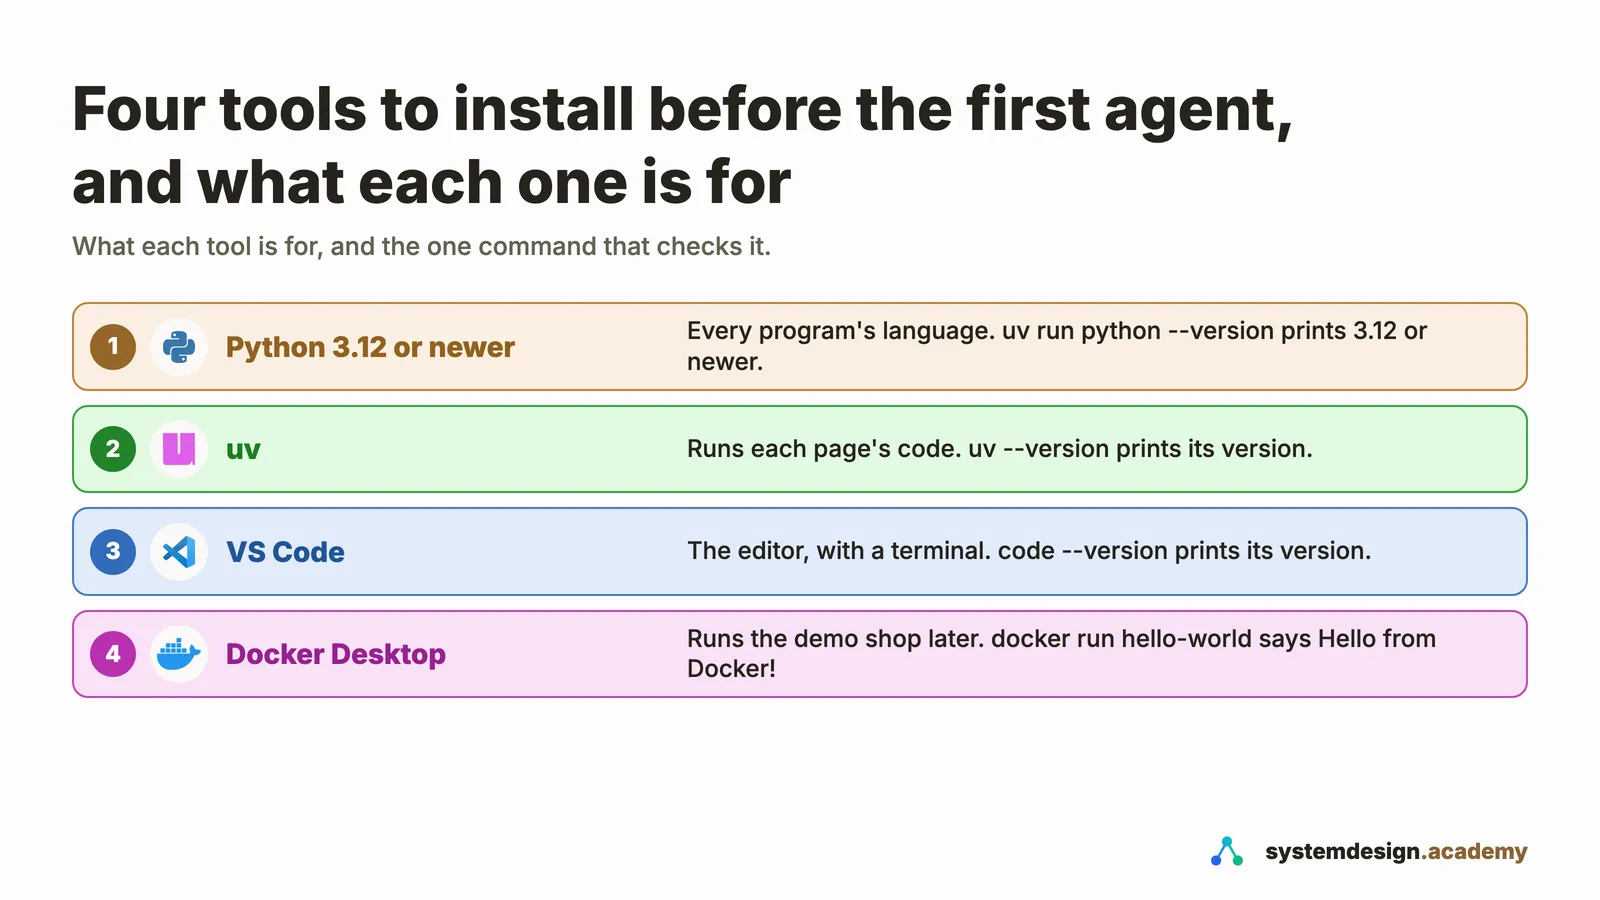
Every page of the course uses the same four tools.
| Tool | What it is for | Check it with |
|---|---|---|
| Python 3.12 or newer | the language of every program in the course | uv run python --version |
| uv | runs each page's code with the right Python and the right libraries, with no manual setup | uv --version |
| VS Code | the editor where you read and change the code, with a terminal built in | code --version |
| Docker Desktop | runs the demo shop, a small online shop on Kubernetes that the agents look after, from the part "One DevOps agent, done safely and measured" onwards | docker run hello-world |
You do not install Python yourself. uv is a tool that downloads a Python version for you and keeps it separate from anything else on your computer. When a page says uv run first_call.py, uv reads which Python and which libraries that page's code needs, sets them up in a hidden folder the first time, and runs the program. That is why every page can say "run this", and it works the same on every machine.
Installing the tools on a Mac or on Windows 11
The tools are the same on both. The difference is where they live. On a Mac, everything runs in the Mac's own terminal. On Windows, the course runs in Ubuntu, a version of Linux, inside WSL2, the Windows Subsystem for Linux. Microsoft describes WSL as a way to "use Linux applications, utilities, and Bash command-line tools directly on Windows". Because the course commands then run on Linux, they are exactly the Mac commands, and you never need a separate Windows version of a step.
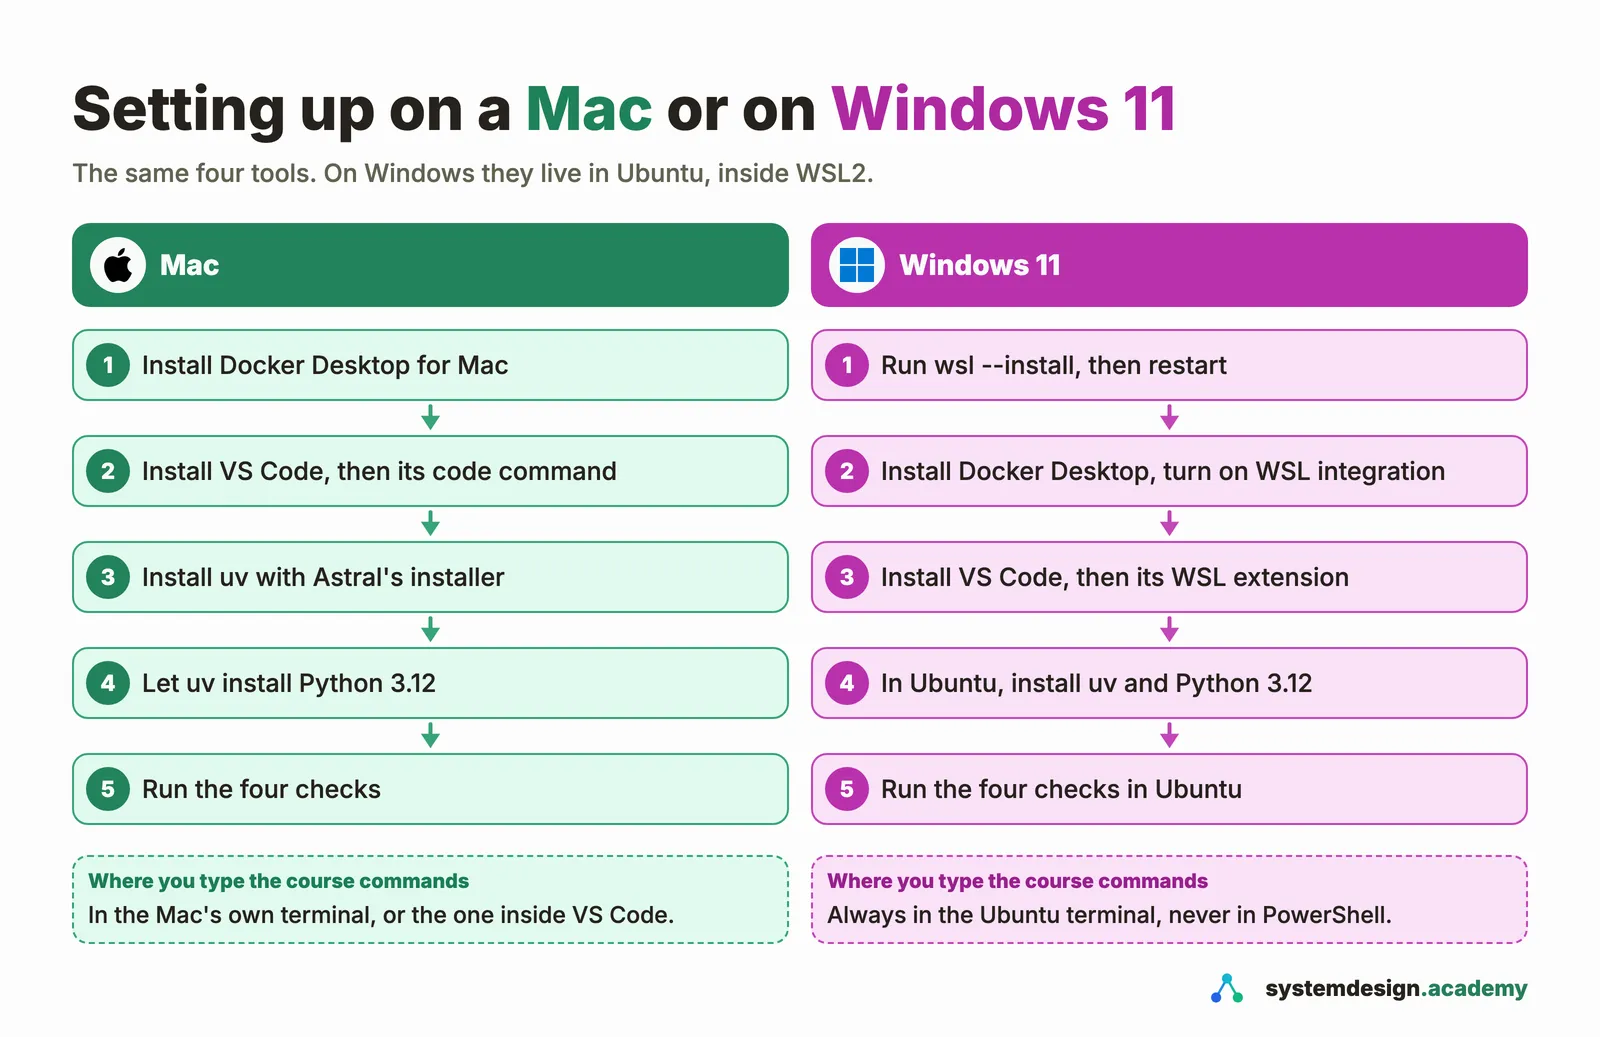
On a Mac
To open a terminal on a Mac, press Cmd+Space, type Terminal, and press Enter.
- Install Docker Desktop for Mac from https://docs.docker.com/desktop/setup/install/mac-install/. Pick the download for your Mac's processor: in the Apple menu, About This Mac shows a Chip line (Apple silicon, such as Apple M1) or a Processor line (Intel). Open Docker Desktop once after installing. It shows Docker's Subscription Service Agreement, and Docker's page says it "won't run if you do not agree to the terms". Signing in to a Docker account is not needed for this course. Docker Desktop also adds the
dockercommand to your PATH, the list of folders your terminal searches for commands, so open a new terminal after installing it. - Install VS Code from https://code.visualstudio.com/. Then add its
codecommand to your terminal: open VS Code, open the Command Palette with Cmd+Shift+P, typeshell command, and run Shell Command: Install 'code' command in PATH. (Newer versions of VS Code call it "Install 'code' and optionally 'copilot' commands in PATH"; choose to add onlycodeif it asks.) Then close the terminal and open a new one. Without this step,code --versionsays the command is not found. We saw that ourselves: in a plain terminal on our Mac, outside VS Code, it printedzsh:1: command not found: code, because nobody had run that shell command on our Mac. - Install uv with Astral's installer:
curl -LsSf https://astral.sh/uv/install.sh | sh
The installer puts uv in a folder called .local/bin in your home folder, and it adds that folder to your shell's start-up file for new terminals. For the terminal you already have open, run the line the installer prints at the end:
source $HOME/.local/bin/env
- Let uv download Python 3.12:
uv python install 3.12
- Run the four checks in the hands-on below.
If you already installed uv another way, for example with Homebrew, that is fine. Our Mac's uv came from Homebrew, as the check below shows.
On Windows 11
We could not run these steps ourselves, because our machine is a Mac. So we checked every step against today's official pages from Microsoft, Docker, VS Code and Astral, which we saved on 12 November 2026 (they are listed under "Sources"). We also ran the Linux part, the uv and Python steps, for real in an Ubuntu 24.04 container on our Mac. That container is Ubuntu, but it is not WSL, so treat it as a check of the Linux commands only.
First, check two things on Docker's Windows page. Its requirements list names Windows 11 Enterprise, Pro or Education, version 23H2 or later, and Windows 11 Home is not in that list today. It also asks for hardware virtualization to be turned on in your computer's BIOS or UEFI settings, and 8 GB of system memory. The same page also says that "Windows Home or Education editions only allow you to run Linux containers", and Linux containers are all this course uses, but because Home is missing from the requirements list, read that page before you install anything on Windows 11 Home.
- WSL2 and Ubuntu. Open PowerShell as administrator (right-click it and choose "Run as administrator") and run
wsl --install. Microsoft's page says this command "will enable the features necessary to run WSL and install the Ubuntu distribution of Linux", and that new installations use WSL 2 by default. Restart your computer. When Ubuntu opens, create your Ubuntu user name and password. From then on, type every course command in the Ubuntu terminal, never in PowerShell. - Docker Desktop. Install Docker Desktop for Windows from https://docs.docker.com/desktop/setup/install/windows-install/, using the WSL 2 backend, which is the default. Then, in Docker Desktop, open Settings, Resources, WSL Integration, check that it is on for Ubuntu, and select Apply. Docker's page says WSL integration "gives you direct access to docker commands from that distribution's terminal". Docker needs WSL version 2.1.5 or later;
wsl --versionin PowerShell prints yours, andwsl --updatebrings it up to date. - VS Code. Install VS Code on Windows from https://code.visualstudio.com/. When the installer shows Select Additional Tasks, keep Add to PATH ticked: VS Code's page says this is what lets you "open a folder in WSL using the code command". Then add Microsoft's WSL extension from the Extensions view (Ctrl+Shift+X). In the Ubuntu terminal,
code .then opens the folder you are in. The first time, VS Code's page says, "you should see VS Code fetching components needed to run in WSL", which happens only once. - uv and Python. In the Ubuntu terminal, run the same three commands as on the Mac:
curl -LsSf https://astral.sh/uv/install.sh | sh, thensource $HOME/.local/bin/env, thenuv python install 3.12. In our Ubuntu 24.04 container, those three commands installed uv 0.13.7 and Python 3.12.16, anduv run python --versionprintedPython 3.12.16.
A note for people at work: Docker's terms say that commercial use of Docker Desktop in larger enterprises, which they define as more than 250 employees or more than 10 million US dollars in yearly revenue, requires a paid subscription. If you use a work laptop, check with your company first.
Where your course folders live
On a Mac there is nothing to decide: keep the course in your home folder. The pages download each zip into Downloads and unzip it there.
On Windows, there is one rule that saves you a lot of trouble. Ubuntu runs inside WSL2, a small Linux virtual machine, and it has its own disk. It can also reach your Windows files, under /mnt/c, but every file it reads there has to cross from Linux to Windows, and that is much slower. Microsoft's guide says: "For the fastest performance speed, store your files in the WSL file system if you are working in a Linux command line". So keep every course folder in your Ubuntu home folder, which is ~, not under /mnt/c.
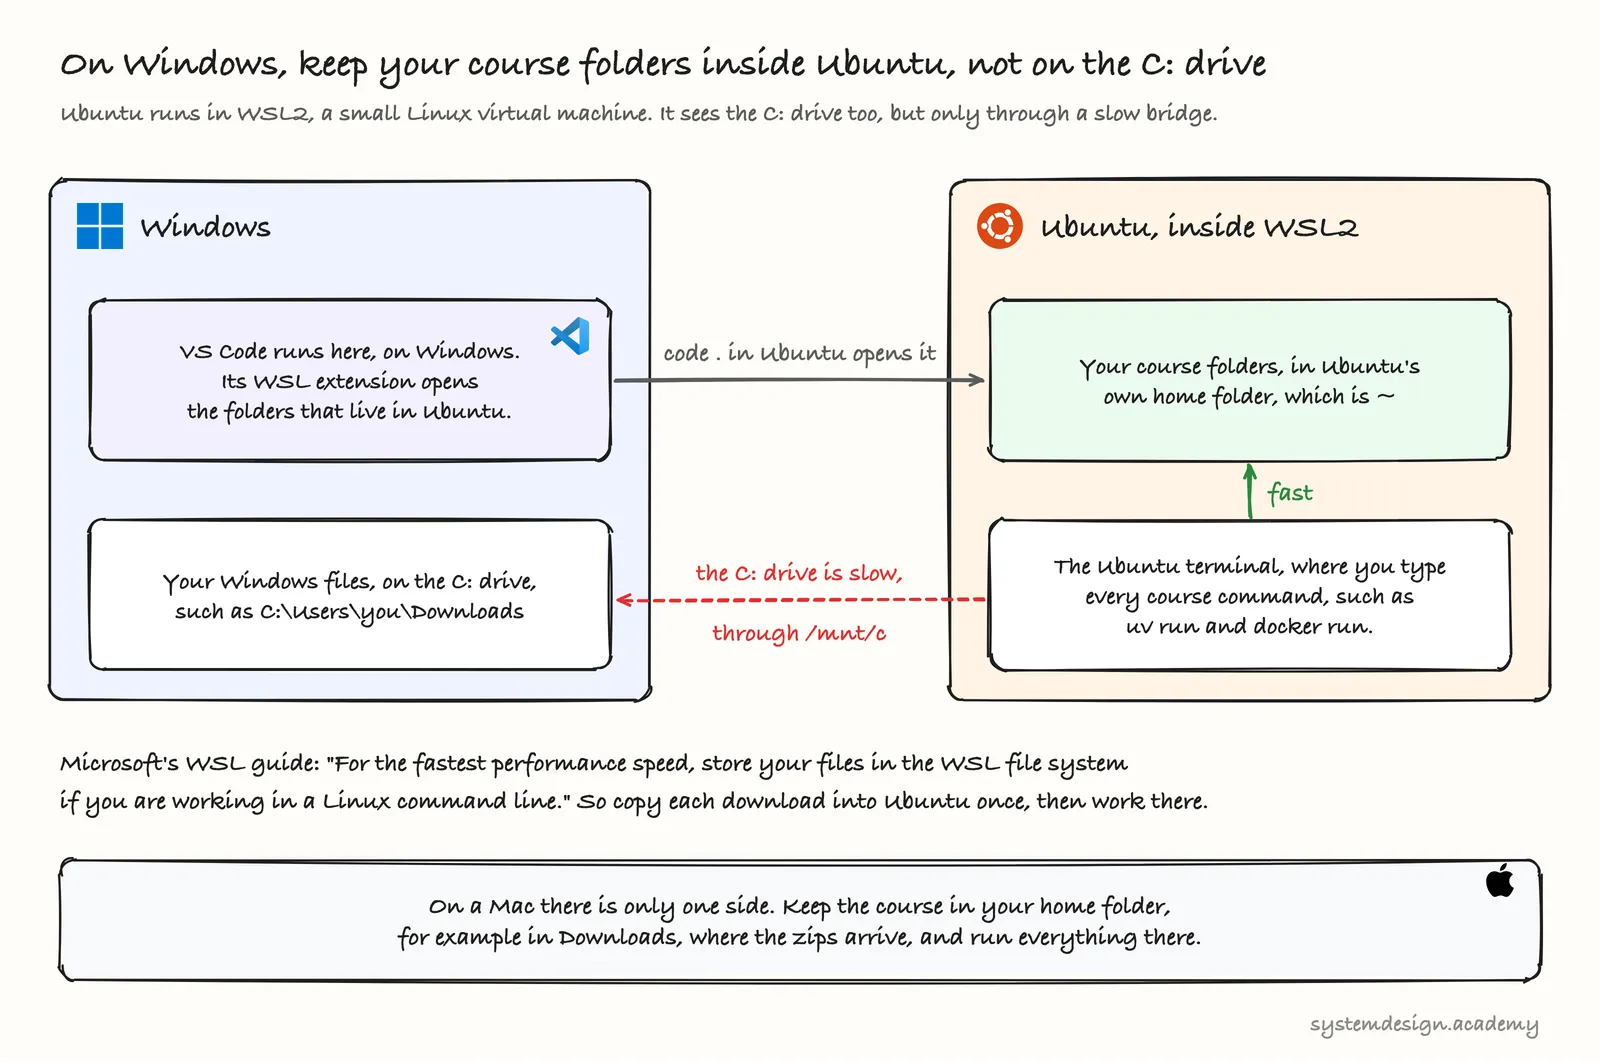
Your browser still saves each zip in your Windows Downloads folder. So every page that has a zip shows one extra command for Windows, which copies the zip into Ubuntu once. You will see it in a moment, in "Get the files ready".
Hands-on: check that every tool works
Note: How we made the outputs and pictures. You do not need to do any of this. On 12 November 2026 we unzipped this page's files into a fresh folder on our Mac,
/tmp/before-you-start/lab. Every command was run in VS Code's terminal, where a small script typed it and pressed Enter, with the prompt shortened tolab %, so no user or machine name shows; those are the terminal screenshots. The same session was recorded word for word with the standardscripttool, and the text under each command comes from that recording, with only the colour codes removed. Pictures were only cropped, never edited.
What you need
- The four tools, installed as the section above shows.
- This page's zip file, lesson-before.zip. The checks below run inside its
labfolder.
Get the files ready
These are the same steps as in START-HERE.md inside the zip. On a Mac, use the Terminal or the terminal in VS Code. On Windows, use the Ubuntu terminal. A command prints nothing unless an output is shown under it.
On a Mac, go to the folder that holds the zip:
cd ~/Downloads
On Windows, instead, copy the zip from your Windows Downloads folder into Ubuntu, replacing YOUR-WINDOWS-NAME with your Windows user name, and go to your Ubuntu home folder. If unzip is missing, install it once with sudo apt update, then sudo apt install unzip. If you are not sure of your Windows user name, ls /mnt/c/Users/ lists the folders there; it can differ from the name you sign in with.
cp /mnt/c/Users/YOUR-WINDOWS-NAME/Downloads/lesson-before.zip ~/
cd ~
Then, on both, unzip it and go into its lab folder. If your browser or Finder has already unzipped it into a lesson-before folder, skip the unzip command.
unzip -q lesson-before.zip
cd lesson-before/lab
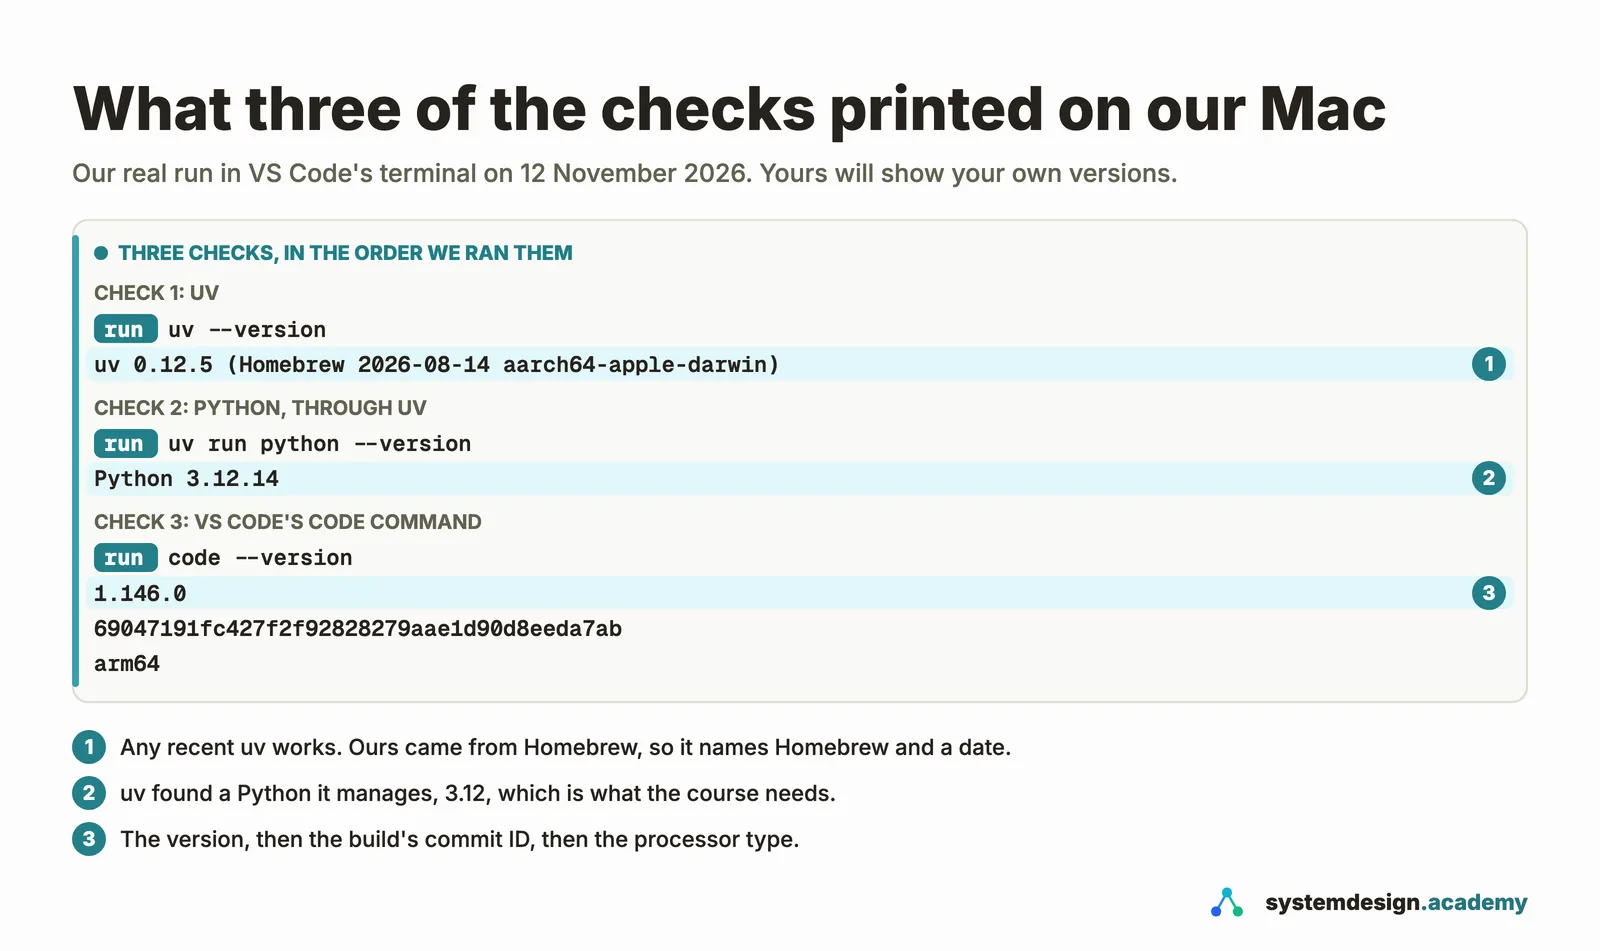
Your numbers will differ from ours below, because your tools will be newer or older versions. That is fine. What matters is that each command does what this page shows, with no error: three of them print a version, and Docker prints Hello from Docker!.
Step 1: Check uv
uv --version
uv 0.12.5 (Homebrew 2026-08-14 aarch64-apple-darwin)

The line names the uv version, and then, in parentheses, where it came from, the build date and the kind of computer it was built for: aarch64-apple-darwin means a Mac with an Apple processor. Ours came from Homebrew. With Astral's installer, the parentheses hold only the kind of computer: in our Ubuntu container it printed uv 0.13.7 (aarch64-unknown-linux-gnu). If you see command not found, run source $HOME/.local/bin/env, or open a new terminal.
Step 2: Check Python, through uv
uv run python --version
Python 3.12.14

uv run found a Python and ran it. Ours is 3.12.14, one of the Pythons uv itself downloaded. By default, uv prefers a Python it manages over one that came with your computer. Anything from 3.12 upward is fine for this course. If it prints 3.11 or older, run uv python install 3.12 and try again.
Why not simply type python3 --version? Because that asks your computer, not uv. On a fresh Mac it either offers to install Apple's command line developer tools, or, once they are installed, prints their older Python: on our Mac, /usr/bin/python3 is Python 3.9.6. On Ubuntu, the command python may not exist at all. Every program in the course runs through uv run, so this is the check that matters.
Step 3: Check VS Code's code command
code --version
1.146.0
69047191fc427f2f92828279aae1d90d8eeda7ab
arm64

Three lines: the version, the ID of the exact build, and the kind of processor. One note about our output: we take every picture in this course with a copy of VS Code that runs in a web browser on our Mac, and its terminal has its own code command. So 1.146.0 is the version of that browser copy. The normal VS Code app on the same Mac is version 1.139.0. Your first line will be your own version. If it says the command is not found on a Mac, run the shell command from the setup step above and open a new terminal. In Ubuntu, VS Code's page gives two reasons: the terminal needs restarting, or Add to PATH was not ticked when VS Code was installed on Windows; run the installer again with it ticked, then open a new Ubuntu terminal.
Step 4: Check Docker
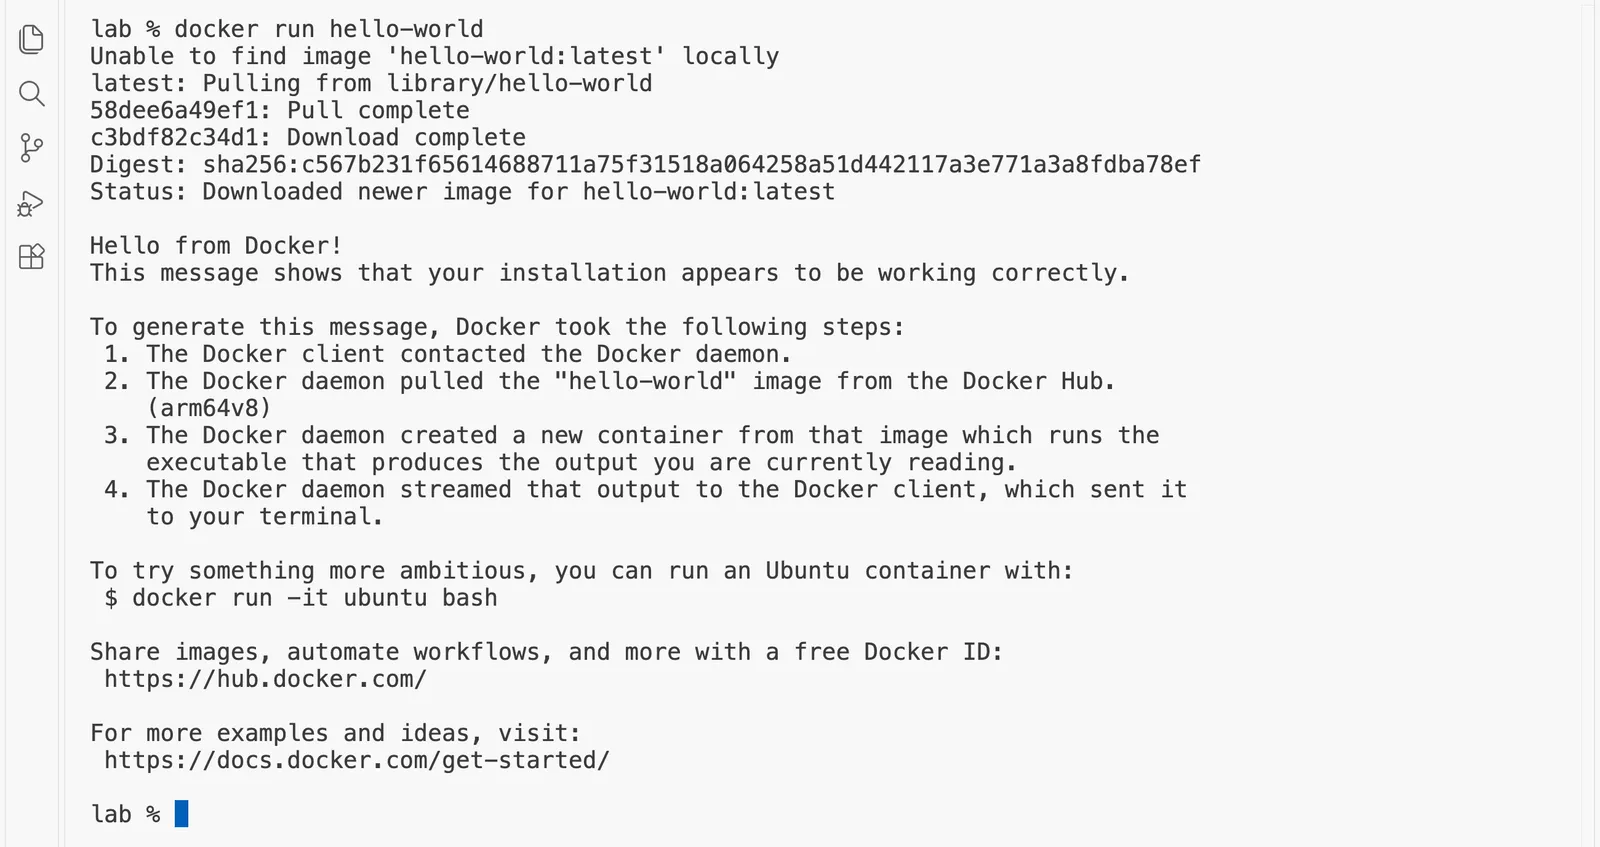
Docker Desktop must be running first: on a Mac, look for the whale icon in the menu bar; on Windows, in the system tray. Then run the command below. This is our first run on this Mac. If the image is already on your computer, the first four lines and the Digest and Status lines do not appear, and the output starts with an empty line and then Hello from Docker!. Docker's own message still says it pulled the image; that sentence is fixed text that Docker prints every time.
docker run hello-world
Unable to find image 'hello-world:latest' locally
latest: Pulling from library/hello-world

58dee6a49ef1: Pull complete
Digest: sha256:c567b231f65614688711a75f31518a064258a51d442117a3e771a3a8fdba78ef
Status: Downloaded newer image for hello-world:latest

Hello from Docker!
This message shows that your installation appears to be working correctly.

To generate this message, Docker took the following steps:
 1. The Docker client contacted the Docker daemon.
 2. The Docker daemon pulled the "hello-world" image from the Docker Hub.
    (arm64v8)
 3. The Docker daemon created a new container from that image which runs the
    executable that produces the output you are currently reading.
 4. The Docker daemon streamed that output to the Docker client, which sent it
    to your terminal.

To try something more ambitious, you can run an Ubuntu container with:
 $ docker run -it ubuntu bash

Share images, automate workflows, and more with a free Docker ID:
 https://hub.docker.com/

For more examples and ideas, visit:
 https://docs.docker.com/get-started/
The screen showed one more progress line than this text, c3bdf82c34d1: Download complete, under the first one. Docker redraws those progress lines in place, so the text recording of the session kept only one of them. Everything else is the same.
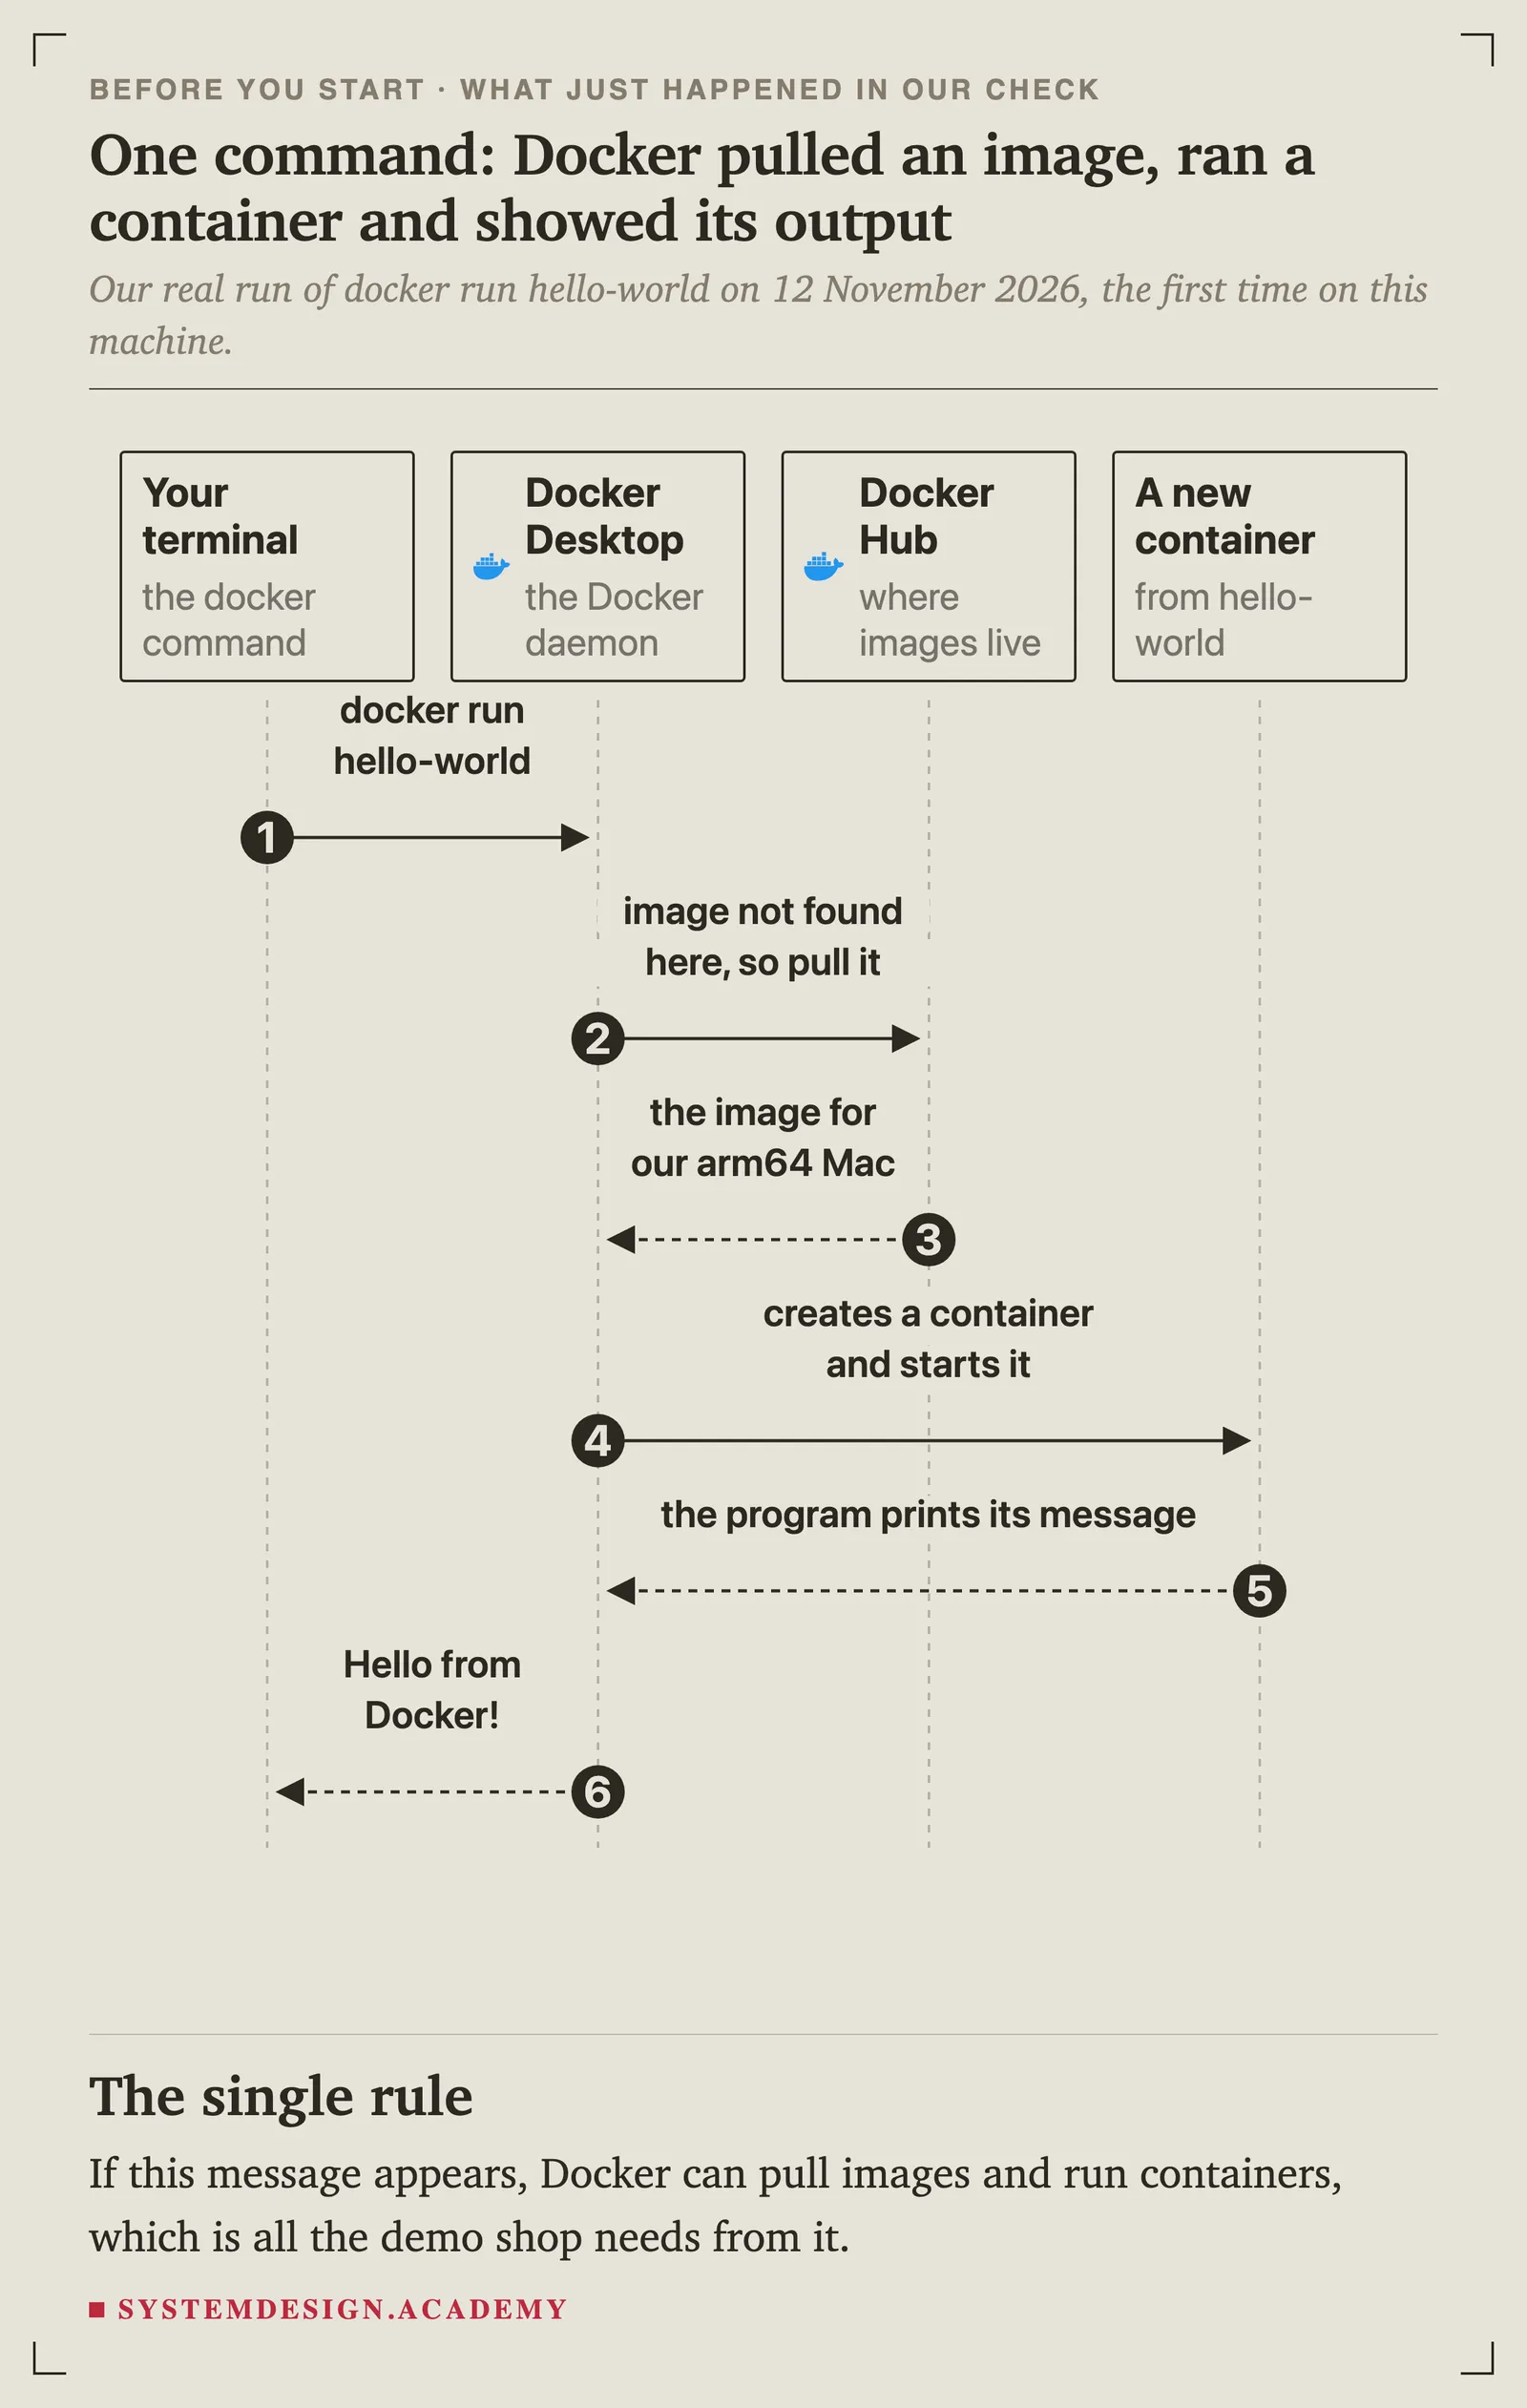
Read the four numbered lines in that output: Docker explains, in its own words, what it just did. The docker command you typed is only a client. The real work is done by the Docker daemon, a background program that Docker Desktop runs. The image was not on our Mac yet, so the daemon downloaded it from Docker Hub, made a container from it (a running copy of the image), and passed the container's message back to our terminal. The whole demo shop later in the course runs the same way, only with bigger images.
If you see Cannot connect to the Docker daemon, Docker Desktop is not running: start it, wait until it says it is running, and try again. On Windows, if docker is not found in Ubuntu, turn on WSL integration for Ubuntu, as the setup step shows.
Step 5: The self-check, and how we did it
Do the three tasks from "What you should already know" yourself first, in a folder of your own anywhere in your home folder, for example ~/my-self-check. To create the Python file, open the folder in VS Code (code ., or File, Open Folder), then use File, New File and save it as above_100.py. When you are done, compare with ours below, which we did inside the lab folder. Git is part of the basics, so start by checking that it is there:
git --version
git version 2.39.5 (Apple Git-154)
Any recent version is fine. On a Mac, if Git is missing, the Mac offers to install Apple's command line developer tools, which include it. On Ubuntu, install it with sudo apt update, then sudo apt install git.
The file: lab/above_100.py
This is our answer to task 1. You wrote your own version in VS Code; ours is in the zip so that you can compare.
above_100.py is 16 lines long. Here it is in VS Code:
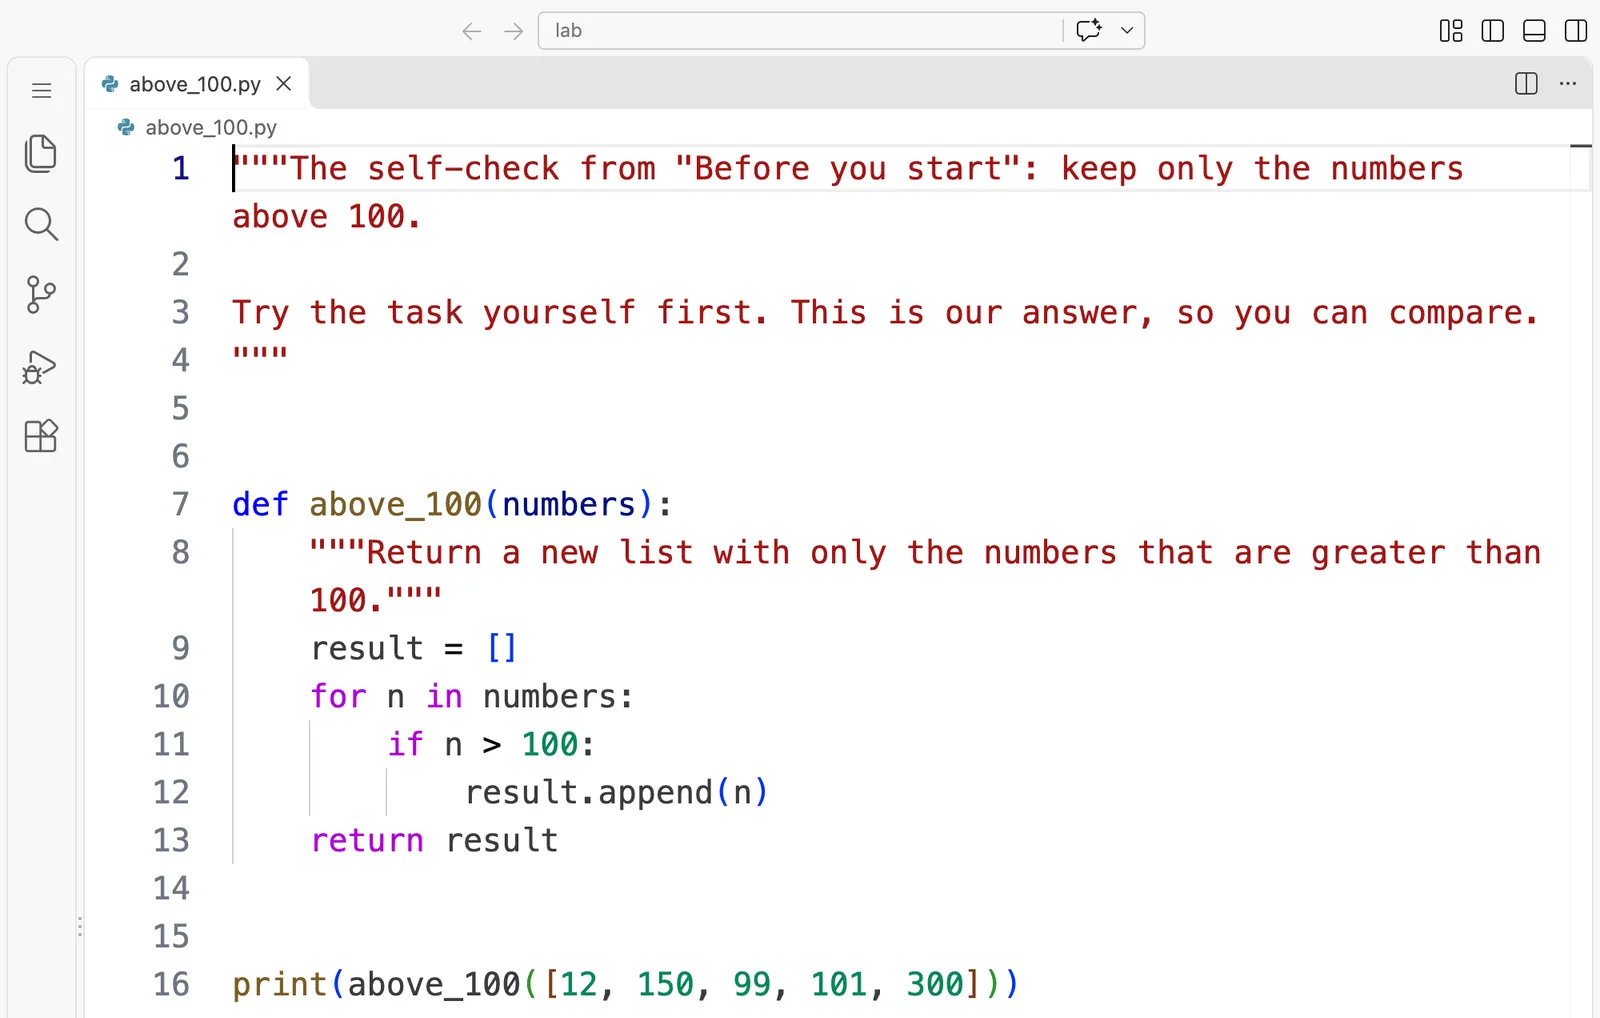
"""The self-check from "Before you start": keep only the numbers above 100.

Try the task yourself first. This is our answer, so you can compare.
"""


def above_100(numbers):
    """Return a new list with only the numbers that are greater than 100."""
    result = []
    for n in numbers:
        if n > 100:
            result.append(n)
    return result


print(above_100([12, 150, 99, 101, 300]))
It is written with a plain for loop on purpose, because that is the level the course expects. If you wrote return [n for n in numbers if n > 100], a list comprehension, that is the same thing in one line, and just as good.
Run it in a new folder
For task 2, we made a folder, put the file in it and ran it. We copied our file in with cp; you would create yours in VS Code instead.
mkdir self-check
cp above_100.py self-check/
cd self-check
uv run python above_100.py
[150, 101, 300]

Notice that the prompt changed from lab % to self-check % after cd: the prompt shows the folder you are in.
Commit it with Git
For task 3, we made the folder a Git repository and committed the file:
git init
Initialized empty Git repository in /private/tmp/before-you-start/lab/self-check/.git/
git add above_100.py
git commit -m "Self-check: keep the numbers above 100"
[main (root-commit) 5293b82] Self-check: keep the numbers above 100
 1 file changed, 16 insertions(+)
 create mode 100644 above_100.py
git log --oneline
5293b82 (HEAD -> main) Self-check: keep the numbers above 100

Your path, your commit ID and maybe your branch name will differ. The commit ID is computed from the files, the message, the author and the time, so yours will almost certainly be different. Our git init printed one line because Apple's Git on a Mac is already set to call the first branch main. Without that setting, as on Ubuntu, git init first prints a block of lines that start with hint: about the name master. That is only advice, and either name is fine.
Git also needs your name and email for every commit. On Ubuntu, if you never set them, git commit stops with Author identity unknown. On a Mac it usually commits anyway, with a name and email guessed from your computer, and prints a note that says so. Either way, tell Git once, with your own name and email:
git config --global user.name "Your Name"
git config --global user.email "you@example.com"
If a commit was already made with the guessed name, git commit --amend --reset-author puts your real name on it.
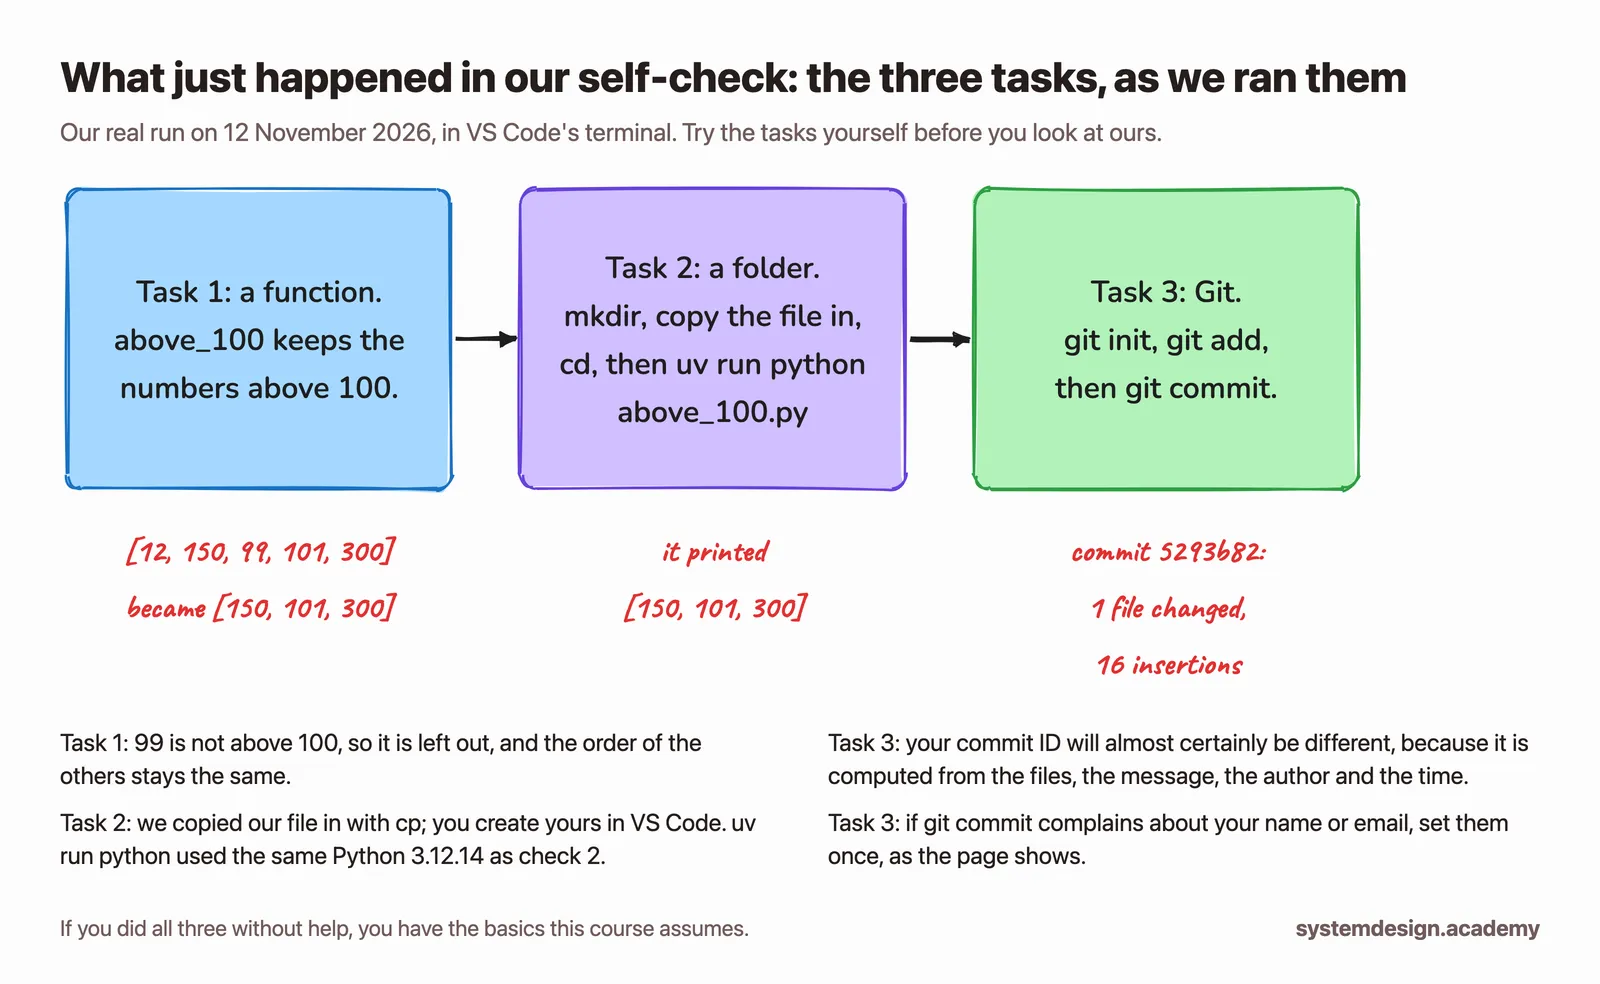
If all three tasks felt easy, you are ready. If one of them took you a long time, that is useful to know now, and an evening with the Python tutorial or the Git book will make the rest of the course much smoother.
How much memory your computer needs
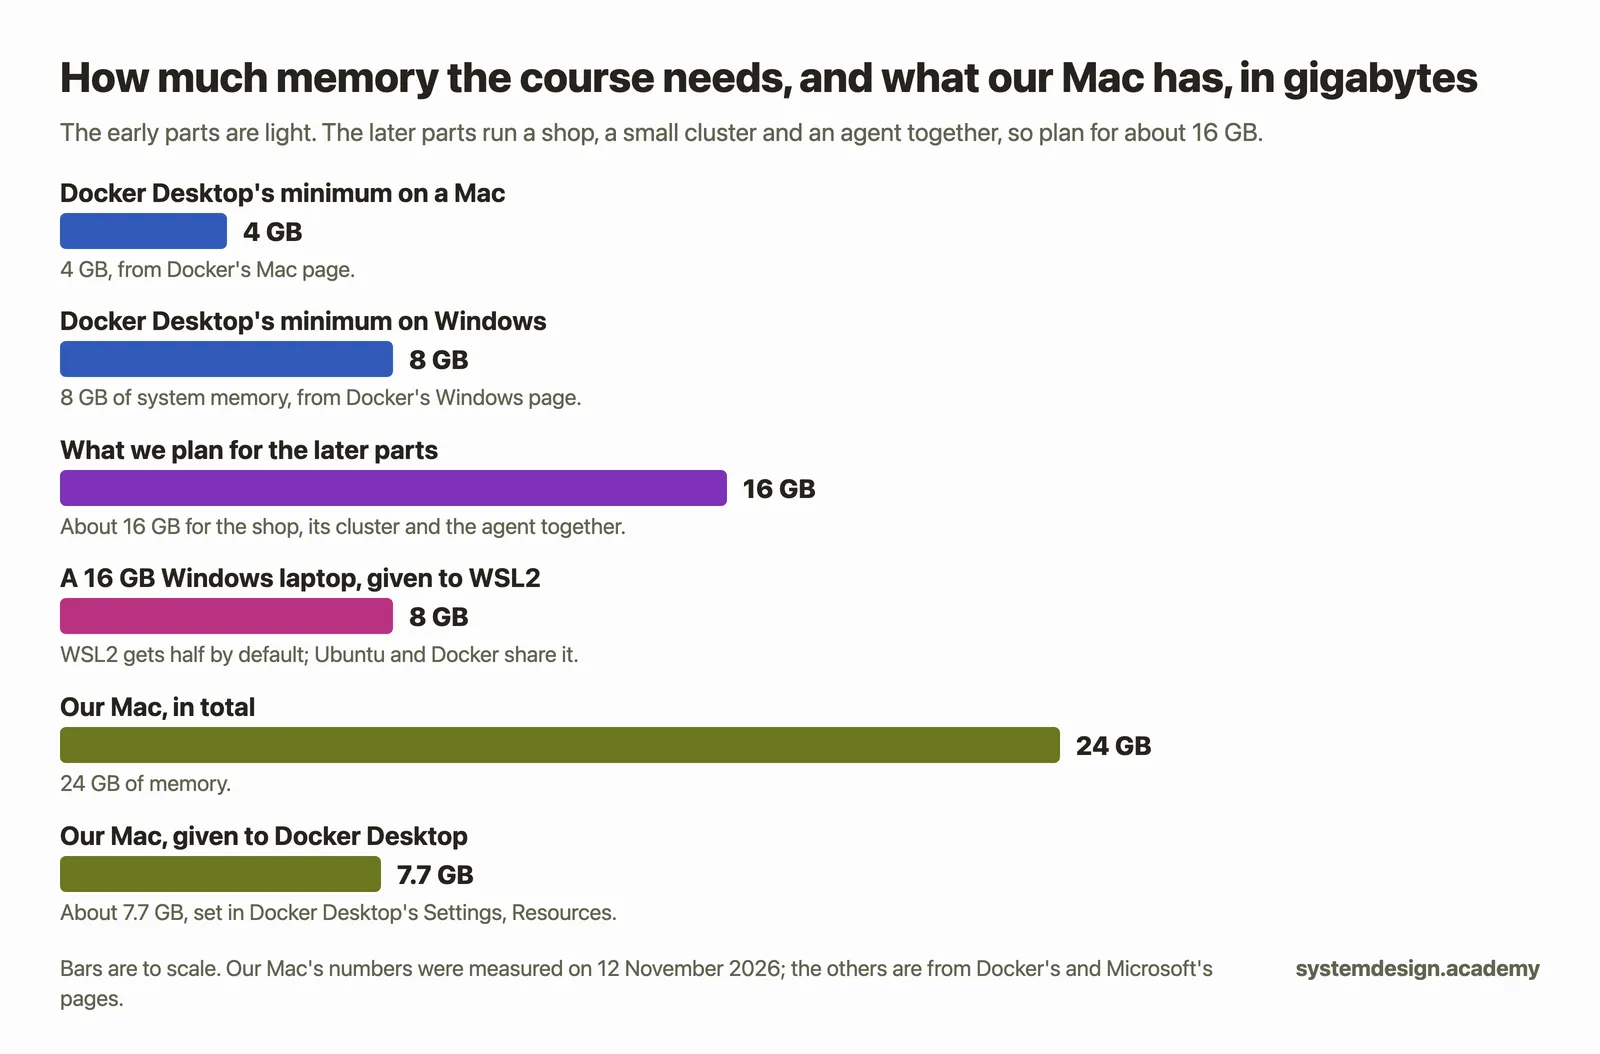
The early parts of the course are light: a Python program, a terminal and an editor. Docker Desktop's own pages give its minimum: at least 4 GB of memory on a Mac, and 8 GB of system memory on Windows. Later in the course, the demo shop, its small Kubernetes cluster and the agent all run together on your computer, and for that we plan for about 16 GB. For comparison, our Mac has 24 GB, and Docker Desktop on it is set to use about 7.7 GB of that; on a Mac you change it in Docker Desktop's Settings, Resources. On Windows, WSL2 gives its Linux virtual machine half of your computer's memory by default, and Ubuntu and Docker share that half, so on a 16 GB laptop they have about 8 GB between them. If your computer has less than 16 GB, you can still do everything up to the DevOps agent part, and that part says what it needs before you start it.
Your model key
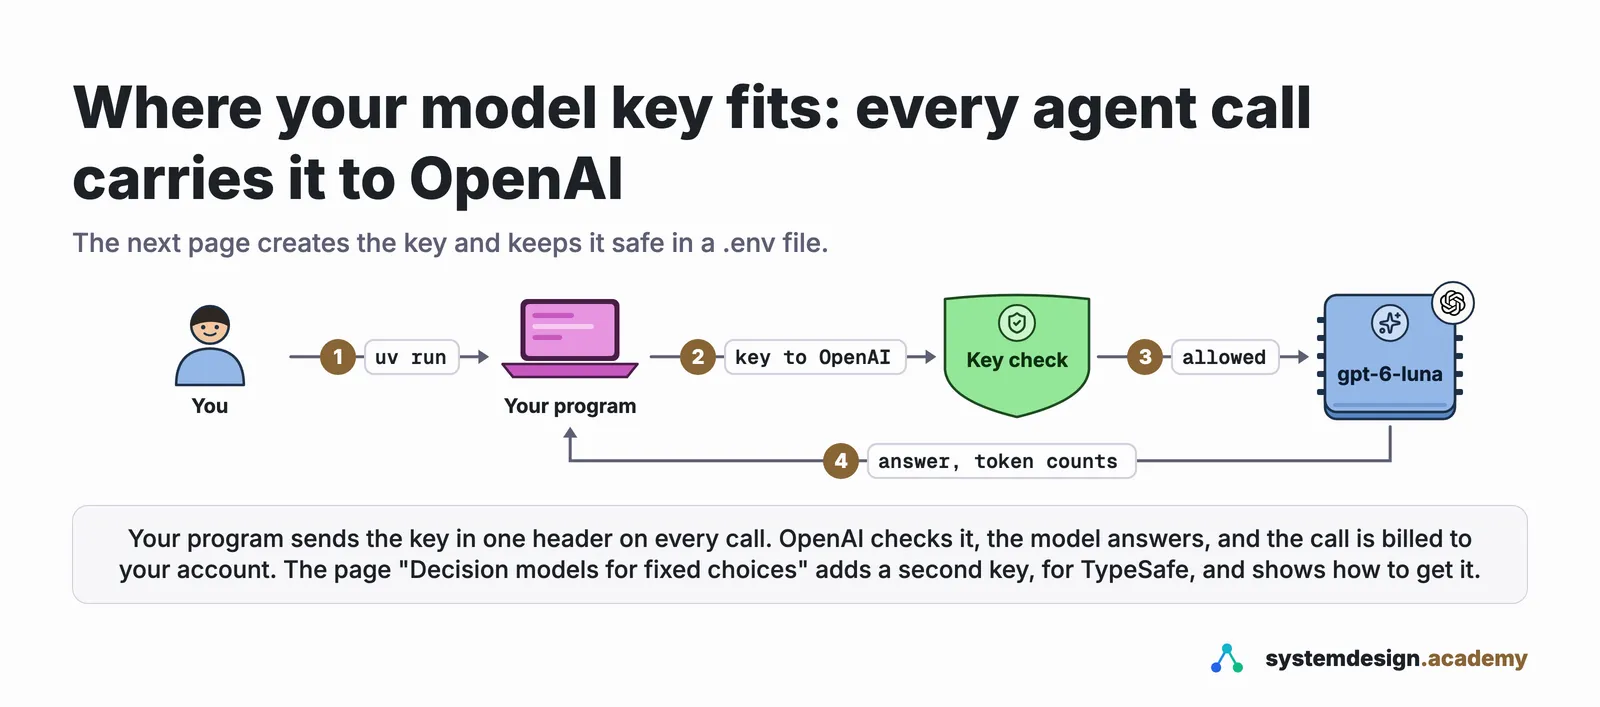
The agents in this course call OpenAI's models, such as gpt-6-luna, so you need an API key: a secret that lets your program use a model, with every call billed to your account. The next page, Getting a model API key and keeping it safe, creates the key, sets a spending limit, and keeps the key in a file called .env that only you can read and that Git ignores. The amounts are small: our recorded run of a whole incident, the one the course is built around, made 7 model calls, with 8,629 input tokens and 345 output tokens, and cost $0.00055 in model fees.
One page later in the course also uses a second key. "Decision models for fixed choices" compares OpenAI with TypeSafe's Jev, which needs a TypeSafe key in the same .env file. That page shows how to get it, so you do not need it now.
Check one more thing now, before you have a key. Your shell is the program inside the terminal that reads your commands, and its start-up file (~/.zshrc on a Mac, ~/.bashrc in Ubuntu) runs every time a terminal opens. If that file exports an old key, that old key is used instead of the key in .env, and nothing tells you. This command counts how many OPENAI_API_KEY variables your terminal already has:
env | grep -c '^OPENAI_API_KEY='
1
On our Mac it printed 1: our own start-up file, ~/.zshrc, exports an old key. For this terminal, we removed it:
unset OPENAI_API_KEY
env | grep -c '^OPENAI_API_KEY='
0

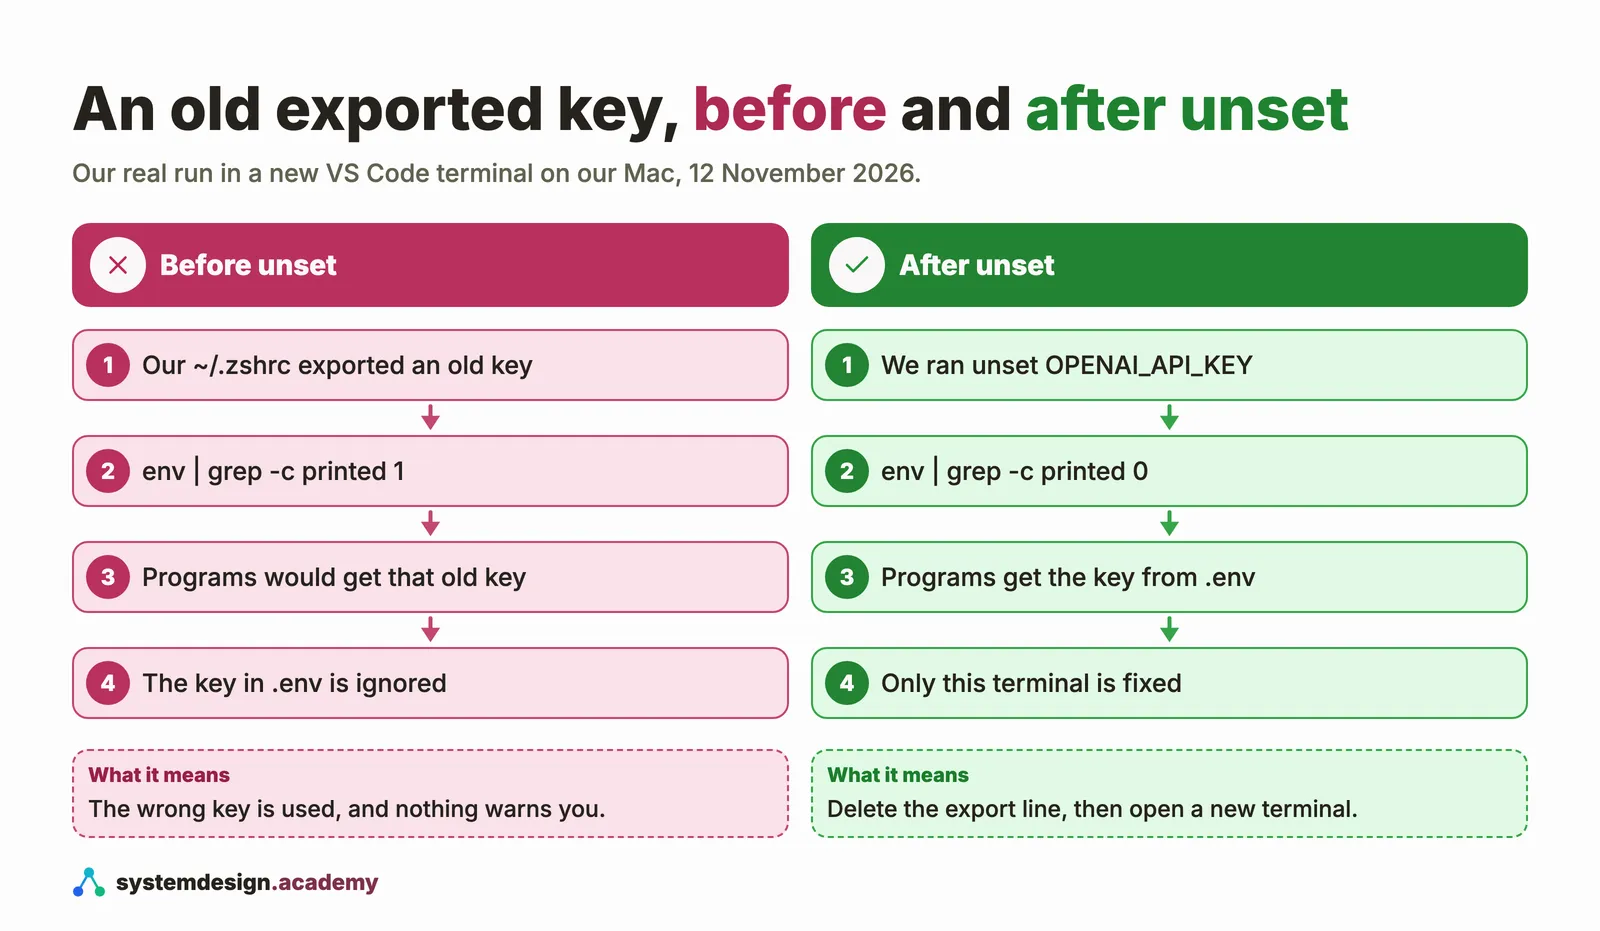
Yours should print 0. When grep finds nothing, it also ends with exit status 1, a number every command returns to say whether it found what it looked for, and some terminals mark that with a small red sign, as ours did; that is normal. If it prints 1, unset fixes only the terminal you are in. To fix it for good, open your start-up file in VS Code, code ~/.zshrc on a Mac or code ~/.bashrc in Ubuntu, delete the line that starts with export OPENAI_API_KEY=, save, and open a new terminal. Never print that line to check it, because it holds a key.
Troubleshooting
| What you see | Why | What to do |
|---|---|---|
uv: command not found | The terminal was opened before uv was installed. | Run source $HOME/.local/bin/env, or open a new terminal. |
uv run python --version prints 3.11 or older | uv found an older Python before any it manages. | Run uv python install 3.12, then check again. |
code: command not found on a Mac | The code command was never added to the terminal. | In VS Code, Cmd+Shift+P, then Shell Command: Install 'code' command in PATH, then open a new terminal. |
code: command not found in Ubuntu | The terminal needs restarting, or Add to PATH was not ticked when VS Code was installed on Windows. | Open a new Ubuntu terminal. If that does not help, run the VS Code installer again with Add to PATH ticked. |
Cannot connect to the Docker daemon | Docker Desktop is not running. | Start Docker Desktop, wait until it is running, and try again. |
docker: command not found on a Mac | The terminal was opened before Docker Desktop was installed. | Open a new terminal. |
docker: command not found in Ubuntu | WSL integration is off for Ubuntu. | In Docker Desktop, Settings, Resources, WSL Integration: turn it on for Ubuntu, and Apply. |
Author identity unknown from git commit | Git does not know your name and email yet. | Run the two git config --global commands from Step 5. |
unzip or git cannot be found by apt | Ubuntu's list of packages is not downloaded yet. | Run sudo apt update first, then the install again. |
| Everything is slow in Ubuntu | Your folder is under /mnt/c, on the Windows side. | Copy the folder into your Ubuntu home folder and work there. |
unzip: command not found in Ubuntu | Ubuntu does not always include it. | Run sudo apt update, then sudo apt install unzip. |
unzip: cannot find or open lesson-before.zip on a Mac | Safari unzipped it for you and moved the zip to the Trash. | Skip unzip and go straight into the lesson-before folder. |
Knowledge check
Answer all four questions before you read the answers below them.
1. On a new Mac, VS Code is installed and opens fine, but code --version in the Terminal says command not found: code (the exact wording depends on your shell). What is the fix?
- A. Reinstall VS Code, because the installation is broken.
- B. In VS Code, run Shell Command: Install 'code' command in PATH from the Command Palette, then open a new terminal.
- C. Run
uv python install 3.12, because VS Code needs Python first. - D. Use
python3 --versioninstead, because it checks the same thing.
2. On Windows 11, where should you keep your course folders, and why?
- A. In
C:\Users\you\Documents, because VS Code runs on Windows and reads Windows files fastest. - B. Anywhere, because Ubuntu and Windows share one disk at the same speed.
- C. In your Ubuntu home folder, because the course commands run in Ubuntu, and Ubuntu reads its own files much faster than files under
/mnt/c. - D. Under
/mnt/c, so that both Windows and Ubuntu can see them.
3. Which command checks the Python that every program in the course will really use?
- A.
python3 --version - B.
python --version - C.
uv --version - D.
uv run python --version
4. You run env | grep -c '^OPENAI_API_KEY=' in a new terminal and it prints 1. What does that mean?
- A. Your key in
.envis working, so you are ready. - B. An
OPENAI_API_KEYis already exported in this terminal, probably by a start-up file, and it would be used instead of the key in your.envfile. - C. You have one model call left on your account.
- D. Nothing; the command only checks that
grepis installed.
Answers
1. B. VS Code is fine; only the terminal does not know where the code command is. The shell command adds it, and a new terminal picks it up. A plain terminal on our own Mac printed the same error, because that command had never been run there.
2. C. The course commands run in Ubuntu, so the files should live on Ubuntu's own disk. Microsoft's guide recommends exactly this for the fastest speed. VS Code still opens those folders, through its WSL extension.
3. D. Every program in the course runs with uv run, so uv run python --version shows the Python those programs get. python3 --version asks your computer instead, and on a fresh Mac it can print an older Python that came with Apple's tools.
4. B. Something has already exported a key into your terminal, usually an export line in ~/.zshrc or ~/.bashrc. An exported key is used instead of the one in .env, so the one in .env is ignored. Run unset OPENAI_API_KEY for now, and delete that line from the start-up file.
What to keep
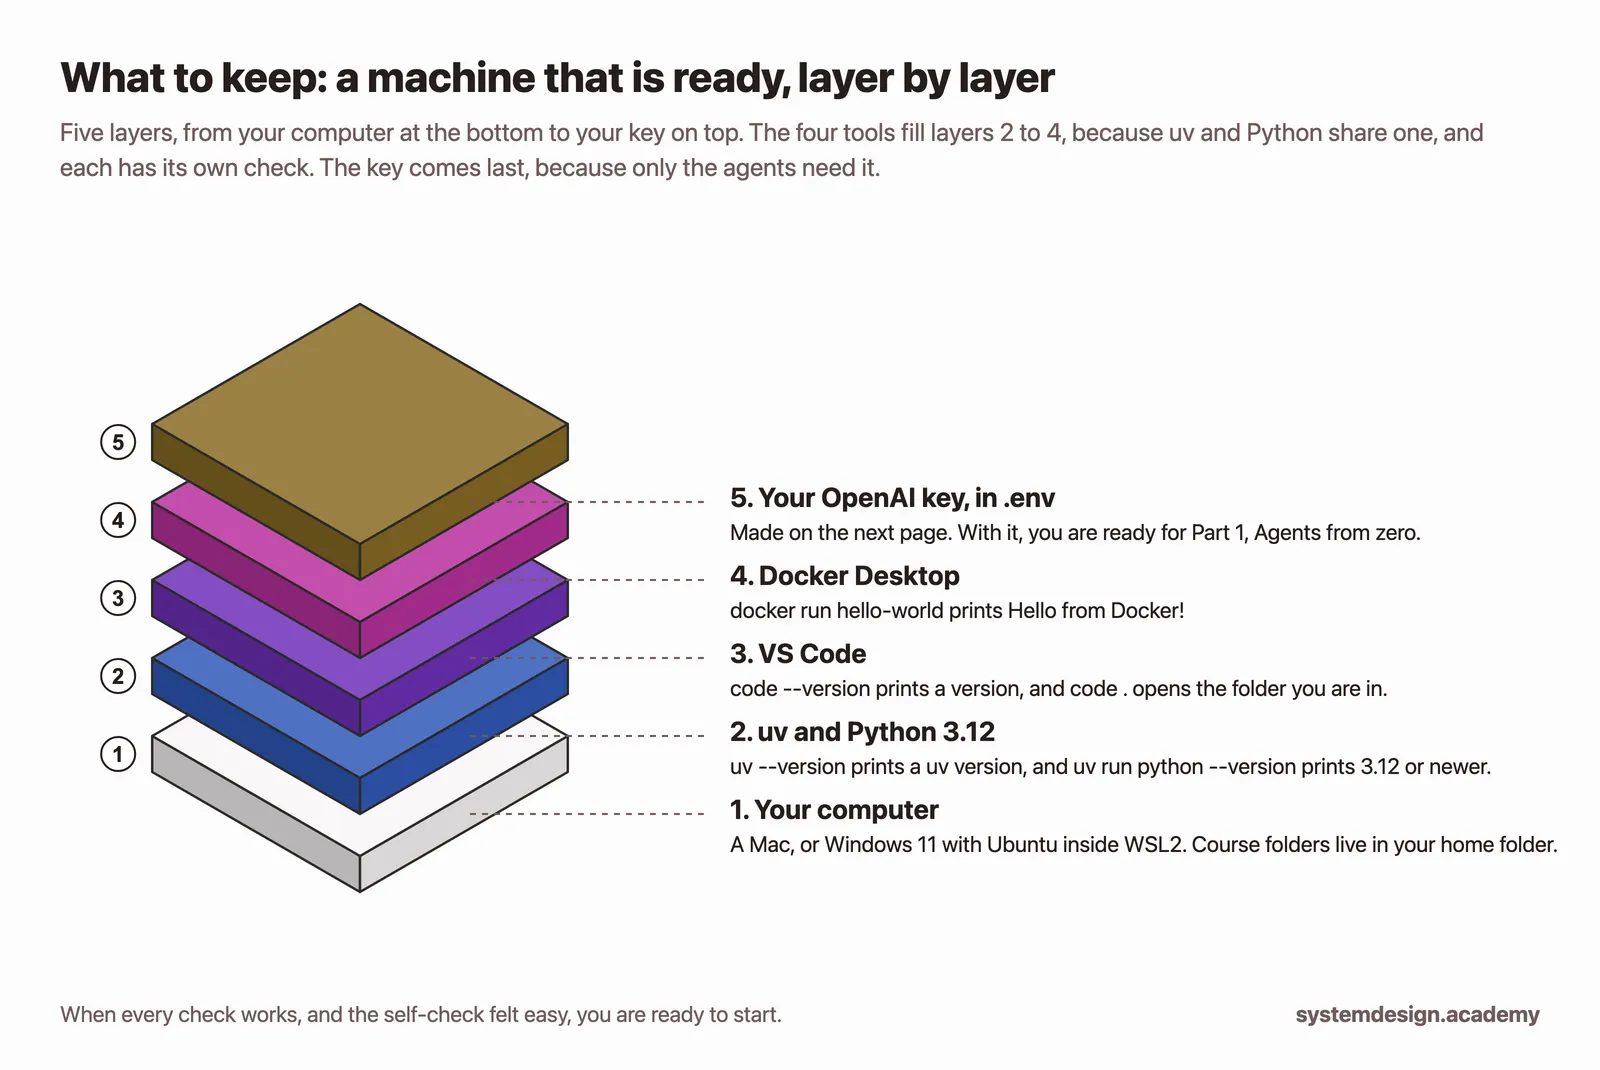
- The course assumes everyday Python, the terminal and Git basics. The self-check tells you in ten minutes whether you have them.
- Four tools: Python 3.12 or newer, uv, VS Code and Docker Desktop. Each one has a check command: three print a version, and Docker prints
Hello from Docker!. - On Windows, everything runs in Ubuntu inside WSL2, and your course folders live in your Ubuntu home folder, not under
/mnt/c. - Check that no old key is exported in your terminal. Then the next page, Getting a model API key and keeping it safe, gets you the key.
When the four checks work and your key works, you are ready for Part 1, Agents from zero, which starts with "What a language model really does".
Download the page files: lesson-before.zip. It holds START-HERE.md, which is the setup checklist on one screen with every check command and its expected output, our answer to the self-check (lab/above_100.py), the page's diagrams as PNG files (figures/), and this whole page as a PDF.
Sources
Every quotation on this page was checked word for word against these pages, fetched on 12 November 2026 and saved with this page's working files.
- Microsoft, "How to install Linux on Windows with WSL": https://learn.microsoft.com/en-us/windows/wsl/install
- Microsoft, "Working across Windows and Linux file systems": https://learn.microsoft.com/en-us/windows/wsl/filesystems
- Docker, "Install Docker Desktop on Mac": https://docs.docker.com/desktop/setup/install/mac-install/
- Docker, "Install Docker Desktop on Windows": https://docs.docker.com/desktop/setup/install/windows-install/
- Docker, "Docker Desktop WSL 2 backend on Windows": https://docs.docker.com/desktop/features/wsl/
- VS Code, "Visual Studio Code on macOS": https://code.visualstudio.com/docs/setup/mac
- VS Code, "Developing in WSL": https://code.visualstudio.com/docs/remote/wsl
- Astral, "Installing uv": https://docs.astral.sh/uv/getting-started/installation/
- Astral, "Installing Python" and "Python versions": https://docs.astral.sh/uv/guides/install-python/ and https://docs.astral.sh/uv/concepts/python-versions/
- Python, "The Python Tutorial": https://docs.python.org/3/tutorial/
- Git, "Pro Git": https://git-scm.com/book/en/v2