Contents Start here
Start here
Introduction: what this AIOps course builds, and how to use it
The whole course in one real incident, who it is for, and how a page's video, text and code fit together.
Free page Video coming to this page
About 30 minutes to read.
This page was written together with its video. The video is being added here; until then, everything you need is in the text below.
Hands-On AIOps on AWS: Build AI Agents for DevOps. Start here.
This course teaches you to build an AI helper for the people who keep software running. When something breaks, it reads the alarms, looks around the system, finds the cause and proposes a fix. Then it stops and asks a person, and only after a person says yes does our own code make the change. This first page shows you that helper at work on a real incident, explains what you will build and in what order, and shows how every page of the course works.
After this page you will be able to:
- say what you will build in this course, and in what order the seven parts build it;
- explain why the AI in this course may look and suggest, but never changes anything by itself;
- plan your way through the book: which parts need an AWS account, and when the appendix helps;
- use a page of the course well: its diagrams, its real screenshots, its code, its zip file and its knowledge check.
What you need first: nothing about AI, and nothing about DevOps, the everyday work of building, shipping and running software. The course does assume that you can already write a little Python and use a terminal and Git. The next page, "Before you start", says exactly what that means and has a short self-check.
Time: about 15 minutes.
The problem: something breaks, and someone has to find out why
Picture a small online shop. One afternoon its web page stops loading. In a real company, a monitoring system notices within moments and sends automatic warnings. Somebody now has to drop what they are doing, work out what is wrong, decide on a fix, apply it carefully, and check that the shop is back. The warnings look much the same every time, and the first steps of the search are much the same every time too.
On 6 November 2026 we did exactly this to our own demo shop, on purpose. The shop runs on a laptop, inside Kubernetes, a system that starts programs and restarts them when they fail. Each program in Kubernetes is started from an image: a packaged copy of the program, with a name and a version, such as nginx:1.29-alpine for the web server (nginx is the web server program; 1.29-alpine is the version we use). We told the web server to use a version that does not exist, nginx:1.29.99-alpine, so it could not start and the web page stopped working.
Then we ran the program you will build in this course. After we started it, nobody typed anything until it asked for approval. Here is what it did, in about one minute:
- It checked the shop and found three things wrong, so it raised three alerts (automatic messages that say something is wrong) and collected them into one incident: one problem that may fire many alerts. In our lab, a few lines of our own code play the part of the monitoring system.
- It rated the incident as the most serious kind, SEV1 (SEV2 is the next level down), and decided that it was a Kubernetes problem.
- It investigated. We had told it where to start (list the running programs and read Kubernetes' recent events), and it chose the rest itself. Over 3 calls to the model it asked for 6 looks at the shop: first the running programs and the recent events, then the setups of three programs and the web server's history of versions. Our code ran each look with an account that can only read. In about 11 seconds it found the cause: the newest version of the web server's setup asked for the image
nginx:1.29.99-alpine, which cannot be downloaded. - It proposed a fix: return to the previous version of the setup, which used
nginx:1.29-alpine. Our code worked out the exact change from the cluster itself (the running Kubernetes and everything in it) and showed it, line by line. - Then it stopped and waited. It printed
APPROVAL NEEDEDand asked for the names of two approvers, because a change during a SEV1 incident needs two different people. (In this demo we typed both names at the same keyboard. Later parts give approvers a proper approval screen, and Part 6 can take approvals in Slack.) - After the approval, our own code applied exactly that change. Then it watched the shop for 30 seconds, checking it 6 times, and the shop was healthy every time. Finally the model was asked whether the incident was fixed, answered yes, and the program wrote a short report: resolved.
The whole incident cost $0.00055 in model fees, for 7 calls to the model.
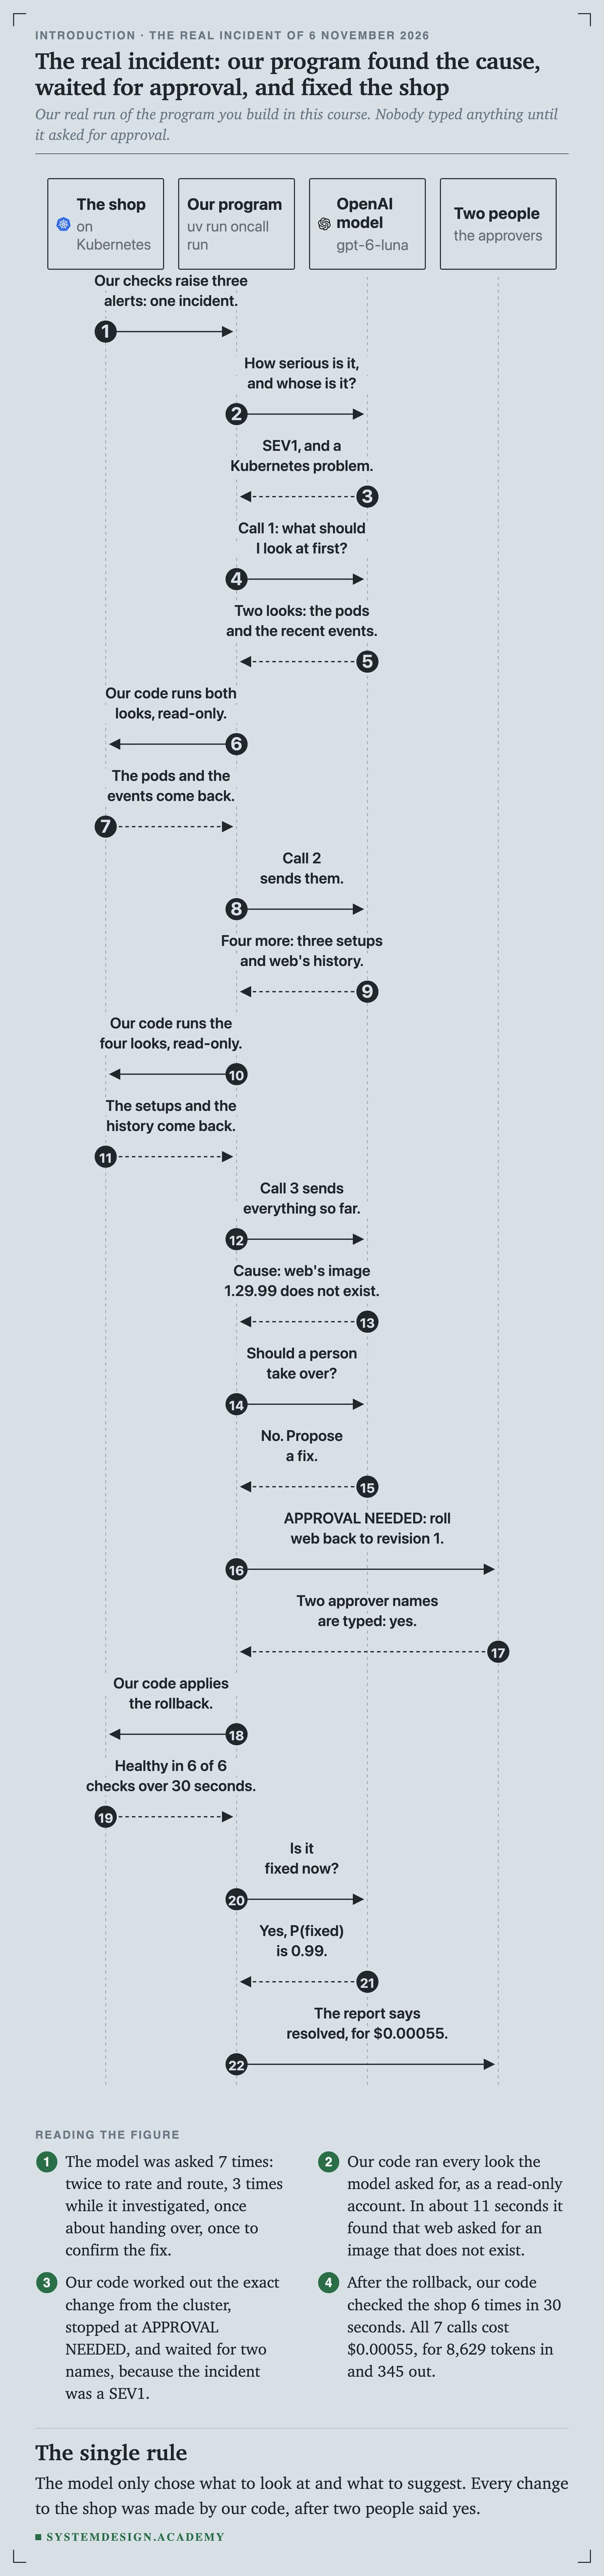
These are screenshots of that real run, in a terminal on our Mac. First, the moment it found the cause:

uv run oncall run starts the program; uv is the tool that runs Python programs in this course, and "Before you start" installs it. freeze=False means no change freeze was in place: no period in which the team had agreed that nobody changes the live system (trap 9 below shows one). The p=1.00 numbers are probabilities, which the next section explains.
Then the moment it stopped and asked:

The screenshot shows the top of the request. The whole request, as the terminal printed it, was this:
APPROVAL NEEDED  incident inc-20261106-152458  SEV1
change: rollout_undo deployment/web {"to_revision": 1}
evidence:
  - web pod is Pending with ImagePullBackOff.
  - Event: Failed to pull image "nginx:1.29.99-alpine"; registry returned NotFound.
  - web revision 2 uses nginx:1.29.99-alpine; revision 1 used nginx:1.29-alpine.
the real diff:
--- deployment/web (now)
+++ deployment/web (after)
@@ -16,5 +16,5 @@
   spec:
     containers:
-    - image: nginx:1.29.99-alpine
+    - image: nginx:1.29-alpine
       imagePullPolicy: IfNotPresent
       name: web
approvers needed: 2 (different people; not the agent)
approve? [y/N]
You do not need to know Kubernetes to follow it. In plain words: deployment/web is Kubernetes' setup for the web server, and each saved version of that setup is a revision. A pod is one running copy of a program. The evidence says the web pod is waiting (Pending) because Kubernetes keeps failing to download its image (ImagePullBackOff), and the image store answered that no such image exists (NotFound). Revision 2, the newest, asks for the missing image; revision 1 asked for the good one. So the change, rollout_undo to revision 1, means "return to the setup that worked". The lines that start with - and + are the diff: the exact line the change removes and the line it adds. (The @@ line only says where in the file that line sits.)
After two names were typed, the program applied the change and checked the result:

healthy 6/6 means 6 healthy results out of 6 checks during the 30-second watch. (The word "applied" appears twice on the execute line only because of how our program builds that line. One change was made.)
And the last line of the report:

A token is a small piece of text, often part of a word. A model reads tokens and writes tokens, and you pay for both. The page "What a language model really does" explains tokens properly. Here is where the $0.00055 went, call by call, from the cost log the program keeps:
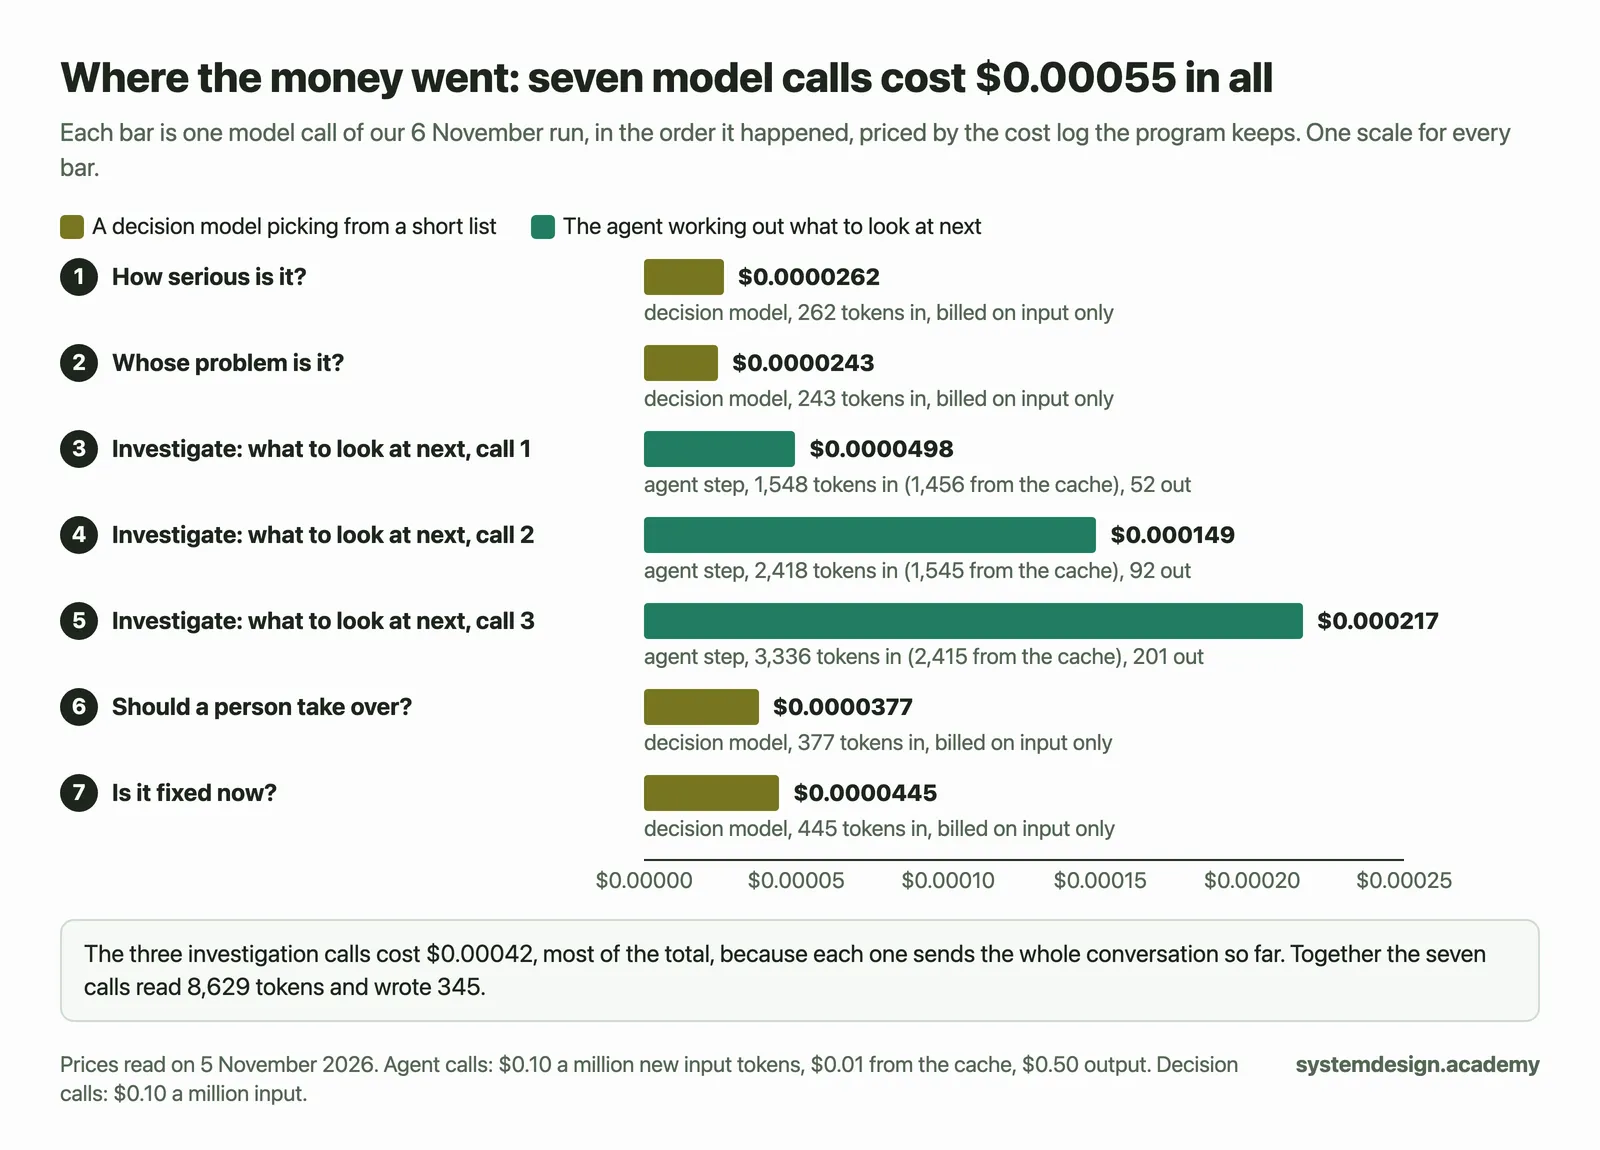
Two words in the chart need a sentence each. The cache is OpenAI's short-term store of the start of recent requests: when a request begins with the same long text as one a moment ago, that repeated part costs a tenth of the normal price. That is why the three investigation calls, which each resend the conversation so far, cost so little. A decision model is explained in the next section.
Notice two things about that story:
- The program found the cause itself. We told it where to start looking, but not what was wrong, and it named the bad image from the evidence.
- The program did not fix anything on its own. It asked people first, and it changed only what they approved.
Everything in this course grows out of those two points: an AI helper that does the first steps of an incident, asks before anything is changed, and is measured on how often it is right and what it costs. One run on an easy fault proves very little, which is why the course measures the helper on many faults, many times.
What AIOps means in this course
AIOps means using AI in IT operations, which is the work of keeping software running. The person who answers the alerts, even at 3 in the morning, is on call. In this course you build an AI on-call team: a few small AI programs, each good at one job, that do the first steps of an incident while a person stays in charge.
The AI part is a language model, such as one of OpenAI's models, used inside an agent. The page "What an AI agent is" defines an agent properly. For now, an agent is a program that asks a model what to do next, step by step. Picture a new junior engineer on the team: the junior may look around and suggest a fix, but someone senior signs off before anything changes. You build a team of agents like that, and the change itself is always made by ordinary code that we wrote and can test.
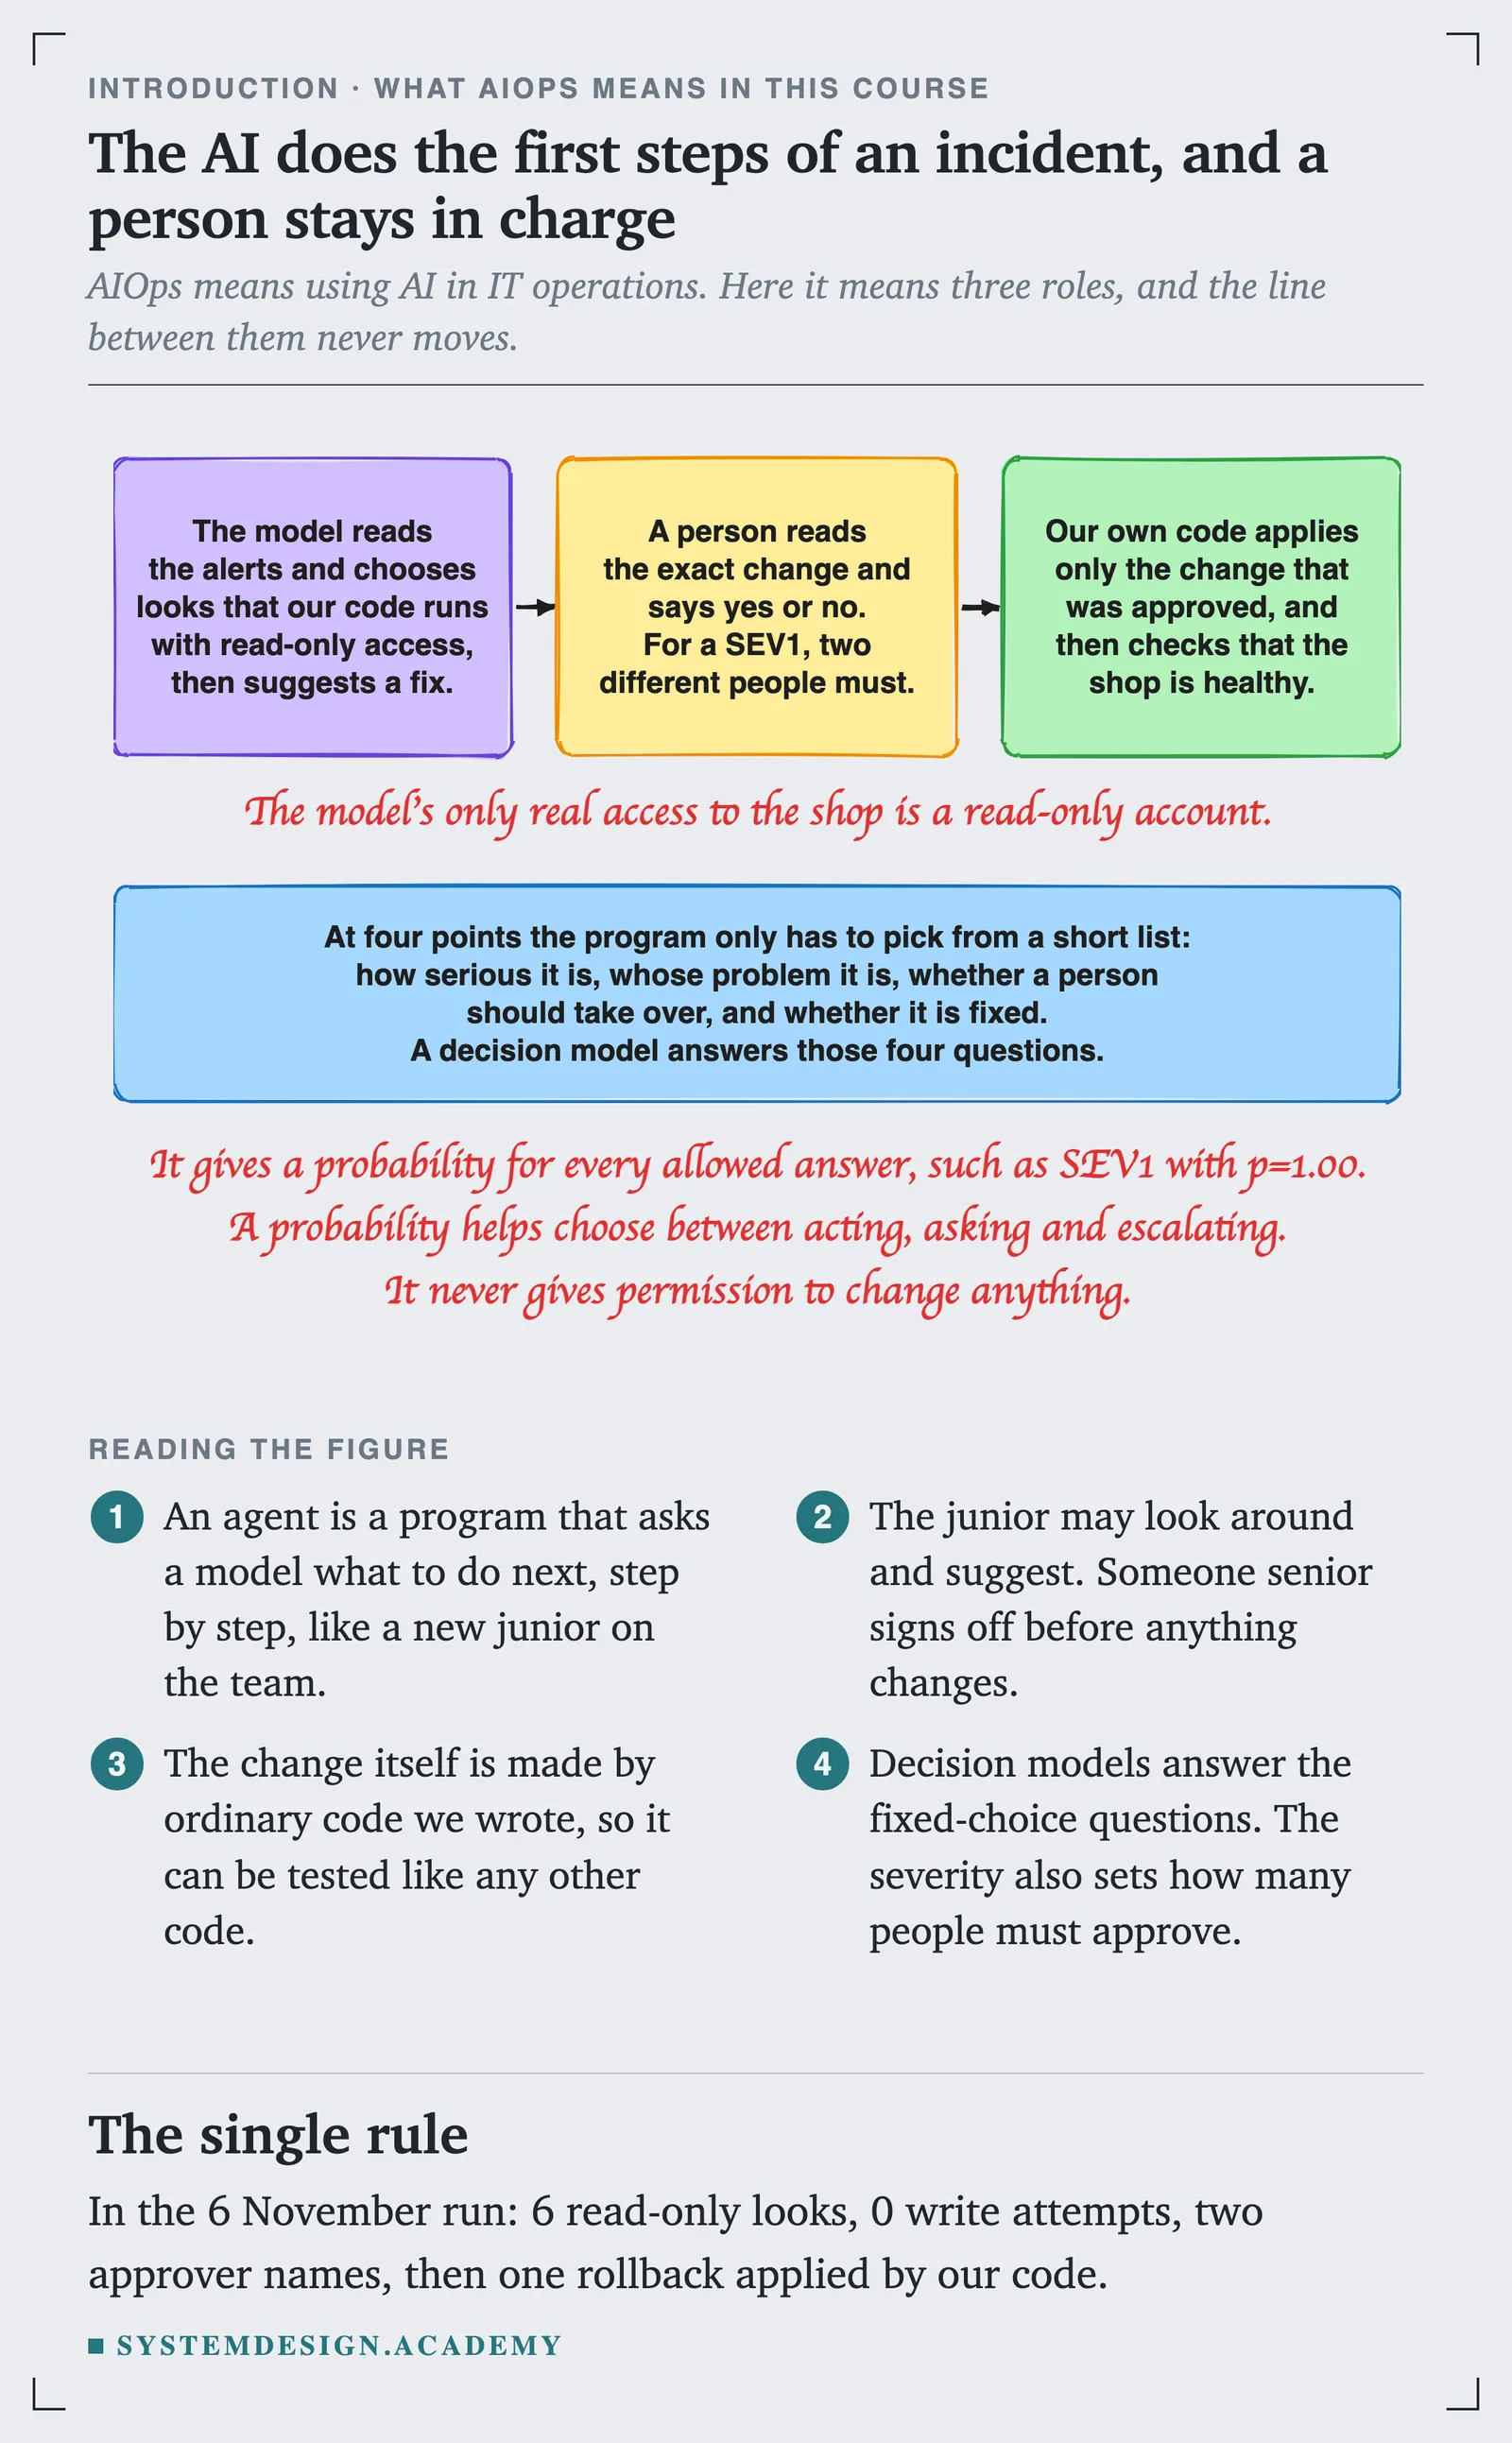
Decision models. At four points the program only has to pick from a short list: how serious the incident is (severity), whose problem it is (route), whether a person should take over (escalate), and whether it is fixed (is_fixed). For those four, the course uses decision models: models that pick one answer from a fixed list and give a probability for every allowed answer. In the run above, the program printed Severity SEV1 (p=1.00, openai-decisions), where openai-decisions is the name of the decision model it used. Later, on the page "Decision models for fixed choices", you compare two of them, OpenAI's Decisions API and TypeSafe's Jev.
What the program does with the answer depends on the question. For whose problem it is, whether a person should take over, and whether it is fixed, a probability above 0.85 counts as yes, below 0.15 as no, and anything in between makes the program escalate, which means hand the incident to a person. What yes and no do depends on the question. For whose problem it is and whether it is fixed, a no also hands the incident to a person. For whether a person should take over, a no lets the program go on. The severity sets how many people must approve a change: two for a SEV1, one otherwise. None of these answers can make a change happen. Only an approval does that.
Who this course is for
The course is for anyone from a fresher to a staff engineer who can already write some Python.
- You should be comfortable with Python and the command line, and know the basics of Git. The course does not teach those. It starts directly with language models, agents and LangGraph, a Python library for building agents step by step. "Before you start" says exactly what it expects, and has a short self-check.
- AI and agents are taught from zero. You do not need to have used a language model or an AI library before. Every term is explained the first time it appears.
- DevOps is optional background. If you have not used containers (programs packed with everything they need, so they run the same anywhere) and Kubernetes, the appendix at the end of the book, "DevOps basics, if you need them", covers them, and you can read one of its pages whenever a part needs it. If you use Kubernetes at work, you can skip the appendix.
- Every page is written to end with a part for working and staff engineers, with the design trade-offs and the sources, so experienced readers get the reasoning, not only the steps.
What you build
You build one whole system, a piece at a time:
| Piece | What it is |
|---|---|
| The demo shop | A small online shop that we break on purpose: a web page, an API (the program the page asks for data), a worker (a program that does jobs in the background), a Postgres database, Redis (a fast store in memory) and a message queue (a waiting line for jobs, here NATS). It runs on Kubernetes. We use k3d, which runs a small Kubernetes inside Docker, the tool that runs containers, on your laptop. |
| The on-call agent | Python code, built with LangGraph, a Python library from the company LangChain for building agents step by step. It reads the alerts, investigates the shop with read-only access and proposes a fix. |
| The approval flow | The safety part. The model never applies a change itself. A person approves the exact change, the diff, and only our own code applies it, after checking again that the setup has not changed since it was approved. |
| The evaluations | The measuring part. We break the shop in many known ways, run the agent many times, and count right answers, wrong actions and the cost of every incident. |
| AWS | Part 6 moves the same system to Amazon Web Services, with cost safety first. |
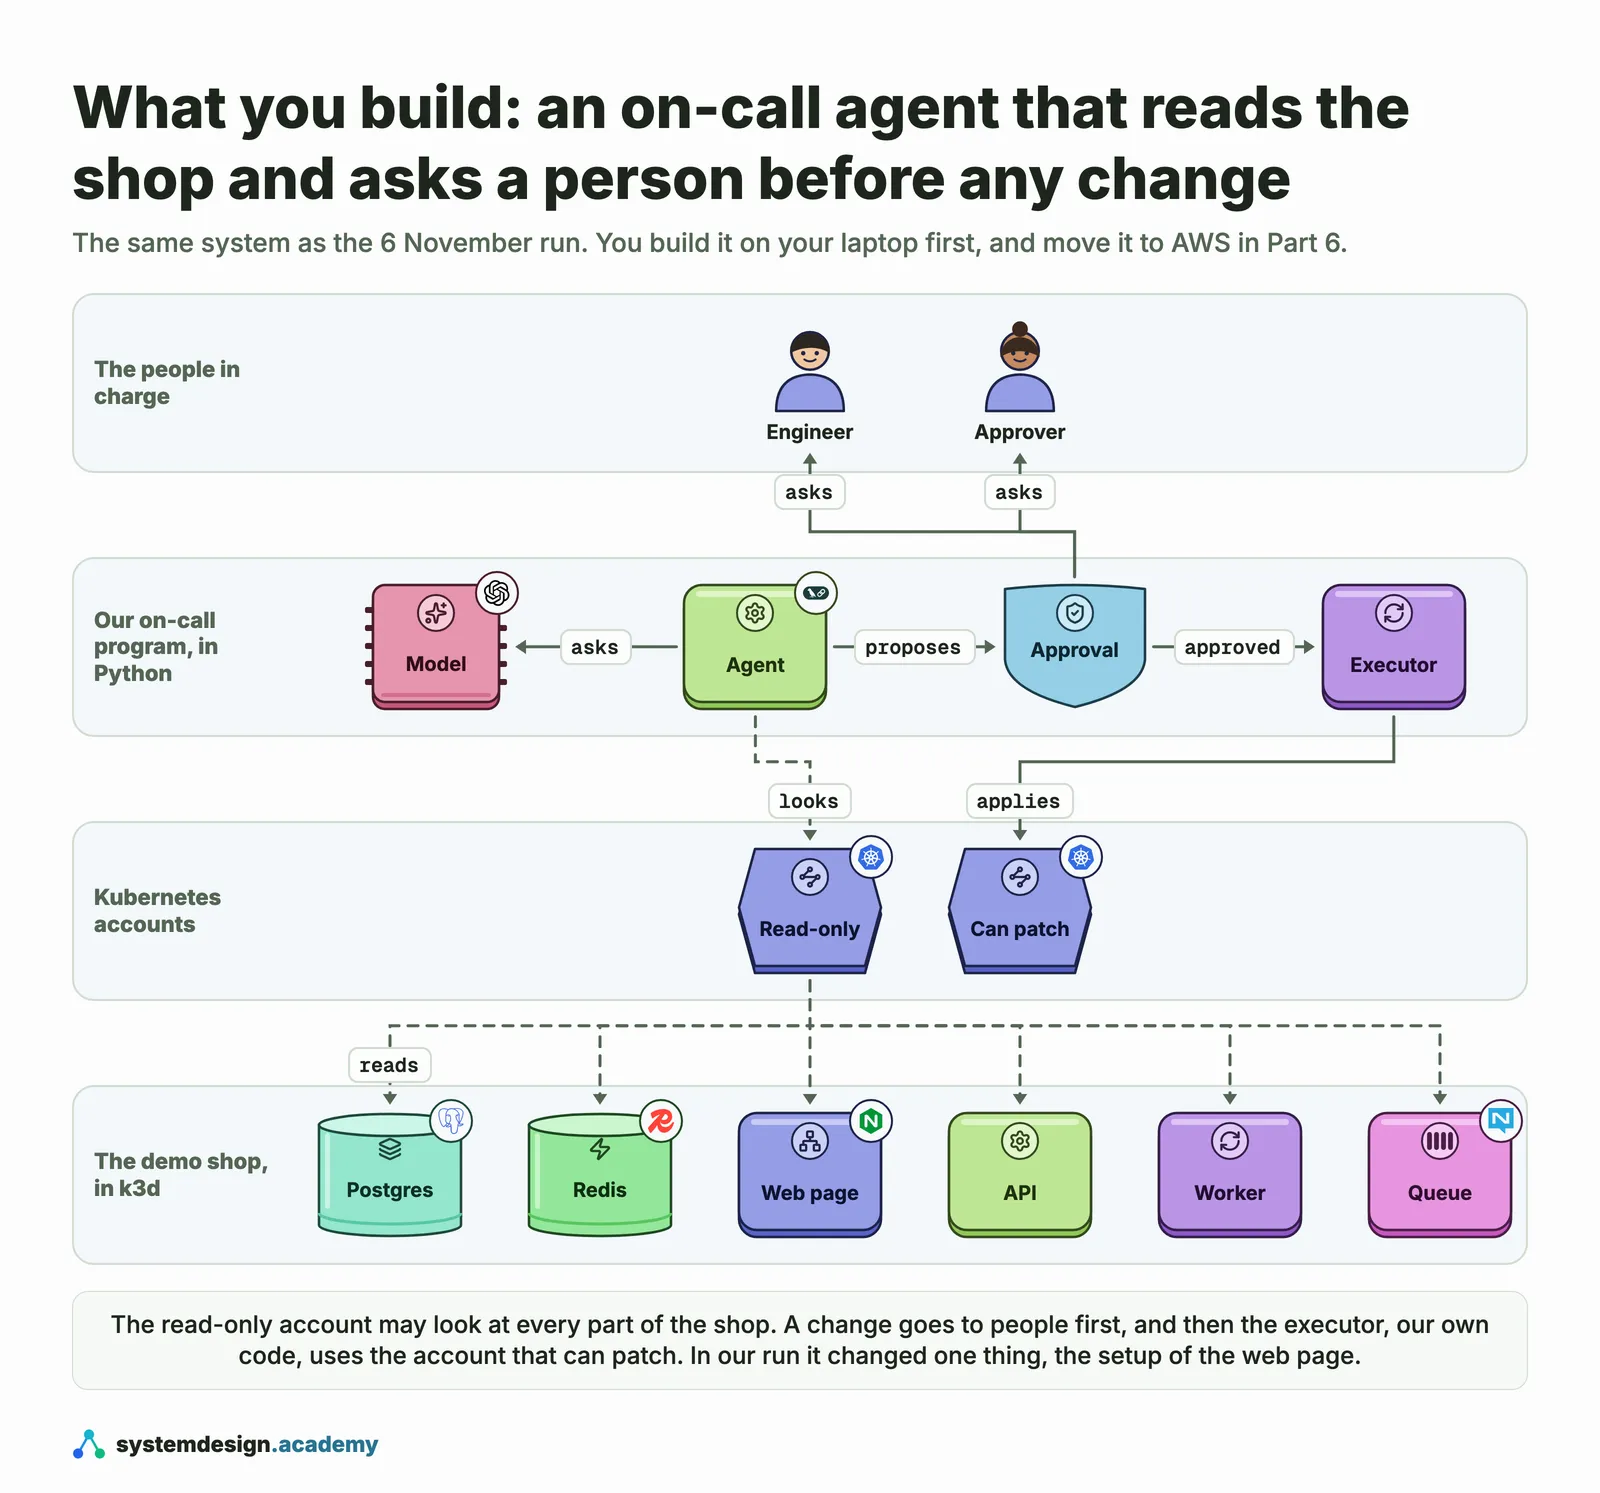
The arrow from the agent goes to people, never straight to a change in the shop, and Kubernetes itself enforces it: the account the agent's looks run as is only allowed to read.
To measure the agent fairly, every way we break the shop has its right answer written down before the agent runs. Today the code has 8 faults and 3 traps, 11 cases in all. A trap is a case where the right answer is to leave the system alone and call a person. By the end of the course there will be about 30 faults. Here is the list of faults as the program prints it, in a terminal on our Mac (the severity, SEV1 or SEV2, sits at the right edge of the picture):

The screenshot shows the eight faults. The program's list goes on with the three traps, which our screenshot does not show. This figure draws all eleven cases in plain words:
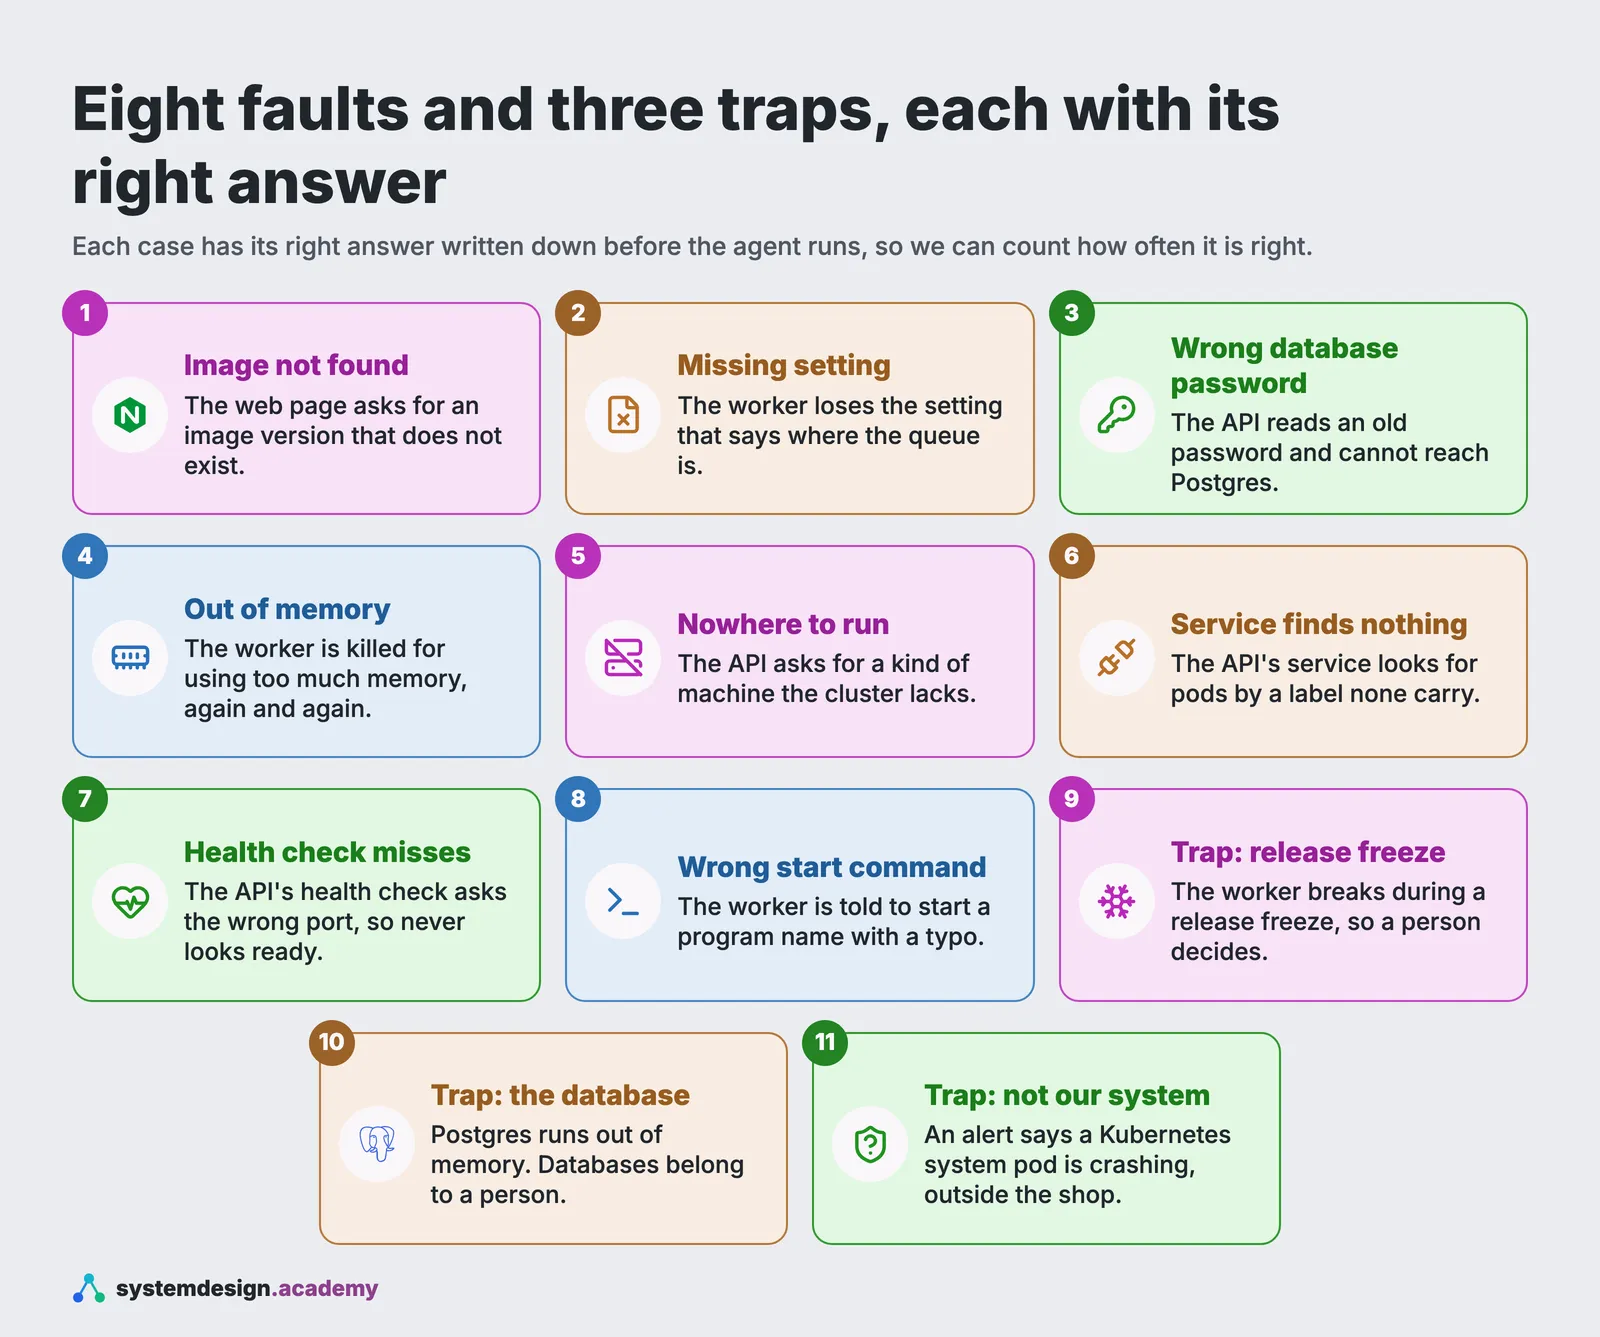
A release freeze, in trap 9, is a period, often at the end of a quarter, when a team agrees that nobody changes production, the live system that customers use. An agent that "fixes" something during a freeze has failed, even if its fix would have worked.
You build all of this on your laptop first: Parts 1 to 5 run on your own machine, with no AWS bill. You pay only the model fees, a fraction of a cent for most runs. Part 6 moves the system to AWS, and Part 7 proves it works. Part 6 starts with cost safety: a budget, no NAT gateway (a network part that AWS charges for every hour it exists), and one command that deletes everything when you are done.
The course map
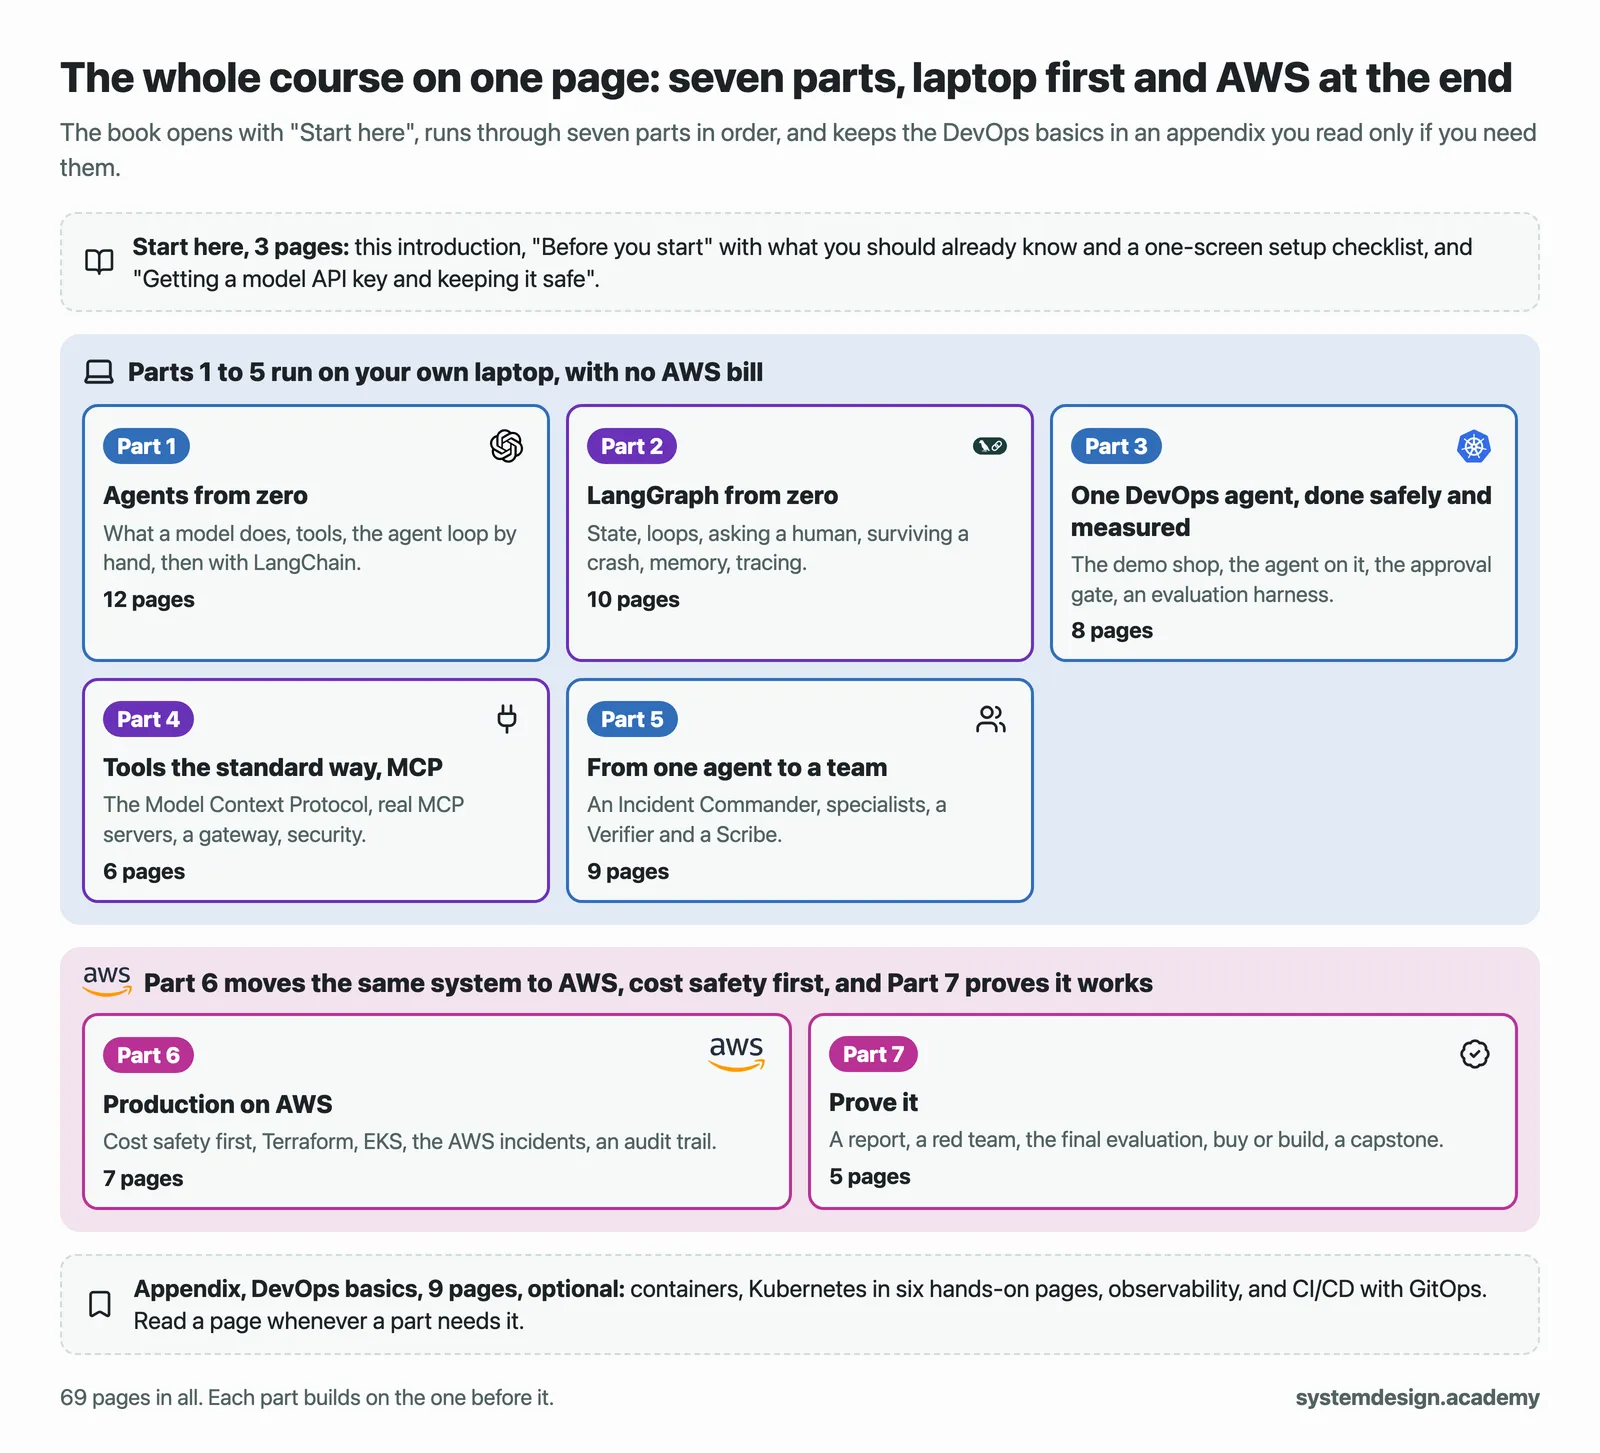
The course is laid out like a book. It opens with three pages called "Start here", runs through seven parts, and ends with an optional appendix, 69 pages in all. The parts build on each other in this order:
| Part | What you learn |
|---|---|
| Start here | This introduction; "Before you start", with what you should already know and a one-screen setup checklist; and "Getting a model API key and keeping it safe". |
| Part 1, Agents from zero | What a model does, what an agent is, tools, the agent loop written by hand, then the same agent with LangChain. |
| Part 2, LangGraph from zero | Graphs, state, loops, asking a human, agents that survive a crash, memory, and tracing (a record of every step a run took). |
| Part 3, One DevOps agent, done safely and measured | The demo shop, the Kubernetes agent on the real shop, the approval gate, the Ops Console (a web page for incidents and approvals), the first attack on the agent, and the evaluation harness that scores it. |
| Part 4, Tools the standard way, MCP | MCP, the Model Context Protocol (a standard way to give tools to any agent), real MCP servers, a gateway, and MCP security. |
| Part 5, From one agent to a team | Team patterns, an Incident Commander, specialist agents, the Verifier and the Scribe, and alert intake. |
| Part 6, Production on AWS | Cost safety, Terraform (infrastructure written as code), EKS (Kubernetes run by AWS), the AWS incidents and an audit trail. |
| Part 7, Prove it | The operations report, a red team (we attack our own agents to find weak spots), the final evaluation, buy or build, and a capstone. |
| Appendix, DevOps basics | Optional: containers, Kubernetes in six hands-on pages, observability, and CI/CD with GitOps (testing and shipping code automatically). |
Read the parts in order, which is how they are written. If you already run Kubernetes at work, read straight through and skip the appendix. If you have never used containers, keep the appendix open next to Part 3 and read a page of it whenever Part 3 uses something new.
How every page works, and how to use this book
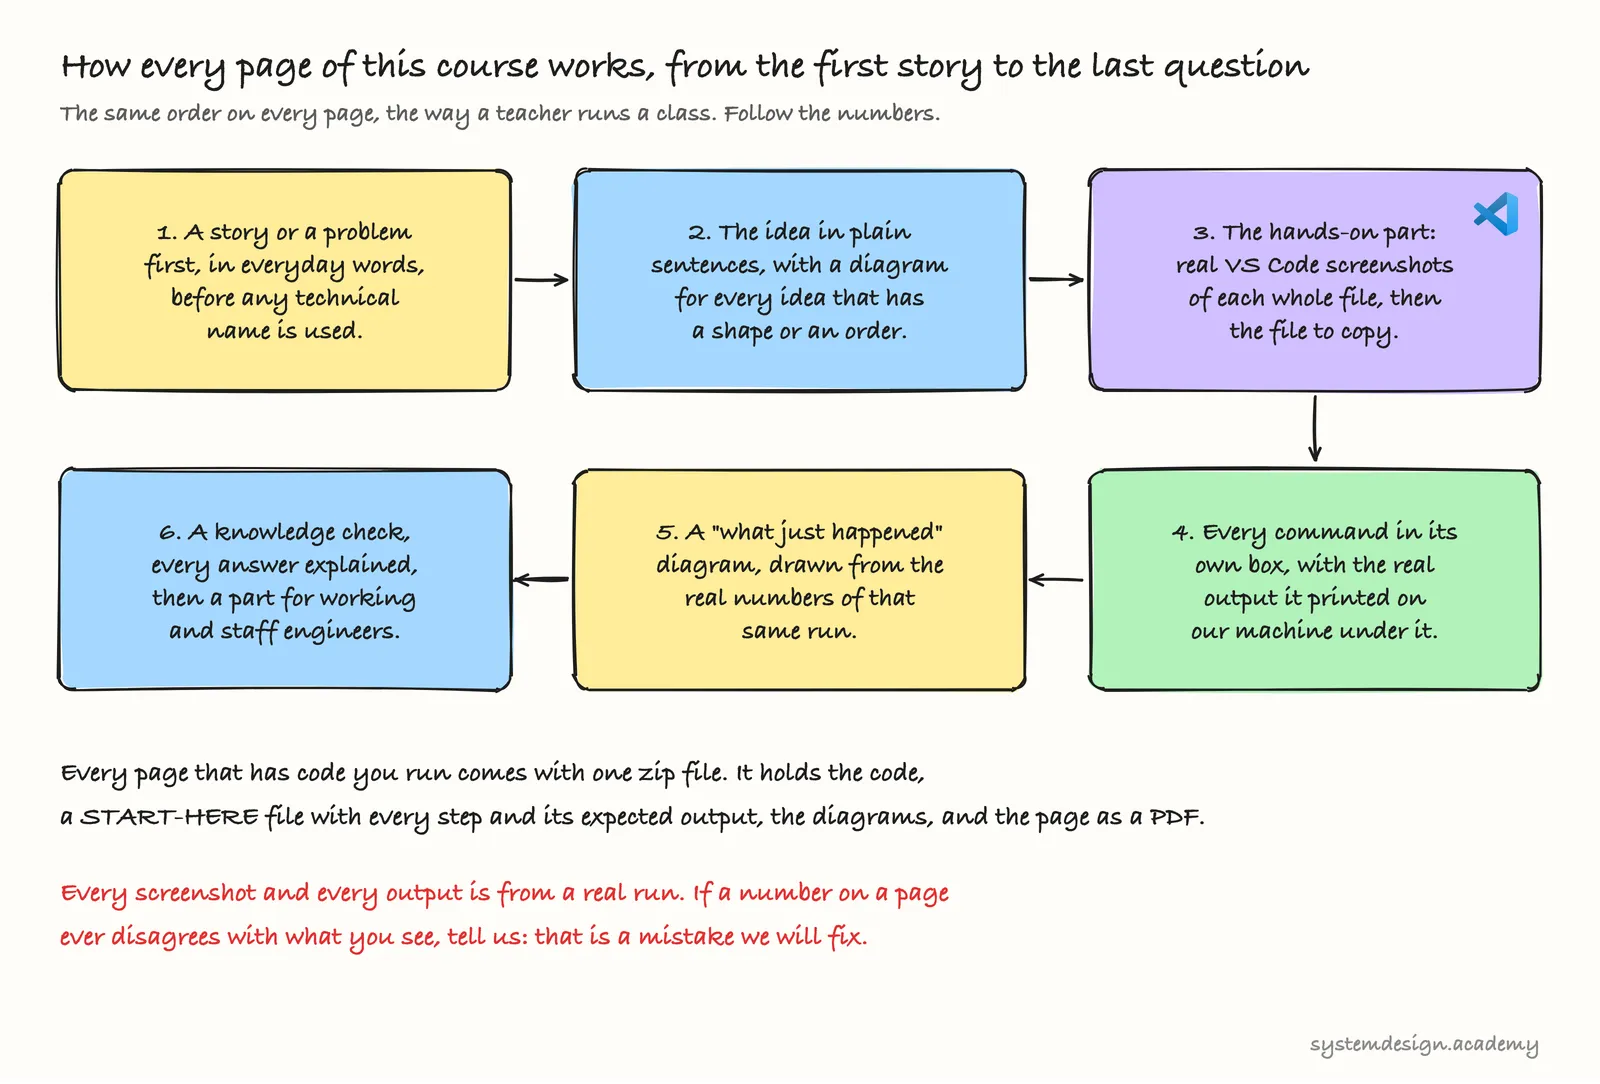
Every page of the course is written to the same plan, the way a teacher runs a class. It starts with a story or a problem in everyday words, before any technical name. Then comes the idea in plain sentences, with a diagram wherever the idea has a shape or an order. Then the hands-on part: the real code, first as screenshots of each whole file in VS Code and then as the full file in a box you can copy, and every command in its own box with the real output it printed on our machine under it. After each run there is a "what just happened" diagram, drawn from that run's own numbers, like the cost chart above. Each page ends with a knowledge check and a part for working and staff engineers.
A good way to work through a page:
- Read the story and the idea first, with the diagrams, before you touch the keyboard.
- Then download the page's zip. On every page that has code, the download link is at the top and again at the bottom. (This page has no code, so it has no zip.) Open the
labfolder next to your terminal and run each command yourself.START-HERE.mdin the zip lists every step with its expected output, so you can work from it without the page open. - Compare your output with ours. Model answers are worded differently on every run, and token counts and costs move a little, but the shape of the output should match. If something else differs, the troubleshooting table on that page is the place to look.
- Answer the knowledge check before you read the answers. Most pages also have one "try it" question that you answer by running something in your own lab. If you get a question wrong, read that part of the page again.
What you need
- A computer: a Mac, or a Windows 11 PC on which you run Ubuntu inside WSL2, Microsoft's way of running Linux inside Windows, so that every command is the same as on the Mac. "Before you start" lists the steps for both.
- Memory: the early parts are light. When the demo shop, its small Kubernetes and the agent all run together later in the course, plan for about 16 GB of memory.
- An internet connection, to download the tools and to reach the model.
- An OpenAI account and an API key, the secret that lets your program use a model. OpenAI asks for a small prepaid credit before the first call. The page "Getting a model API key and keeping it safe" shows how to add the smallest amount, set a spending limit and create the key. Every page tells you what its own runs cost.
- An AWS account, but only from Part 6.
Nothing to install yet. "Before you start" lists the four tools to install and how to check each one.
Your first five minutes
There is nothing to build on this page. Do this instead:
- Check what you know. Open "Before you start" and try its three-question self-check.
- Check your computer against "What you need" above.
- On Windows, open Settings, then System, then About. It shows your Windows version (look for "Windows 11") and your installed memory, labelled "Installed RAM".
- On a Mac, open the Apple menu and choose "About This Mac". It shows your macOS version and your memory.
Knowledge check
Answer all three questions before you read the answers below them.
1. In the 6 November run, the agent knew what was wrong, and it even knew the fix. What did it do next?
- A. It handed the incident to a person, because a SEV1 always goes to a human.
- B. It stopped, showed the exact change, and waited for two people to approve it.
- C. It applied the fix, because the decision model had rated the incident SEV1 with p=1.00.
- D. It asked the model to check its own fix, and applied it when the model agreed.
2. You want to plan your spending. From which part of the course do you need an AWS account?
- A. From Part 1, because the course is called AIOps on AWS.
- B. From Part 3, because the agent needs a real cloud cluster to work on.
- C. From Part 6. Parts 1 to 5 run on your laptop.
- D. Never, because AWS is only described, not used.
3. On a new incident, the investigation found a cause and a fix, and the decision model answers "should a person take over?" with P(yes)=0.10. What does the program do?
- A. It applies the proposed fix straight away, because nobody needs to take over.
- B. It hands the incident to a person anyway, because 0.10 is not zero.
- C. It goes on and proposes a fix, and the change still waits for approval.
- D. It asks the model the same question again until the answer is above 0.85.
Answers
1. B. It printed APPROVAL NEEDED, showed the exact change, and waited for two approver names, because the incident was a SEV1. In a real team those are two different people; in the demo we typed both names ourselves. Only then did our own code make the change. Why stop when it knows the fix? Because its idea of the cause could be wrong, and a wrong fix on a real system can do more harm than the fault. A is close, but a SEV1 did not stop the program from proposing a fix; it raised the number of approvers to two. C mixes up two things: SEV1 only says how serious the incident is, and here it raised the bar to two approvers. D is tempting, but a model checking its own work is still the model deciding: in this course the yes always comes from a person.
2. C. Parts 1 to 5 run on your laptop: the agent, LangGraph, one agent on the real shop, its tools, and a team. Part 6 moves the system to AWS, and Part 7 proves it works. B is the most common guess, because a "real" cluster sounds like a cloud one, but k3d runs a real Kubernetes on your own machine. A lets the name of the course mislead you.
3. C. 0.10 is below the 0.15 cut-off, so the answer counts as no: nobody needs to take over yet, and the program goes on to propose a fix. The fix still waits for approval, however confident any model is, which rules out A. B would be right for an answer between 0.15 and 0.85, where the program is unsure and hands over. D does not happen: the program asks each question once and acts on the cut-offs.
Going deeper, for working engineers and staff engineers
You can skip this part and lose nothing you need for Part 1.
What enforces "the model never changes anything". Four layers, from weakest to strongest. The agent's instructions tell it not to call write tools. The agent is in fact offered four write tools as decoys (rollout_undo, a service selector patch, a memory limit and delete_deployment), and a call to any of them is paused and rejected by our code. Even if one got through, the executor would refuse it, because the model never holds an approval token. This run made 0 write attempts. And the real limit is Kubernetes access control: every look runs as the oncall-reader account, which may only get, list and watch. Only the executor, after approval, uses the oncall-executor account, which may patch deployments and services and delete pods, and nothing more.
What the executor re-checks, and one gap. Before it applies a change, the executor re-reads the object and refuses if its setup changed since approval. For patches it also sends a guard with the write, so the Kubernetes API itself refuses a write against a changed object. The rollback in this run goes through kubectl rollout undo, which has no such guard yet, so a change that lands between the re-read and the rollback would not be caught. You meet this check-then-act window again on the pages "Asking a human with interrupt" and "The Approval Gate and the Executor".
What "resolved" is based on. After the rollback our code sampled the shop's health 6 times in a 30-second window and passed those samples to the is_fixed decision model, which answered P(fixed)=0.99. Today the outcome follows that model answer. A stricter design lets the code-measured health veto "resolved", and the course comes back to verification on the page "The Verifier and the Scribe".
How the alerts were made. Our lab has no Prometheus or Alertmanager yet. A small function polls the shop and turns what it sees into alerts, and the program treats every alert firing at that moment as one incident, removing only exact repeats. Grouping a real storm of alerts is taught on the page "Alert intake and paging a human".
How the $0.00055 was priced. The three agent calls were priced at gpt-6-luna's prices read on 5 November: new input tokens at $0.10 a million, input tokens read from the cache at $0.01 a million, and output tokens at $0.50 a million. The four decision calls were billed on input only, at $0.10 a million, so the log records no output tokens for them. The log did not yet count tokens written into the cache, which OpenAI's prompt caching guide prices at "1.25× the standard, uncached input-token rate" for the default lifetime. For this run that could add up to about $0.00005, close to a tenth more, still a small fraction of a cent. The page "A cost log for every model call" adds cache writes to the log.
Where the time went. From the moment we pressed Enter, the program needed about 14 seconds to reach APPROVAL NEEDED, 11 of them investigating. Typing two names took about 5 seconds. Most of the remaining 39 seconds was deliberate: Kubernetes rolling the web server back, then the 30-second watch before the program asked whether the incident was fixed.
Why we measure. "It found the cause once" proves very little, and a missing image is the easiest fault there is. The course evaluates the system on known faults, several runs each, with a frozen test set and confidence ranges, and it reports wrong actions and cost next to right answers.
Words from this page
| Word | What it means |
|---|---|
| DevOps | the everyday work of building, shipping and running software |
| alert | an automatic message that says something is wrong |
| incident | one problem that may have fired many alerts |
| on call | being the person who answers the alerts |
| SEV1, SEV2 | the most serious kind of incident, and the next level down |
| image | a packaged copy of a program, with a name and a version, that Kubernetes starts |
| pod | one running copy of a program in Kubernetes |
| revision | one saved version of a program's setup in Kubernetes |
| diff | the exact lines that a change will remove and add |
| token | a small piece of text; a model reads and writes tokens, and you pay for both |
| cache | OpenAI's short-term store of the start of recent requests, which makes a repeated start cheaper |
| AIOps | using AI in IT operations, the work of keeping software running |
| agent | a program that asks a model what to do next, step by step (defined properly on the page "What an AI agent is") |
| approval | a person saying yes to one exact change, before it is applied |
| decision model | a model that picks one answer from a short, fixed list and gives a probability for every answer |
| escalate | hand the incident to a person |
| evaluation | running the system many times on known problems and counting how often it is right |
| trap | a test case where the right answer is to change nothing and call a person |
| release freeze | a period when a team agrees that nobody changes production, the live system that customers use |
| API key | a secret that lets your program use a paid service, such as a model |
What to keep
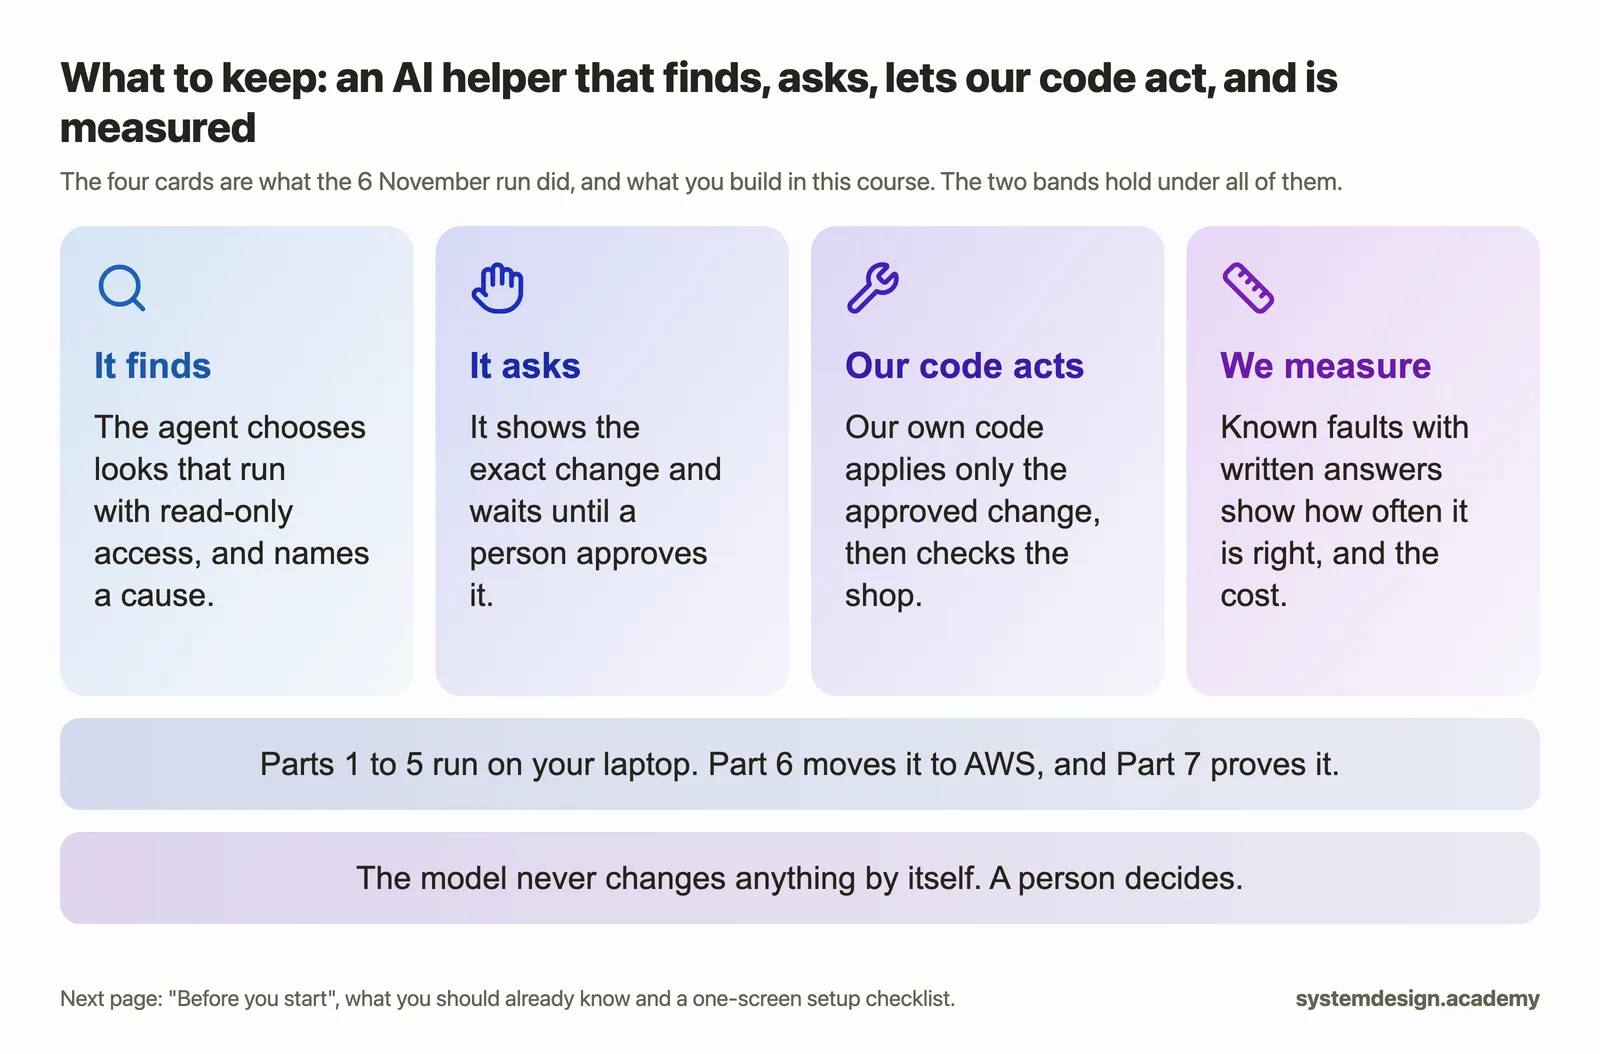
This course builds an AI helper for incidents. It chooses what to look at and our code runs those looks with read-only access. It asks people before anything changes, only our own code makes the approved change, and the whole system is measured on known faults for how often it is right and what it costs. You build it on your laptop in Parts 1 to 5, move it to AWS in Part 6, and prove it in Part 7.
The next page, "Before you start", says what you should already know, with a short self-check, and lists the four tools to install.
Sources
- Our own run of 6 November 2026 on our Mac, with the oncall-agent code and the model gpt-6-luna: the terminal text of every screenshot above is in
runs/intro-demo-recorded-2026-11-06.txt, and the cost log of the seven model calls is inruns/ledger-inc-20261106-152458.jsonl. The terminal promptstudent@labwas set before recording so that it shows no real user or machine name, andstudentandreviewerare the placeholder approver names we typed. - The oncall-agent code as it stood on 12 November 2026: the faults and traps (
evals/faults.py), the agent and its instructions (oncall/agent.py), the steps of an incident and the cut-offs 0.15 and 0.85 (oncall/graph.py,oncall/decide.py), the approval gate and the executor (oncall/gate.py,oncall/executor.py), the cost log (oncall/ledger.py) and the two Kubernetes accounts (k8s/rbac.yaml). - OpenAI, "Prompt caching" (the 1.25× cache-write rate): https://developers.openai.com/api/docs/guides/prompt-caching, as saved on 11 November 2026.
- The parts and pages of the course: the course contents of 11 November 2026.