Contents Start here
Start here
Before you start: the skills this course assumes, the tools to install, and a five-minute self-check on AWS
The Python, SQL, terminal and Git this course assumes, the tools to install, and a five-minute self-check that ends with your AWS account answering.
Free lesson Code zip with this lesson
About 50 minutes to read, and about 20 minutes for the hands-on lab.
Your progress0 of 7 checks answered right
It fills only when a prediction matches the measured result. Reading a page does not move it. It is kept in this browser.
Become a Forward Deployed Engineer: Ship AI for Real Customers. Start here.
Download the code for this lesson: lesson-before.zip. It holds START-HERE.md with every step and its expected output, the course's lab folder (the setup check, the self-check and its two small files, the Makefile, and the Terraform and helper scripts the next lesson uses), the diagrams, and this lesson as a PDF.
This lesson makes sure that nothing stops you on the evening you build your first lab. It says what you should already know, and it gives you a five-minute self-check in Python and SQL so that you can test yourself. It lists the seven tools to install on your own computer, on Windows, Linux or macOS, and the one command that checks each of them. Then it checks your AWS account from your terminal, checks that the account is allowed to run the lab's one small server, and sets a $10 budget alert before anything is built. Nothing in this lesson creates a server. The next free lesson, "Meet Bramfield Mutual, the customer in this course", builds the lab.
After this lesson you will be able to:
- say whether you have the Python, SQL, terminal and Git this course assumes, by predicting what a short program prints before you run it;
- install the AWS CLI, the Session Manager plugin, Terraform, Python, uv, Git and VS Code, and check each one with one command;
- run
check_setup.pyand read its ten checks, including the one that proves your AWS account answers, as an ordinary user, in us-east-1; - explain what
make quotameasures, and why one virtual CPU is enough for this course's lab; - set a $10 budget alert, and explain why a budget only warns you, and what really limits a forgotten session.
Time: about 40 to 45 minutes to read, plus the installs: about 30 to 45 minutes if you have none of the tools yet. The checks and the self-check take about five minutes.
What it costs: nothing. The checks only read, and AWS does not charge for a budget that only sends email alerts. The lab that the next lesson builds costs about $0.03 an hour while it runs, and this lesson explains that number before you spend a cent of it.
Dates and times: every time in this lesson is in UTC. We ran every command in this lesson on 13 November 2026, at about 07:56 UTC, which was 13:26 in the afternoon where we work, in India, in the terminal of our own VS Code. Every output below is filled in from that recording, not typed.
The problem: a course that stops at the first command
Most people who give up on a technical course do not give up on the hard ideas. They give up on the first evening, when a command prints an error they have never seen, and they cannot tell whether the problem is them, their computer or the course. A course like this one makes that more likely, because its lab is not one program on your computer. It is a small company's worth of systems in your own AWS account: an old claims database, an old SOAP service, a work queue, a file drop and a sign-in service, all on one server that nothing on the internet can reach. A SOAP service is an older style of web service that sends its messages as XML, a work queue holds jobs that are waiting to be done, and a file drop is a folder where other companies leave files for Bramfield to collect.
The company is Bramfield Mutual Insurance Company, a car and home insurer in Pennsylvania, and it is fictional. It does not exist, any likeness to a real company is accidental, and every record in its systems is synthetic, which means it was made up by the course's own generator program. You will work for Bramfield from the first meeting to the day its claims team uses what you built.
This lesson takes the risk out of that first evening. Think of a pilot's checklist before take-off. Nobody expects trouble, but every switch is checked on the ground, where a problem costs nothing. You check, before the first lab, that you have the few skills the course assumes and that your tools work. Every command here shows the output it printed for us, so you can compare yours line by line.
Words for this lesson
Eight words carry most of this lesson. Here they are first in plain words, each with an everyday comparison. Each one is explained again where it first matters.
| Word | Plain meaning | Everyday comparison |
|---|---|---|
| AWS account | your own space at Amazon Web Services, where the lab is built and billed | a rented workshop with your name on the door and a meter on the wall |
| region (us-east-1) | one group of AWS data centers in one area; the course uses N. Virginia | which branch of a bank you open your account at |
| root user | the identity the AWS account was created with, which can do anything, even close the account | the master key to the whole building, kept in a safe |
| Terraform | a tool that builds cloud resources from text files and deletes them all again with one command | a flat-pack furniture instruction sheet that also tells you how to take it apart |
| Session Manager | the AWS service that reaches the lab server from inside, with no open door to the internet | a staff corridor into a vault that has no street door |
| vCPU and service quota | a vCPU is one share of a processor; the quota is how many of them your account may run at once | a car park with a fixed number of spaces for your account |
| budget alert | an email from AWS when your spending crosses a line you set; it stops nothing | a smoke alarm: it warns you, but it does not put out the fire |
| synthetic data | records made up by the course's own program, so no real person is in them | the play money in a board game |
What you should already know
Idea: You need Python, SQL, the terminal and Git at a working level, and an AWS account, while the AI, the AWS services and the customer work are taught from zero.
A cooking class on soups expects you to chop an onion and light the stove already. It teaches the soups, not the knife. This course works the same way.
The course teaches the job of a forward deployed engineer, the AI it uses, and the parts of AWS it needs, from zero. It does not teach Python, SQL, the terminal or Git. You need them at a working level, not an expert's:
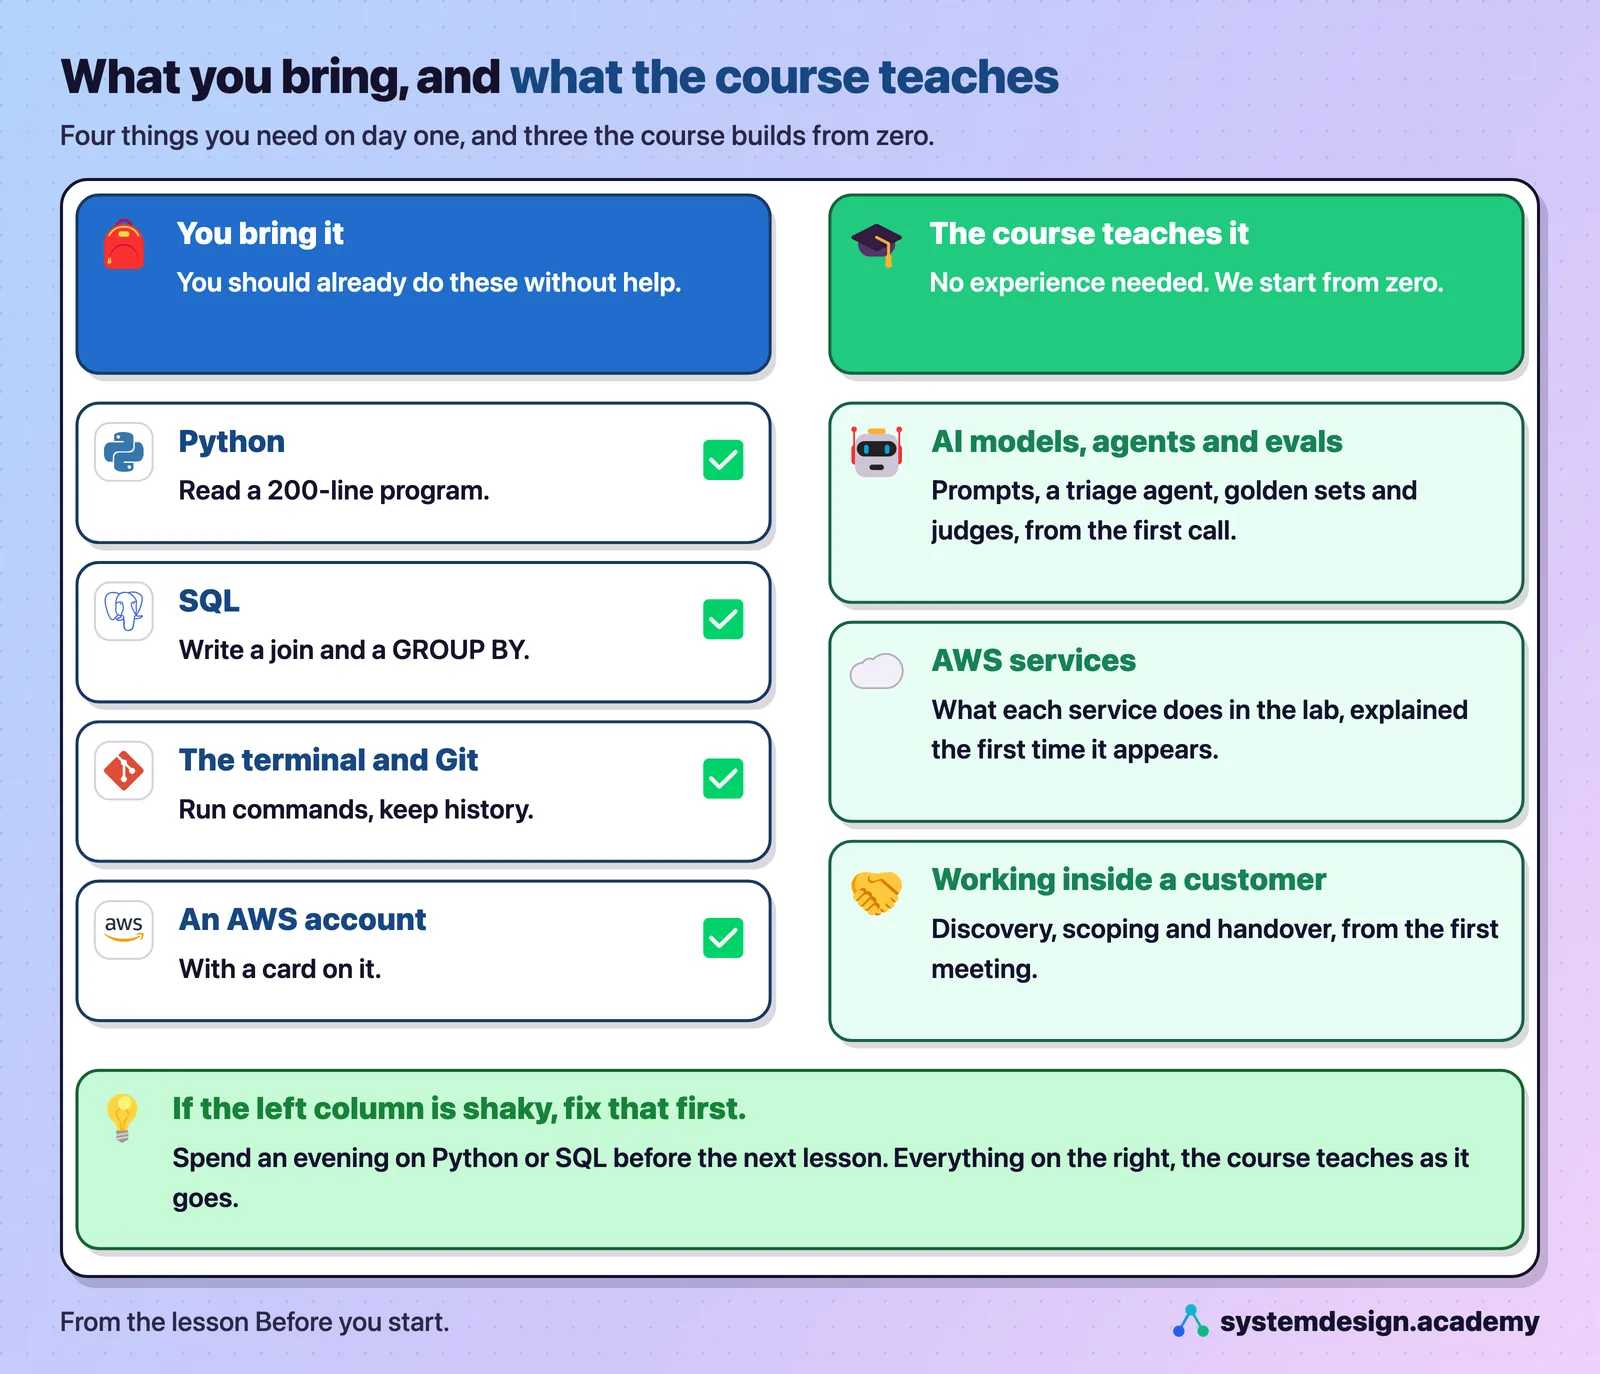
- Python. You can read a program of about 200 lines with functions, loops, lists and dictionaries, say roughly what it will print, and change a line of it. You can read a CSV file, a plain text table with commas between the values, with Python's own
csvmodule. You do not need classes, async code or any web framework yet. - SQL. You can write a
SELECTthat joins two tables, filters the rows withWHERE, and totals them withGROUP BY. Bramfield's claims live in a PostgreSQL database, and much of the course is reading it. - The terminal and Git. You can open a terminal, move between folders with
cd,lsandpwd, run a command, and read what it prints, errors included. You can make a Git repository, commit to it and look at its history. The course keeps your working notes and code in Git from the first day. - An AWS account. You have one, or you can create one at aws.amazon.com with an email address and a payment card, and you can sign in to its console. You do not need to know AWS: every part of it that the lab uses is explained the first time it appears.
You do not need any AI, AWS or consulting experience. Models, agents, retrieval and evaluation are taught from zero when the course first needs them. If the Python or the SQL is new to you, spend a week on it first: Python's own tutorial at docs.python.org is free and good, and the PostgreSQL tutorial at postgresql.org covers joins and grouping.
Watch out: Do not skip the self-check near the end of this lesson because the list above looks easy. Reading a list and nodding is not the same as predicting what a program prints. The self-check takes five minutes and tells you the truth.
Which of these must you already be able to do on the first day of the course?
Show the answer
The answer: B.
Write a SQL query with a join and a GROUP BY. The course assumes Python, SQL, the terminal and Git at a working level. AI agents and evals, the AWS services and working with a customer are all taught from zero, the first time the course needs them.
The tools, and what each one is for
Idea: Seven tools on your own computer do all the course's work, and each one has a single command that proves it is installed.
A carpenter checks the toolbox before driving to a job. Each tool does one thing, and one missing tool can stop the whole day. Your computer is the toolbox for this course.
Your own computer is your desk. It runs the editor, the small Python programs, and the commands that build, reach and delete Bramfield's systems in AWS. It needs no special power: the heavy work runs in the cloud.
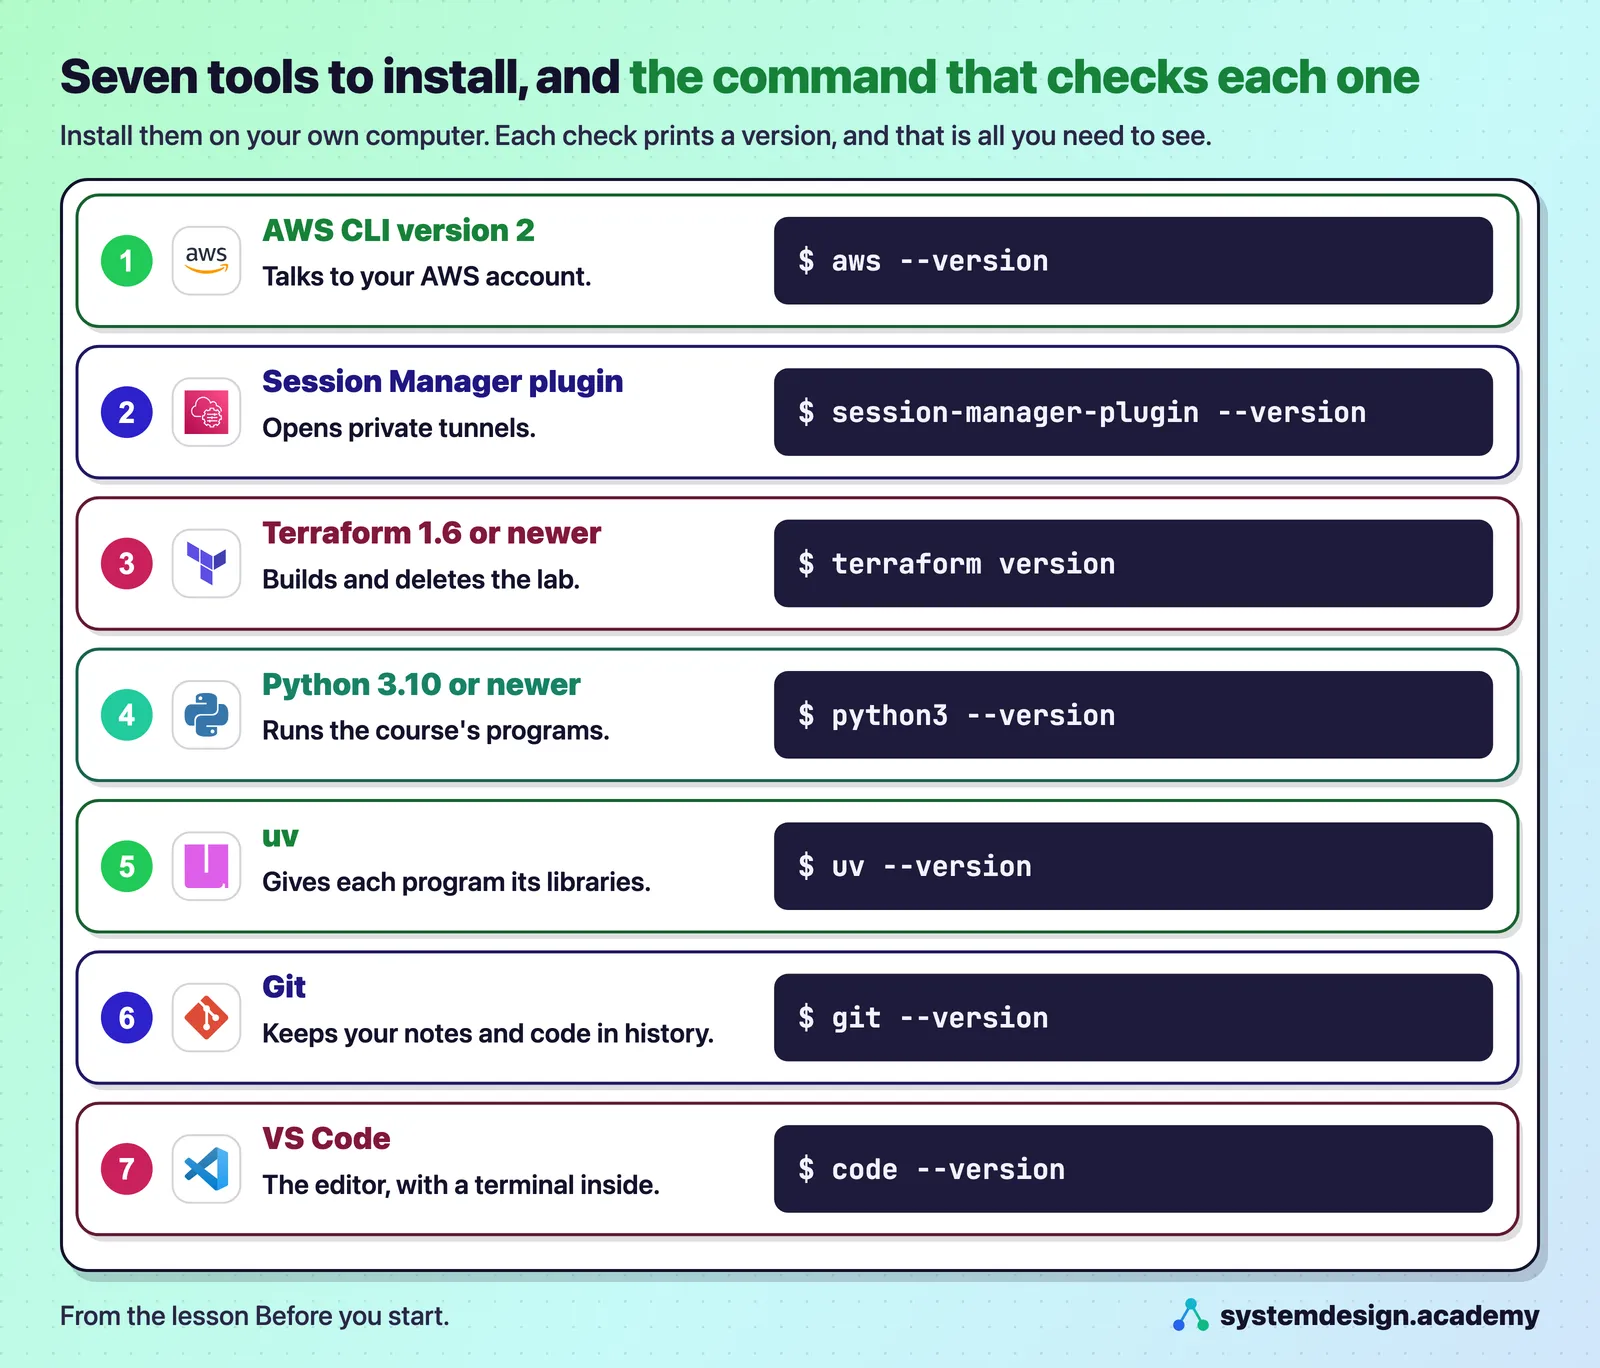
| Tool | What it is for in this course |
|---|---|
| AWS CLI, version 2 | Amazon's command-line tool. Every lab command uses it to talk to your AWS account. After you install it, run aws configure once and give it an access key for an ordinary user in your account and the region us-east-1. |
| Session Manager plugin | A small add-on for the AWS CLI. It opens a private tunnel from your computer to the lab server, which has no open ports at all. A port is a numbered door that a program listens on for connections. |
| Terraform 1.6 or newer | A tool from HashiCorp that builds cloud resources from text files and deletes them again. The lab is 28 resources, such as the network, the firewall rules and the server, and Terraform keeps track of every one, so that one command removes them all. |
| Python 3.10 or newer | Runs the course's programs. The checks in this lesson need nothing beyond Python itself. |
| uv | A fast tool from the company Astral that installs the right libraries for each program and runs it, with uv run. The lab's look-around and cost programs use it from the next lesson on. |
| Git | Keeps your working notes, decision log and code under version control, as a real engagement would. |
| VS Code | The editor. Its built-in terminal is where every screenshot in this course was taken. |
You also need two small programs that most systems already have. make runs the short commands in the lab's Makefile, and nc (netcat) is what the tunnel script uses to check that a tunnel is open. On macOS both come with the system and Apple's command line tools; on Ubuntu they are the packages make and netcat-openbsd. check_setup.py does not check these two or VS Code, so check them yourself with make --version, nc -h and code --version.
Installing them on Windows, Linux and macOS
Install each tool from its official page, listed under Sources at the end. Where we are sure of the exact commands, they are written here. Where a tool's install changes with your system, we send you to its official page rather than guess.
On Windows 11, type every course command in Ubuntu inside WSL2, Microsoft's way of running Linux inside Windows. Open PowerShell as administrator, run wsl --install, restart, and open Ubuntu once from the Start menu to create your Linux user. Then install every tool below inside Ubuntu with the Linux instructions, except VS Code: install VS Code on Windows itself, add its WSL extension, and then code . typed in Ubuntu opens the folder you are in. Keep your course folders in Ubuntu's own home folder, not on the C: drive. We did not run this course on Windows ourselves; these are Microsoft's and each tool's own instructions.
On Linux (Ubuntu 24.04, or Ubuntu inside WSL2):
sudo apt update && sudo apt install -y unzip make netcat-openbsd git python3
curl "https://awscli.amazonaws.com/awscli-exe-linux-x86_64.zip" -o "awscliv2.zip"
unzip awscliv2.zip
sudo ./aws/install
curl "https://s3.amazonaws.com/session-manager-downloads/plugin/latest/ubuntu_64bit/session-manager-plugin.deb" -o "session-manager-plugin.deb"
sudo dpkg -i session-manager-plugin.deb
curl -LsSf https://astral.sh/uv/install.sh | sh
These are the AWS CLI and Session Manager commands for an x86 processor, copied from AWS's own pages. On an ARM computer, both AWS pages give a different download address: use theirs. Ubuntu 24.04 already ships Python 3.12. For Terraform, HashiCorp's "Install Terraform" page gives these lines for Ubuntu, which add HashiCorp's own package source and then install with apt; we copied them from that page on 13 November 2026:
wget -O - https://apt.releases.hashicorp.com/gpg | sudo gpg --dearmor -o /usr/share/keyrings/hashicorp-archive-keyring.gpg
echo "deb [arch=$(dpkg --print-architecture) signed-by=/usr/share/keyrings/hashicorp-archive-keyring.gpg] https://apt.releases.hashicorp.com $(grep -oP '(?<=UBUNTU_CODENAME=).*' /etc/os-release || lsb_release -cs) main" | sudo tee /etc/apt/sources.list.d/hashicorp.list
sudo apt update && sudo apt install terraform
On macOS: install Apple's command line tools with xcode-select --install, which brings Git and make. Install the AWS CLI with the macOS installer package from AWS's install page, and the Session Manager plugin from AWS's page "Install the Session Manager plugin on macOS". If you use Homebrew, Terraform is:
brew tap hashicorp/tap
brew install hashicorp/tap/terraform
uv installs on macOS with the same curl -LsSf https://astral.sh/uv/install.sh | sh line as on Linux. For Python, the installer from python.org is the simplest; any version from 3.10 works.
Your AWS user. Never use the account's root user, the one you signed up with, for the labs: it can do anything, including close the account. Use an ordinary IAM user with its own access key. IAM, AWS's Identity and Access Management, is where you create users and decide what each one may do. Give that user's key to aws configure, or, better, use IAM Identity Center, AWS's single sign-on, with aws configure sso, which gives your terminal short-lived keys instead of a key that lasts forever. To be open about our own run: we used an administrator user named admin in the owner's own account, which is broader than the lab needs. The lesson "Your AWS account and model key, set up safely", in the paid course, narrows the permissions further. Whichever you choose, check_setup.py below marks the root user FIX.
Watch out: Never give
aws configurethe root user's key, not even "just for tonight". The root user can do anything, including close the account, so a leaked root key is the worst key you can lose. Make an ordinary IAM user first, and use its key.
If your AWS account is opened in India. An account with an Indian contact and billing address has its agreement with Amazon Web Services India Private Limited. That company bills in rupees rather than dollars and issues tax invoices, so expect GST on top of the dollar prices in this lesson. Some Indian debit and credit cards must have international or online payments switched on before AWS can charge them, so check with your bank before you start. Every figure in this course stays in US dollars.
Which of the seven tools keeps a record of every resource the lab builds, so that one command can remove them all again?
Show the answer
The answer: B.
Terraform. It builds the lab's 28 resources from text files and records each one in its state file, so make destroy can delete every one of them. The AWS CLI talks to AWS, the plugin opens tunnels, and uv runs programs, but none of them keeps that record.
Where everything in this course runs
Idea: Your computer holds only the tools, and Bramfield's systems run on one small server in your own AWS account that nothing on the internet can reach.
Think of a bank vault with no door onto the street. Staff reach it only through a guarded corridor from inside the building. Nobody outside can even knock. The lab server is the vault, and AWS Session Manager is the corridor.
Before you check anything, it helps to see where each piece will live. Your computer holds the tools. Bramfield's systems run in your own AWS account, in the region us-east-1 (N. Virginia), because Bramfield's rule is that its data stays in a US region.
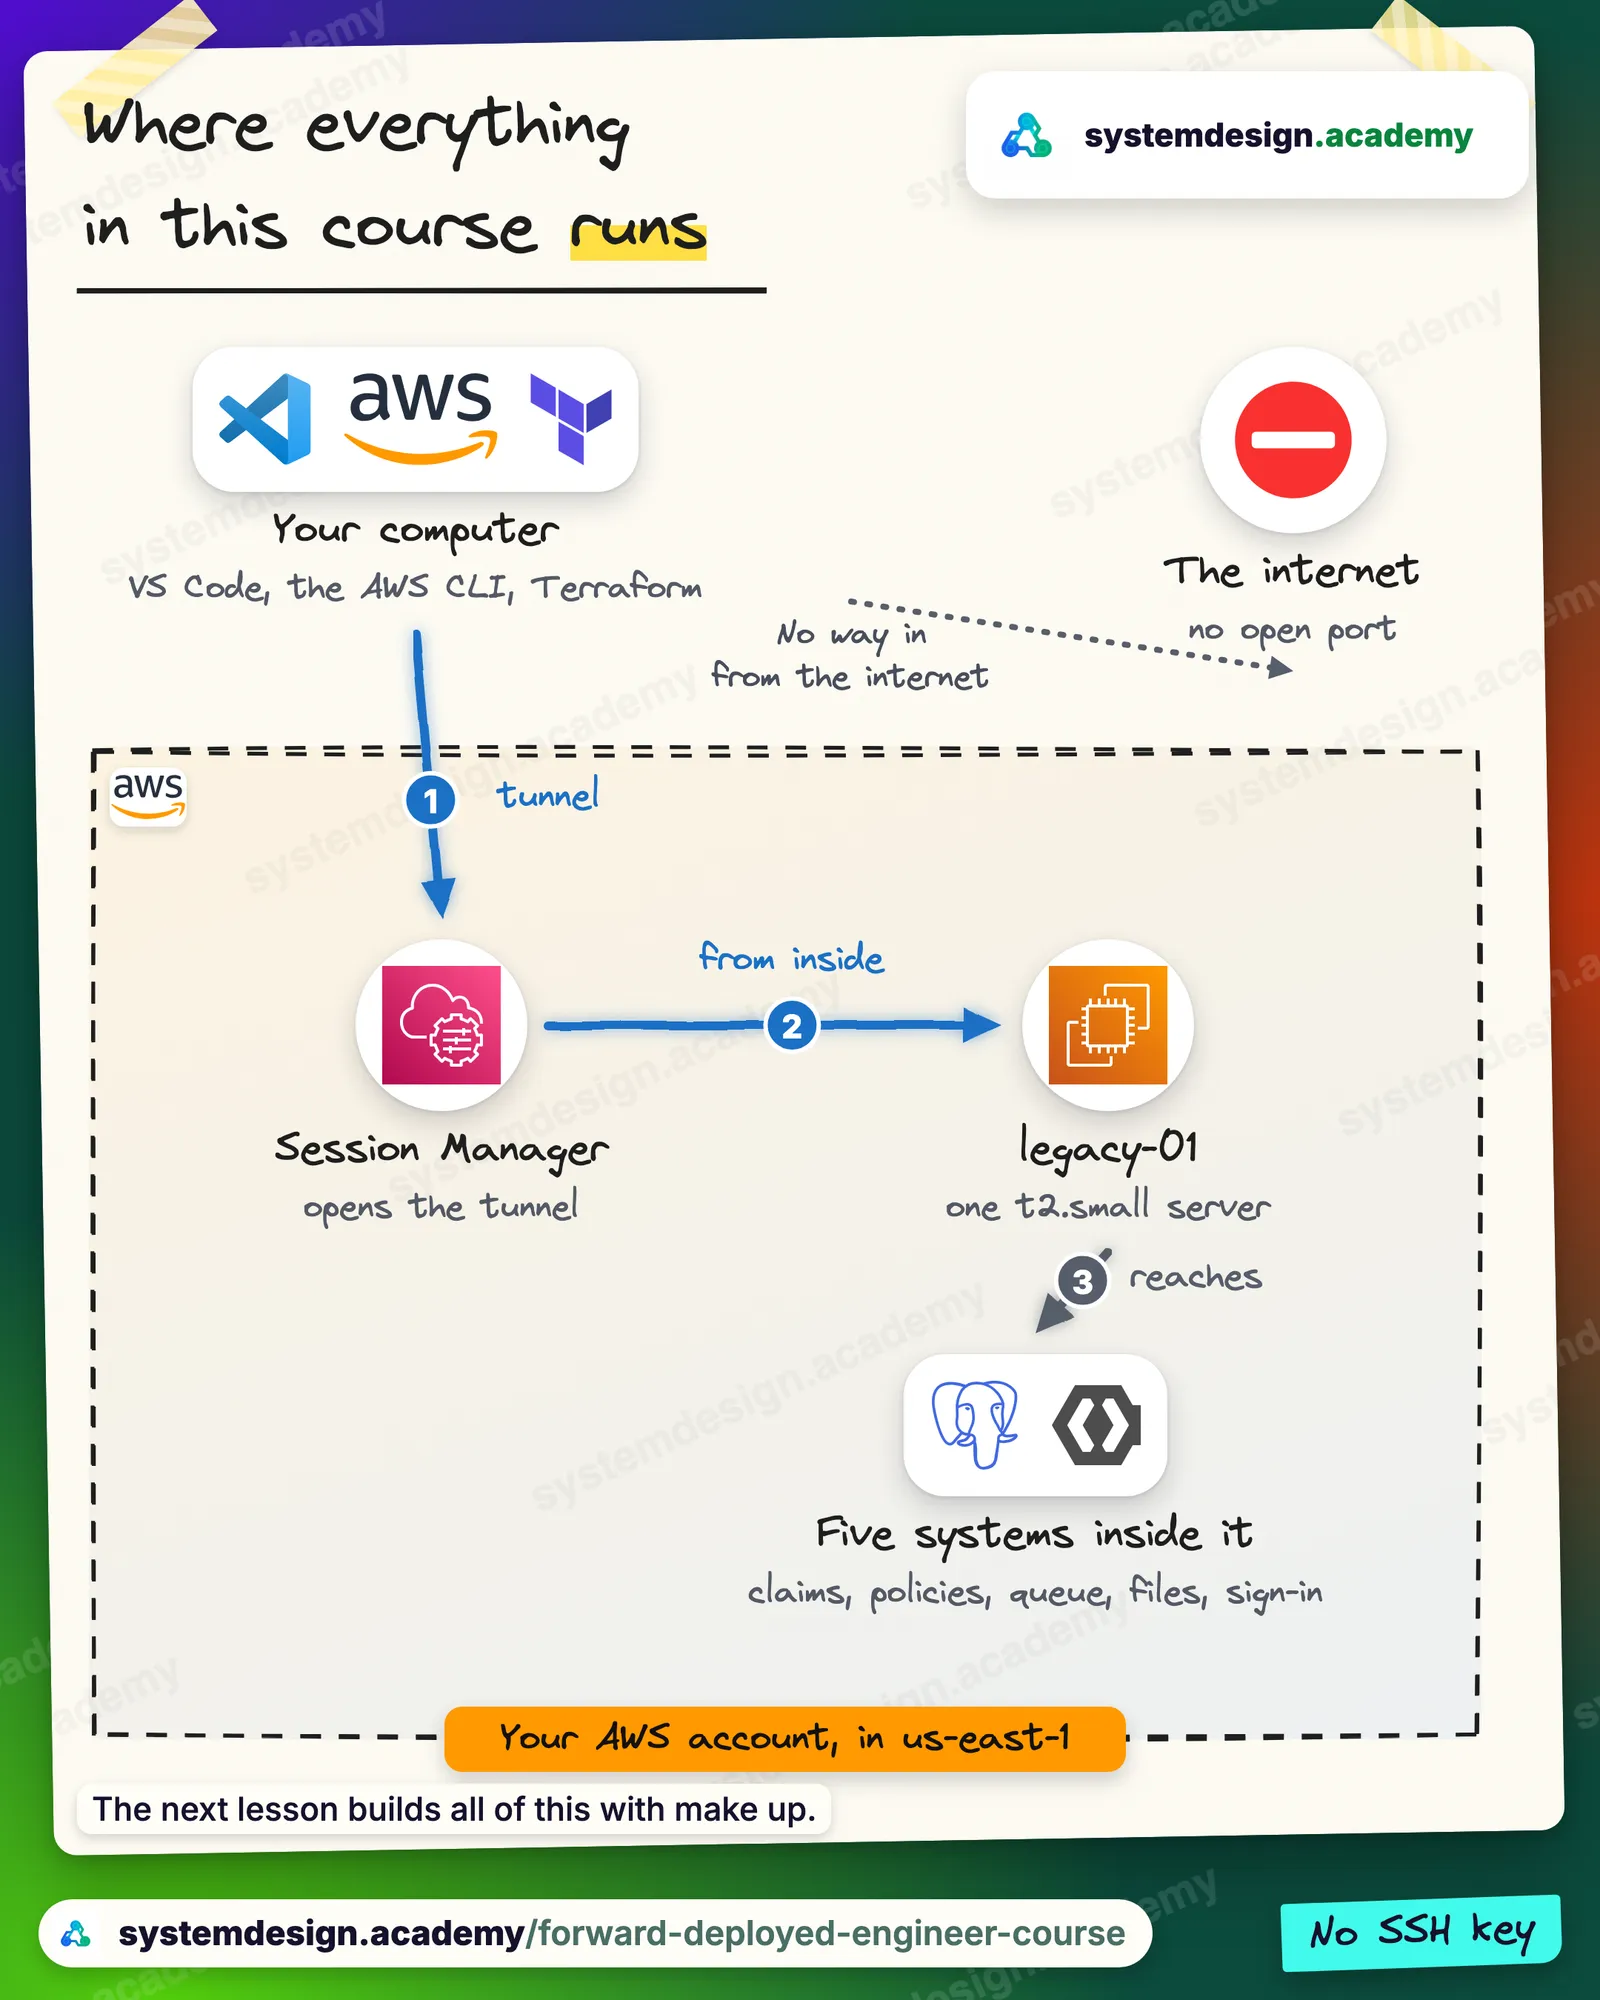
- One server. The next lesson builds a single small virtual machine, a
t2.smallwith 1 virtual CPU and 2 GB of memory, namedlegacy-01. A virtual CPU, or vCPU, is one share of a processor that AWS rents to you. - Five of Bramfield's systems on it, each in its own container, a sealed package that holds one program and everything it needs, and each listening only on the server itself: the claims database (PostgreSQL), an old SOAP policy service, a work queue, an SFTP file drop that receives a new file every night (SFTP is a secure way to copy files between computers), and Keycloak, an open-source sign-in server that plays the part of Bramfield's single sign-on, the one login its staff use for every system. A sixth container, the generator, runs once to build the synthetic data.
- Nothing open to the internet. The server's firewall, which AWS calls a security group, has no inbound rules at all. There is no SSH key, the usual way to log in to a Linux server from outside. You reach the server through AWS Session Manager, which connects from the inside, and the Session Manager plugin carries private tunnels from five ports on your own computer to the systems on the server.
This is why the tools above matter: the AWS CLI and Terraform build it, the plugin reaches it, and Python and uv read it.
Watch out: Do not add an inbound rule or an SSH key to the server "to make it easier to reach". The empty security group is what keeps Bramfield's systems off the internet, and Session Manager already gives you a way in.
The lab server's security group has no inbound rules, and there is no SSH key. How do you reach the claims database on it from your own computer?
Show the answer
The answer: A.
Through a Session Manager tunnel. Session Manager connects to the server from the inside, and the plugin carries a private tunnel from a port on your computer, 15432 for the claims database, to the system on the server. The public IPv4 address lets the server download software, but nothing can connect in through it.
What the lab will cost, and what protects your money
Idea: The lab costs about 3 cents an hour while it runs and about 5 cents a day while it is stopped, and what really protects your money is the server's 4-hour stop and make destroy, not the budget email.
A taxi meter is a good picture. The meter runs only while you ride. Parking the car costs a little each day. Handing the car back costs nothing. The lab's server, its disk and its deletion work the same way.
These are AWS's on-demand prices, the pay-by-the-hour prices with no contract, for us-east-1, read by the lab's make cost command from the AWS Price List on 13 November 2026. Check them on the day you start, because AWS changes them.
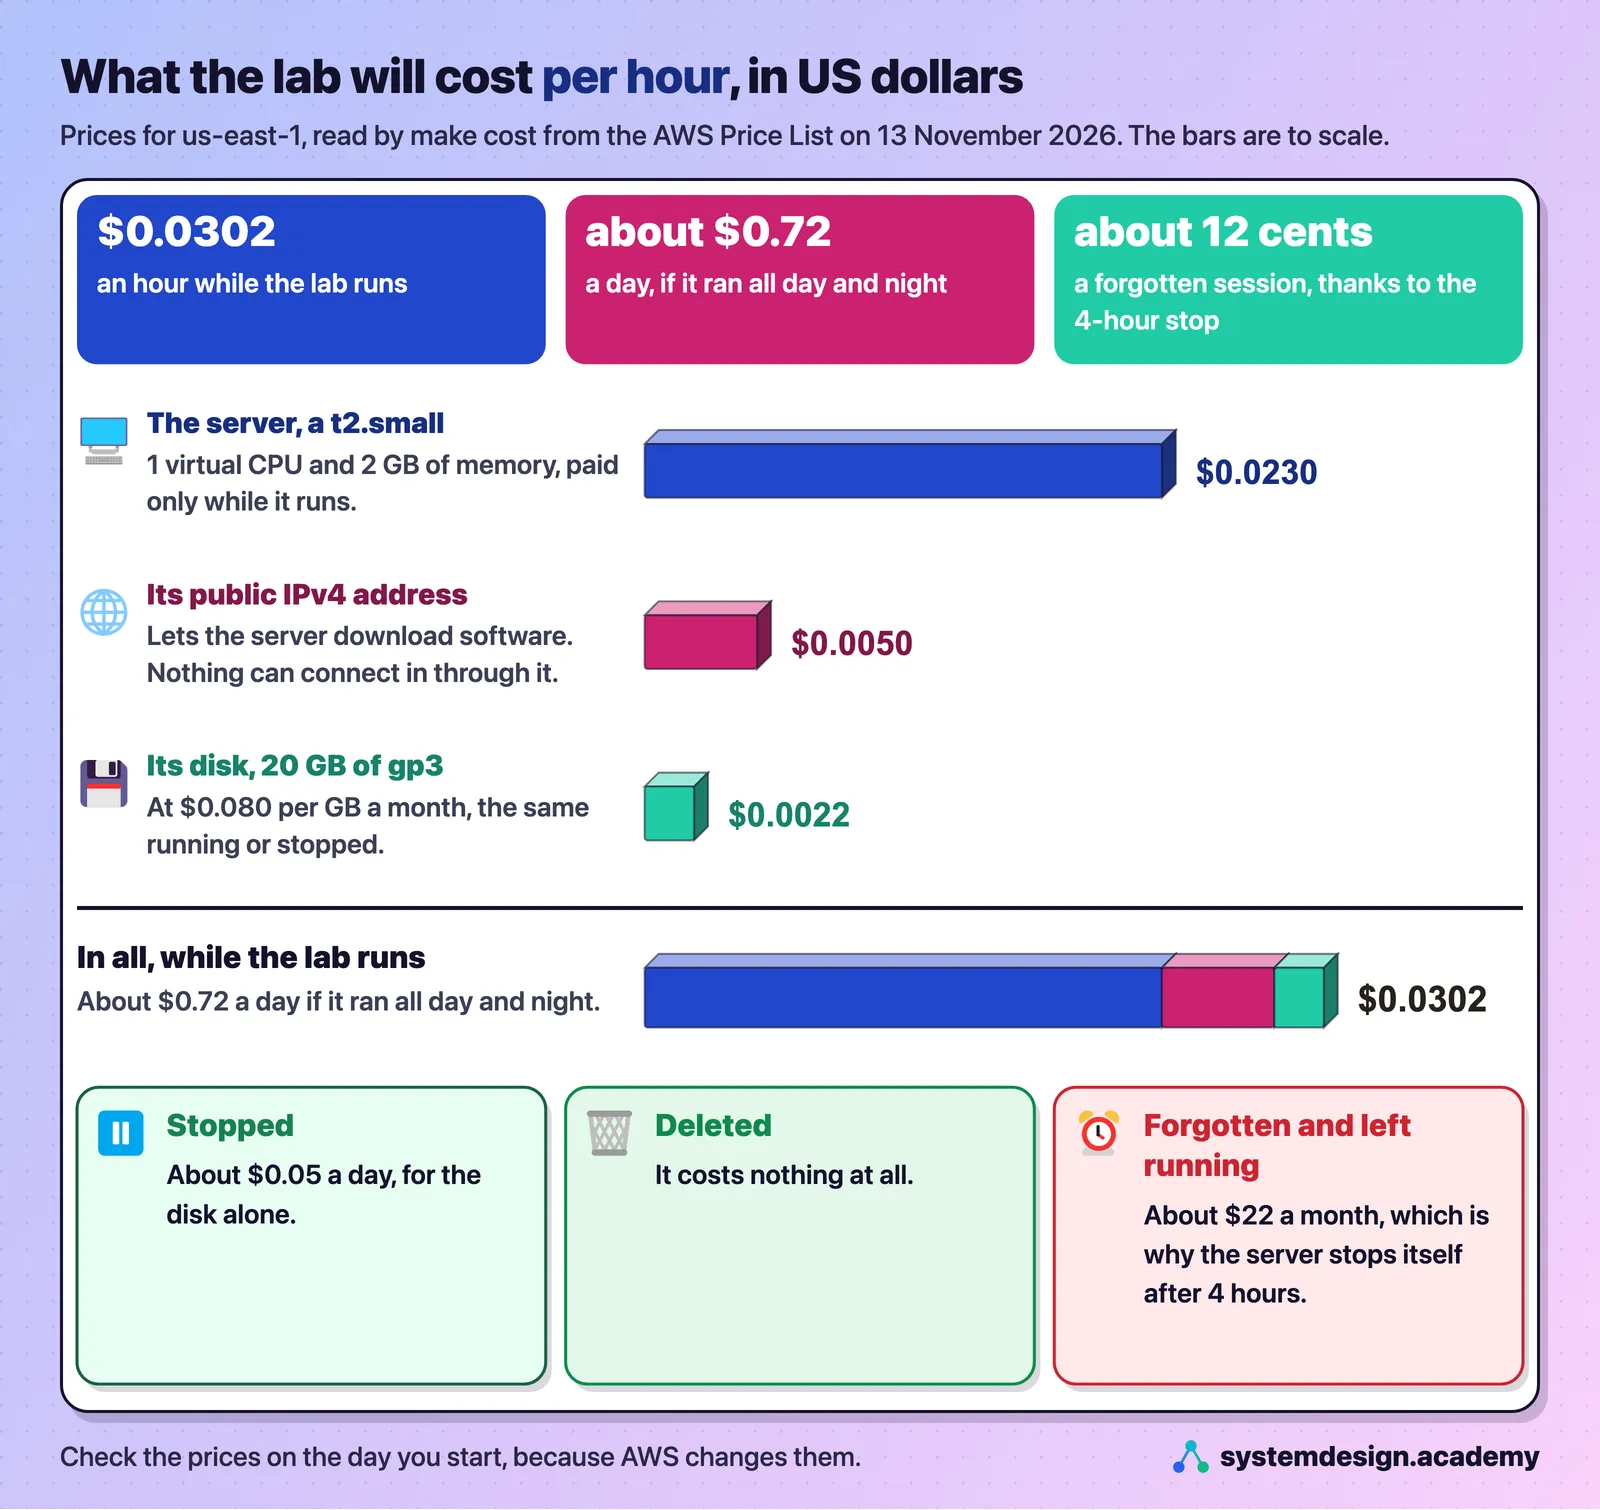
- While it runs: about $0.0302 an hour, so a two-hour evening costs about 6 cents.
- While it is stopped: about $0.05 a day, for the disk alone.
- Once it is deleted: nothing.
- Forgotten and left running, if nothing stopped it: about $22 a month. Something does stop it, as the next figure shows.
The course plan estimates about $8 to $12 of AWS for the whole course, plus about $5 a month for stopped disks while the course is in progress. Both are estimates, not measurements, and they were made for a larger server, a t3.large at $0.0832 an hour; the real lab is smaller, for a reason Step 3 explains.
Worked example: one evening, then three days stopped. Here is the arithmetic for an ordinary week of study, using the prices in the chart.
- You run the lab for a two-hour evening: 2 times $0.0302 is $0.0604, about 6 cents.
- Then you run
make stop. Only the disk is billed now, at $0.0022 an hour. A day has 24 hours, so a day stopped costs 24 times $0.0022, which is $0.0528, about 5 cents. - You come back three days later: 3 times $0.0528 is $0.1584, about 16 cents.
- In all, $0.0604 plus $0.1584 is $0.2188, about 22 cents for the evening and the three quiet days.
- If you then run
make destroy, the disk is deleted too, and from that moment the lab costs nothing.
Three different things protect your money, and it matters which does what:
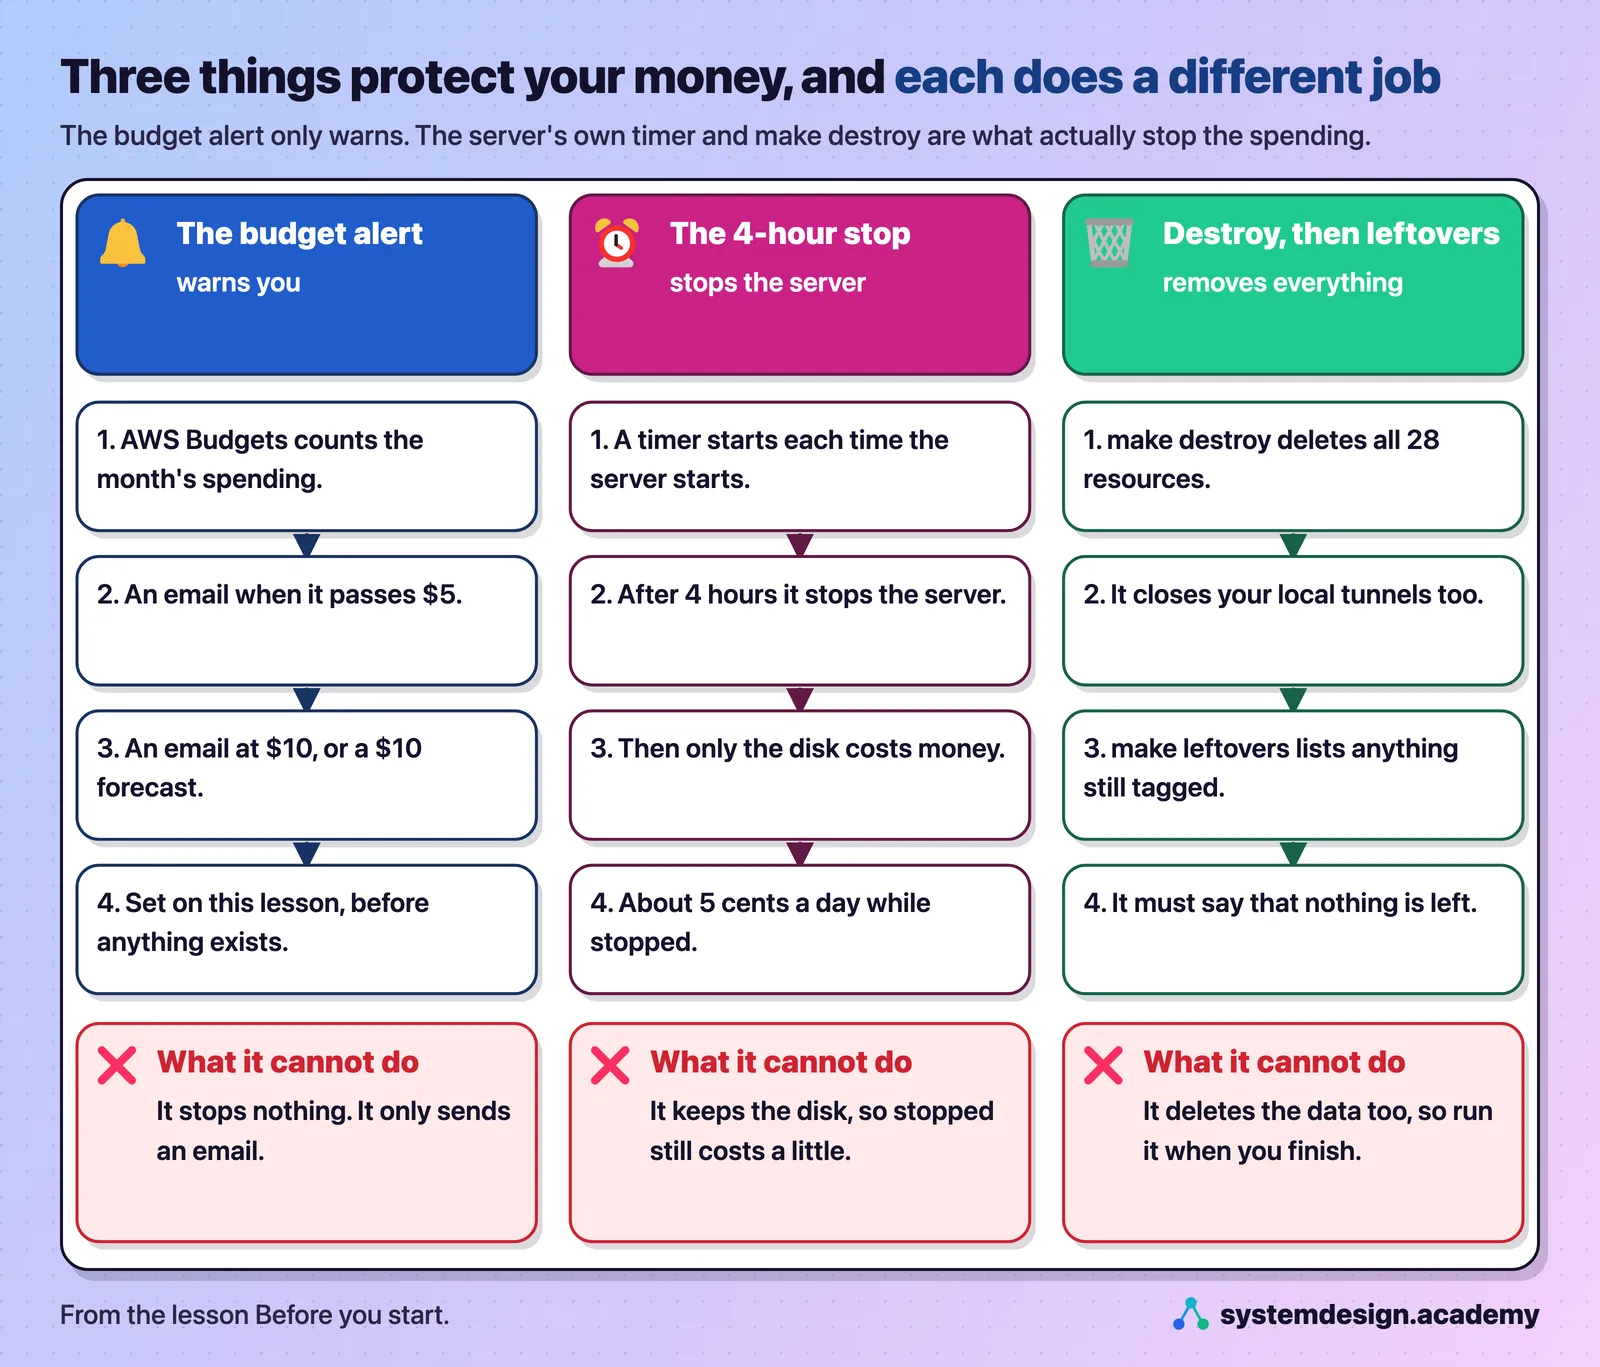
- The budget alert is an email. You set it in this lesson, in Step 4.
- The 4-hour stop is a small timer on the server itself. Every time the server starts, the timer starts too, and 4 hours later it shuts the server down. A session you forget therefore costs about 12 cents of running time, and then about 5 cents a day for the disk.
make destroydeletes everything the lab built, andmake leftoversthen asks AWS, one kind of resource at a time, whether anything is left. It must end with "nothing is left". You will run both at the end of the next lesson.
Watch out: Do not treat the $10 budget as a spending cap. It is a smoke alarm, not a fire door: it sends an email and switches nothing off. Stop or destroy the lab at the end of every session yourself.
You close your laptop at 9 p.m. with the lab running, and you forget about it for a week. Roughly what did that week cost?
Show the answer
The answer: C.
About 50 cents. The server ran for 4 hours and then stopped itself, which is about 12 cents, and after that only the disk was charged, at about 5 cents a day for the rest of the week. Without the 4-hour stop it would have been about $5, which is 168 hours at $0.0302. The budget alert would not have stopped either one.
Hands-on: check your computer and your account
Idea: Four short checks prove that your tools work, that your AWS account answers, that its machine limit is enough and that a budget alert is set, and none of them creates a server.
What you need
- The seven tools from above, plus
makeandnc, installed, andaws configure(oraws configure sso) done once, as a user that is not root, with the regionus-east-1. - The zip from the top of this lesson, unpacked.
Get the files ready
Unpack lesson-before.zip, open the folder in VS Code, open a terminal inside it (in the menu, Terminal, then New Terminal), and go into the lab folder:
cd lesson-before/lab
Watch out: Keep one lab folder for the whole course. This lesson's zip and the zip of "Meet Bramfield Mutual, the customer in this course" carry the same
labfolder. Pick one copy and use it for every lesson.
Here is why. Terraform keeps its record of what it built, its state, in a file inside the folder you built from. If you build from one copy and run make destroy from another, the second copy knows of nothing and destroys nothing, and the server keeps running. The folder also ships a .gitignore, because that state file holds the lab's passwords in plain text. Never commit it, and never remove those lines.
The files this lesson uses are these. The rest of the folder is the lab that the next lesson builds.
| File | What it is |
|---|---|
check_setup.py | checks Python and five command-line tools, your AWS sign-in, your region, your account's machine limit and five local ports, and changes nothing |
self-check/self_check.py | the self-check: a short Python and SQL program whose two printed lines you predict |
self-check/claims.csv, self-check/policies.csv | eight claims and five policies for the self-check, synthetic like everything at Bramfield |
Makefile | one short command for each lab step: make quota and make budget in this lesson, make up and the rest in the next |
Step 1: check each tool's version
Run these one at a time. Each prints a version and nothing else. These are the six we recorded; the seventh, code --version, comes after them:
python3 --version
Python 3.13.15
aws --version
aws-cli/2.36.26 Python/3.14.6 Darwin/24.6.0 exe/arm64
terraform version
Terraform v1.9.8
on darwin_arm64
session-manager-plugin --version
1.2.896.0
uv --version
uv 0.12.5 (Homebrew 2026-08-14 aarch64-apple-darwin)
git --version
git version 2.39.5 (Apple Git-154)
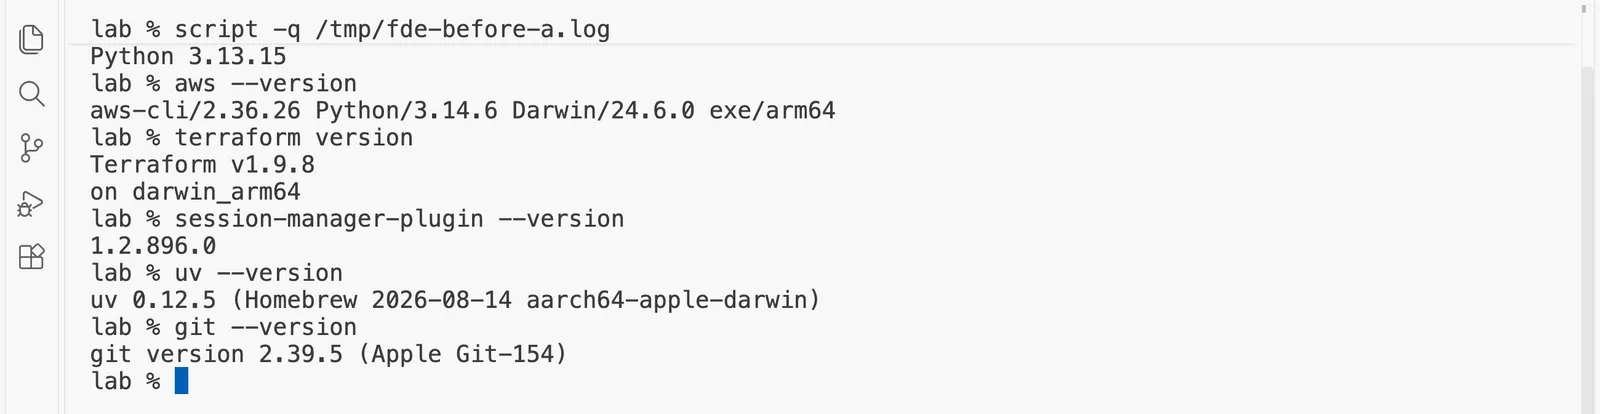
Your versions will differ from ours, and that is fine. Our computer was an Apple machine, so some of our lines say darwin, Darwin, Apple or aarch64; yours will name your own system. What matters is that each command prints a version, not command not found. Also run code --version. We did not record it in this run; on your computer it prints three lines, the version, a long commit ID and the processor type.
Step 2: check that your computer can reach your AWS account
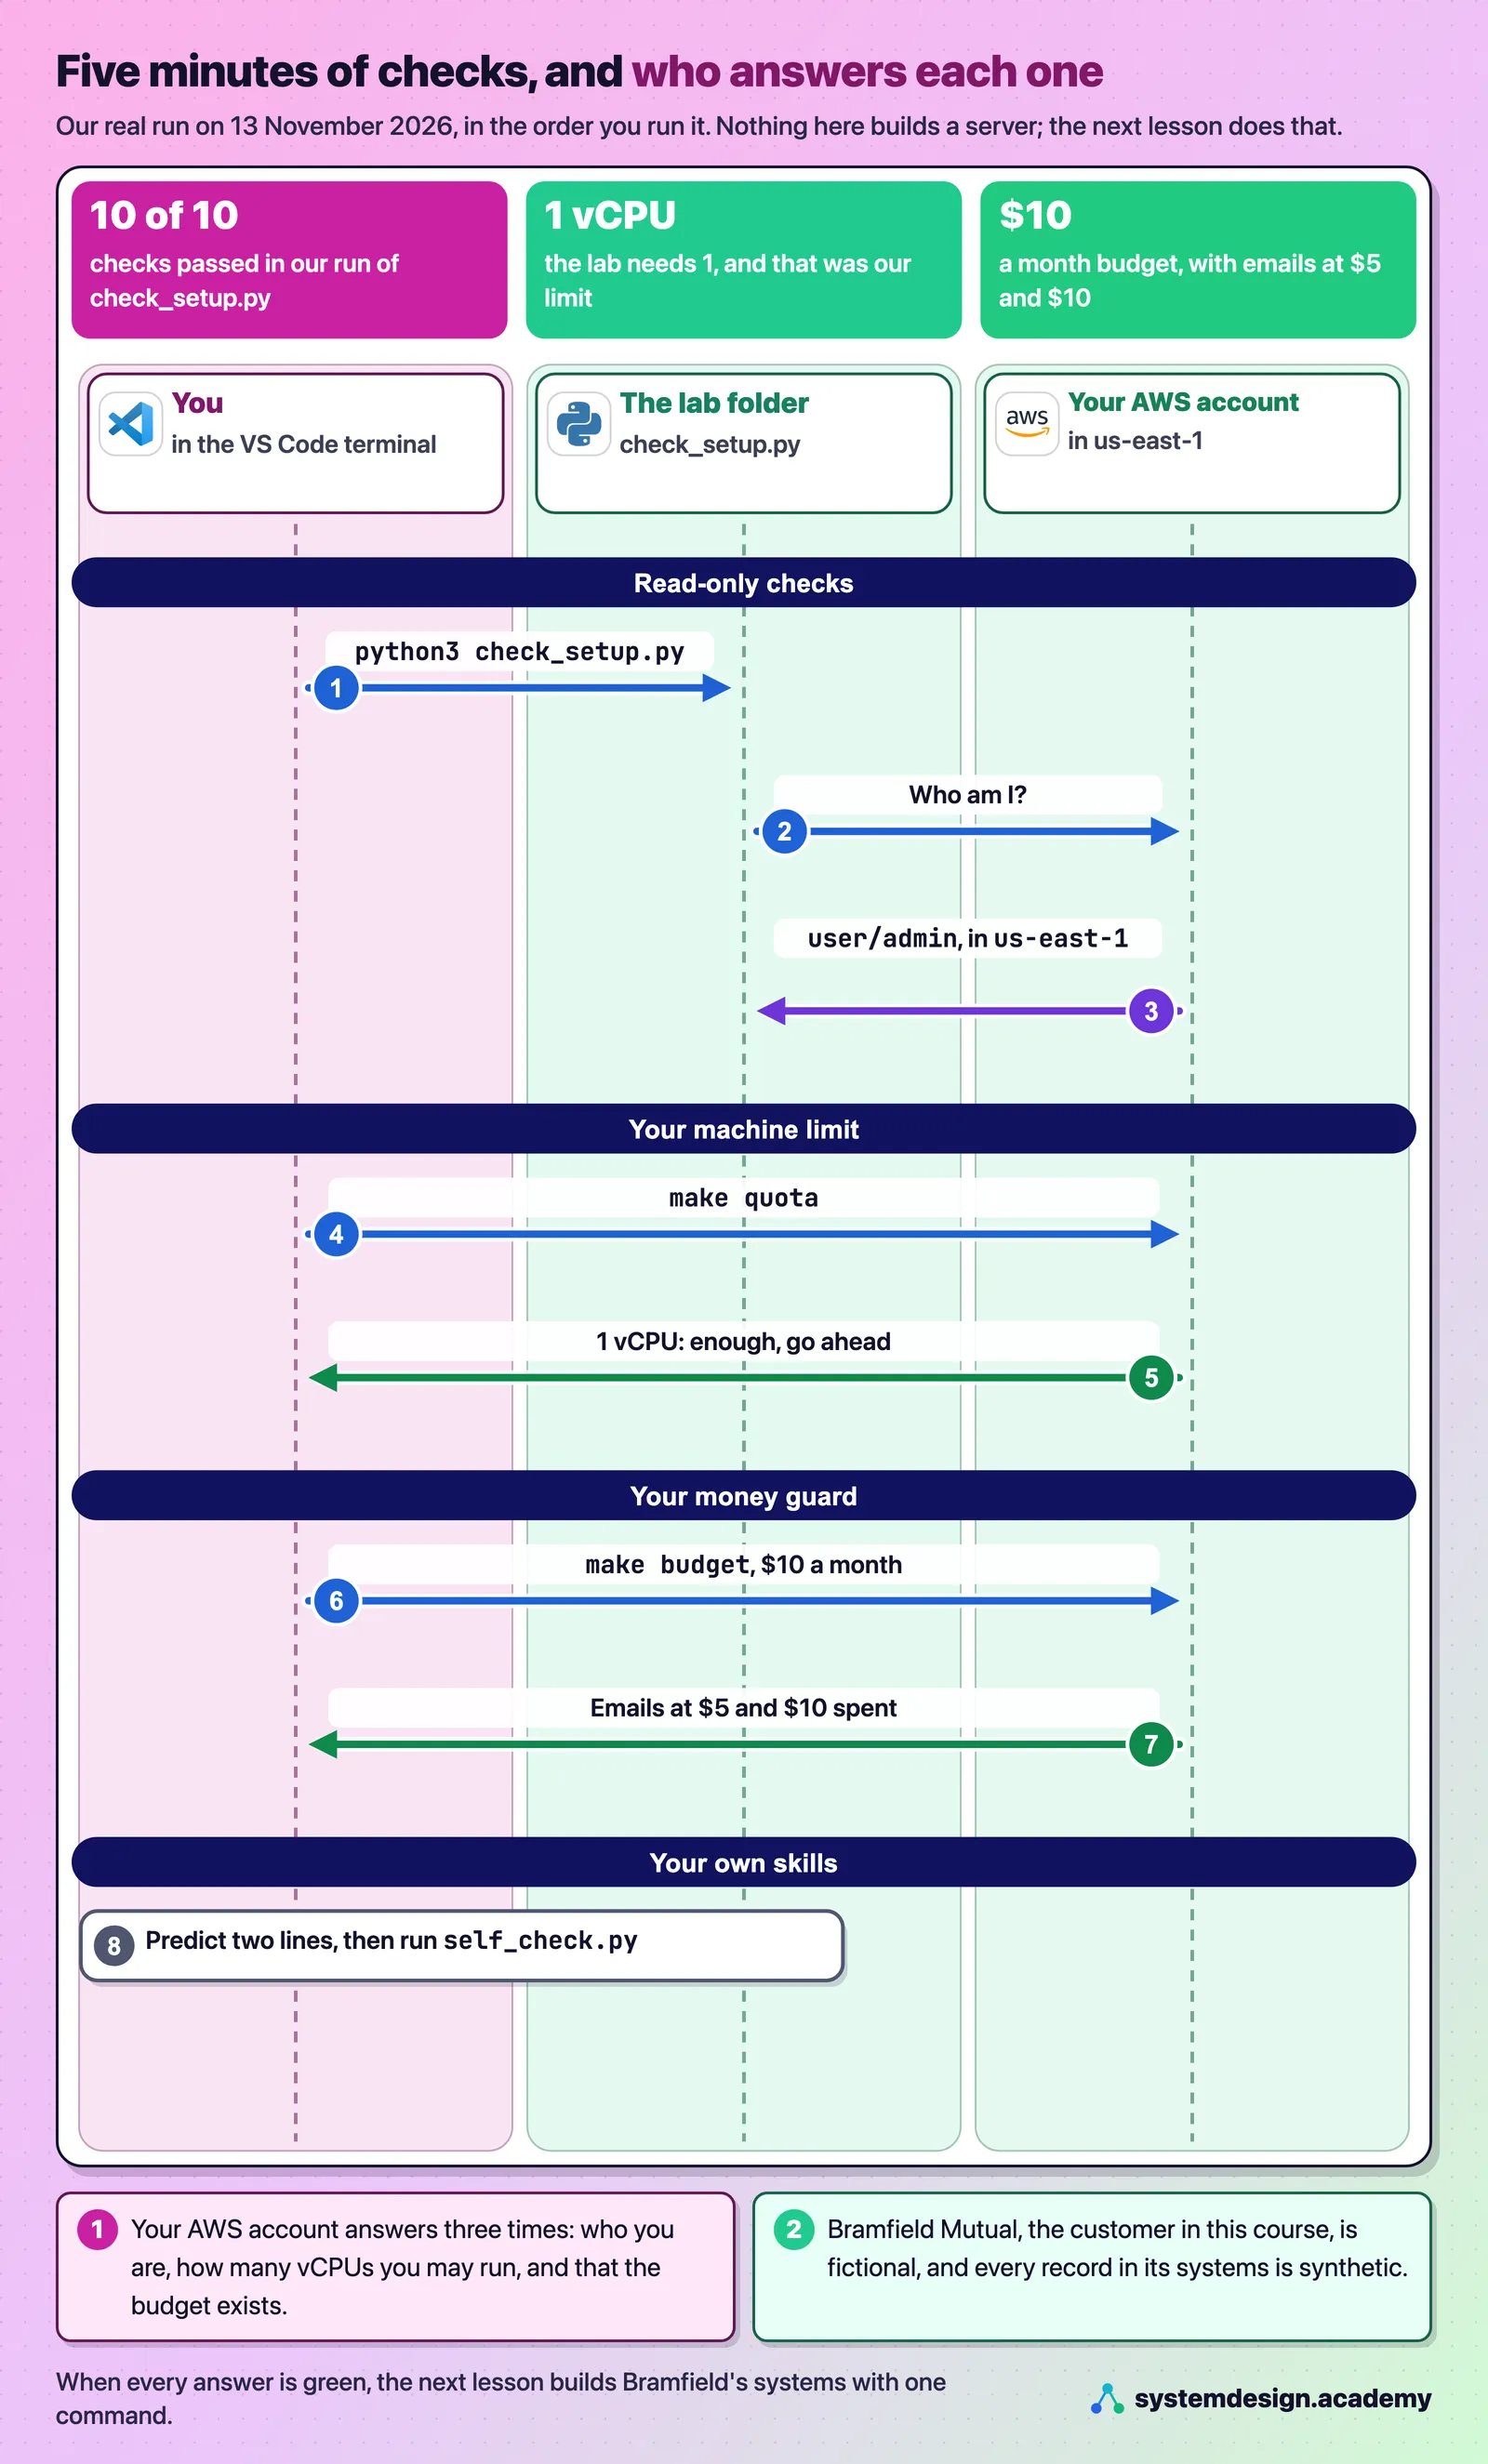
python3 check_setup.py
OK   Python 3.13.15, need 3.10 or newer
OK   aws: aws-cli/2.36.26 Python/3.14.6 Darwin/24.6.0 exe/arm64
OK   terraform: Terraform v1.9.8
OK   session-manager-plugin: 1.2.896.0
OK   uv: uv 0.12.5 (Homebrew 2026-08-14 aarch64-apple-darwin)
OK   git: git version 2.39.5 (Apple Git-154)
OK   the AWS CLI can sign in to your account, as user/admin
OK   region us-east-1
OK   your account may run 1 vCPU of standard machines in us-east-1; the lab needs 1
OK   local ports 15432, 18080, 18081, 12222 and 18180 are free for the tunnels
10 of 10 checks passed
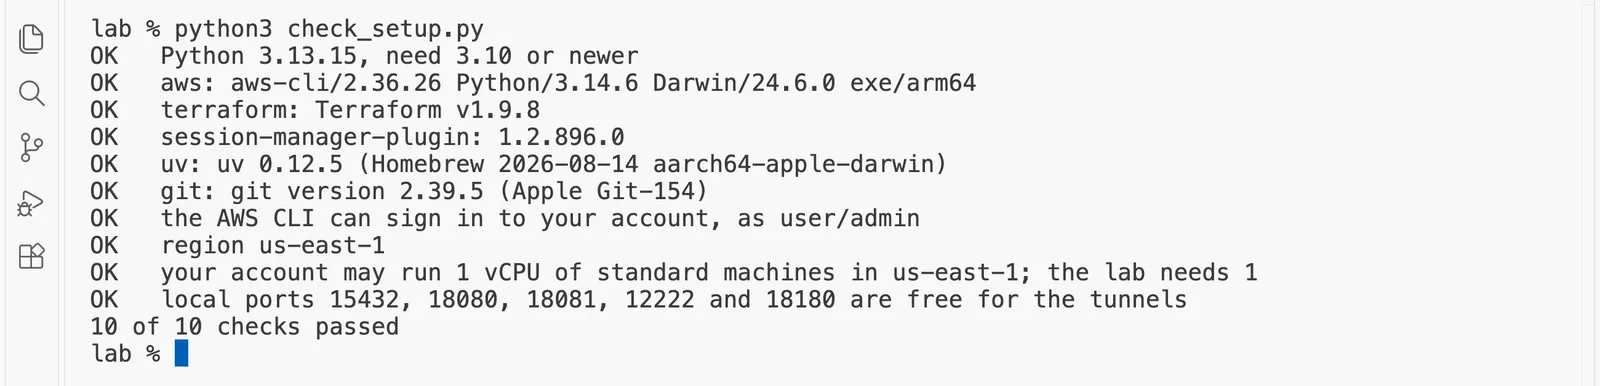
This is the moment your AWS account answers. The line "the AWS CLI can sign in to your account, as user/admin" means AWS itself replied to your computer and said who you are.
What just happened. The program made ten checks and changed nothing:
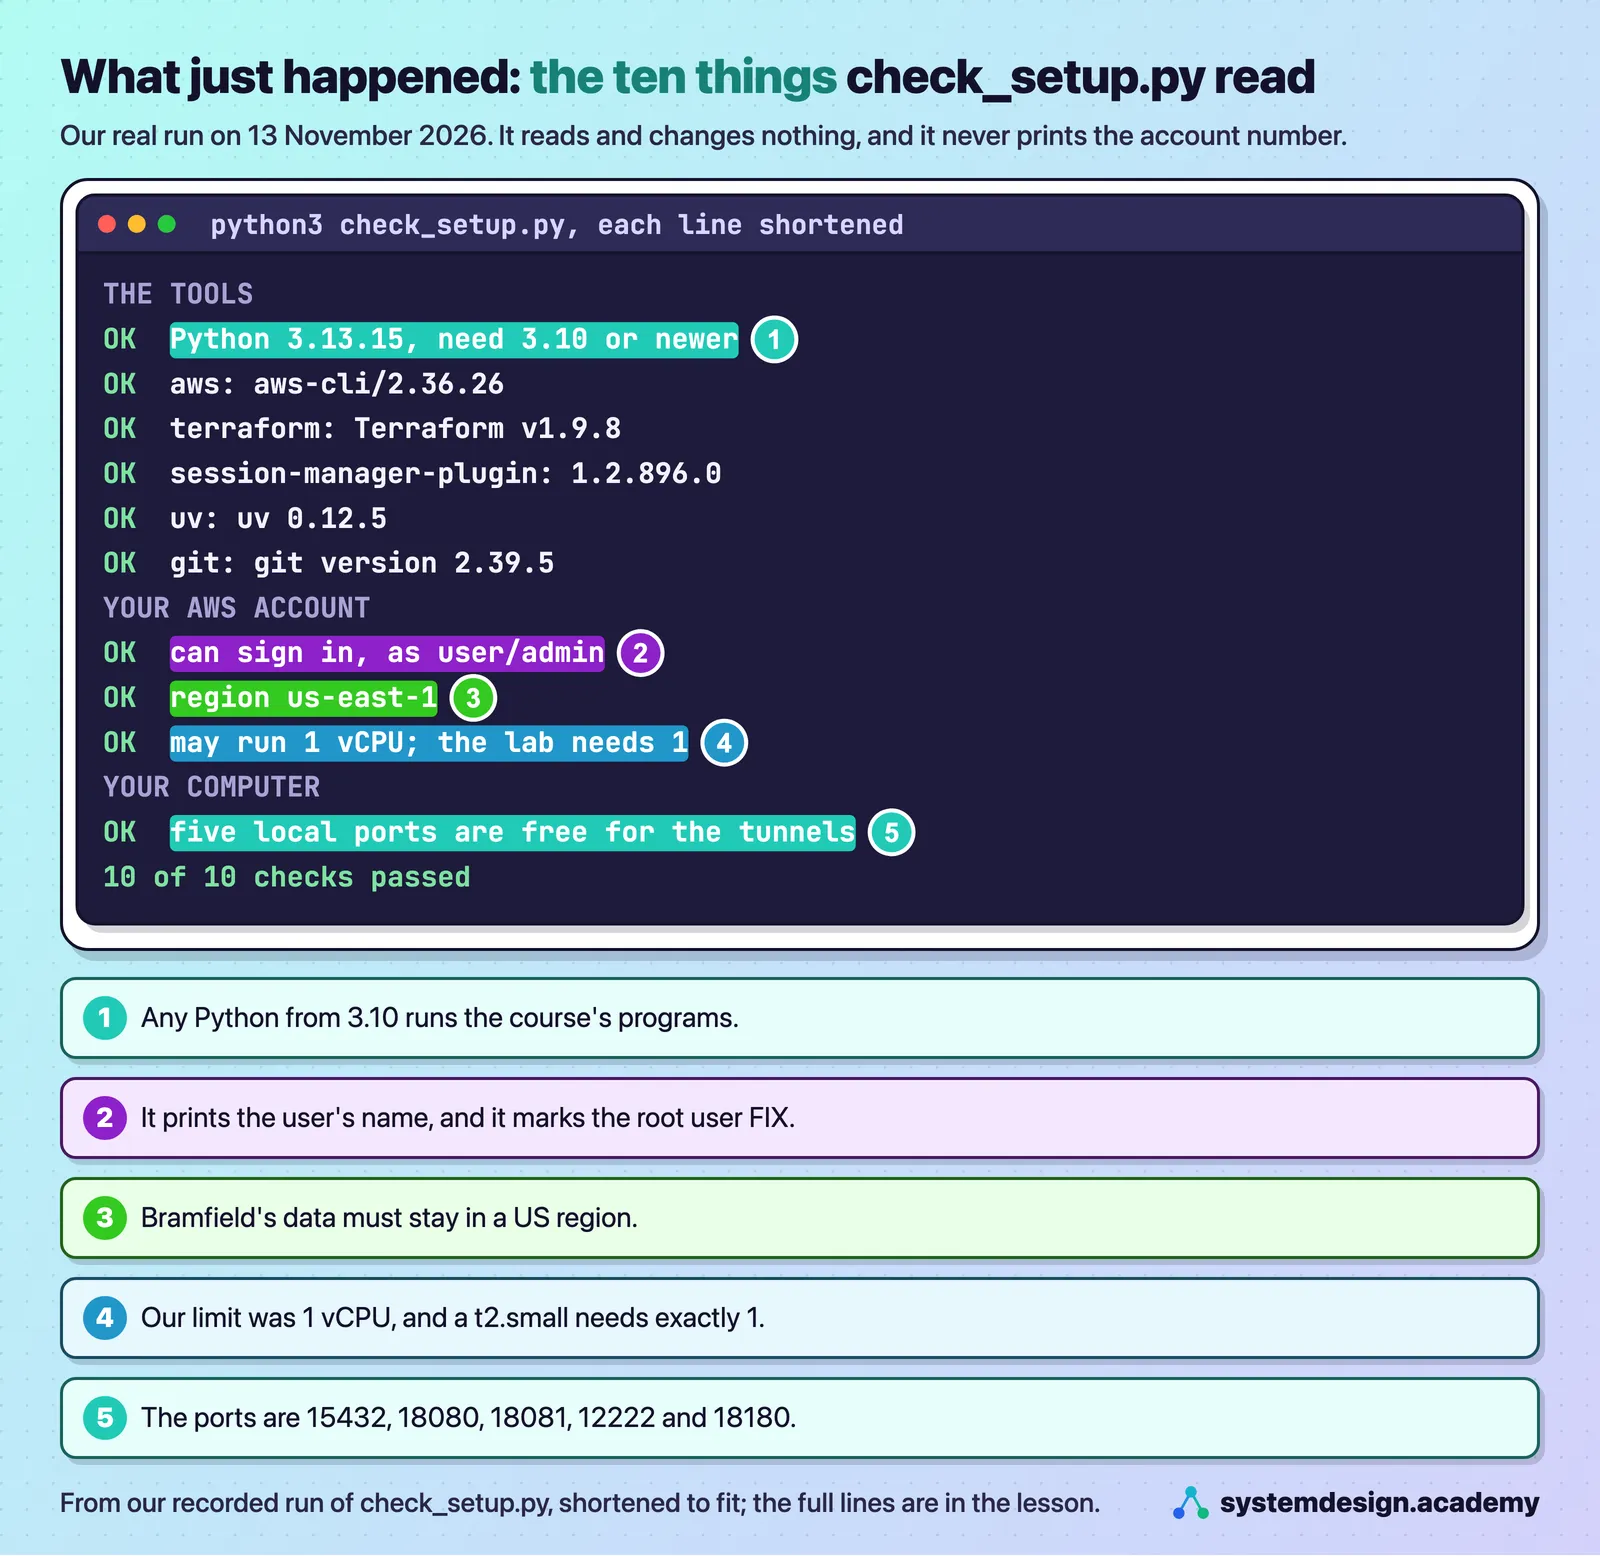
- Python and five command-line tools. It checks that Python is 3.10 or newer. Then, for
aws,terraform,session-manager-plugin,uvandgit, it looks for the program on your PATH, the list of folders your terminal searches for commands, and prints the first line of its version. It does not checkmake,ncor VS Code. - Your sign-in. It runs
aws sts get-caller-identity, which asks AWS "who am I?", and prints only the user's name from the answer. It never prints your 12-digit account number or your keys. If the name isroot, the line says FIX, because the labs should never run as the root user. - The region decides where the lab is built. The course uses
us-east-1, and every price in this lesson is for it. - The machine limit is the same number
make quotaprints in Step 3. - The five local ports are where the tunnels will put Bramfield's systems on your own computer in the next lesson: 15432 for the claims database, 18080 for the policy service, 18081 for the work queue, 12222 for the file drop and 18180 for Keycloak. If another program already uses one, the line says which.
If any line says FIX, it also says what to do, and the troubleshooting table below has more.
Step 3: check your account's machine limit
Think of a car park that gives your account a fixed number of spaces. A small car takes one space and a large van takes two. The car park counts spaces in use, not vehicles. AWS works the same way. Every AWS account has a limit, called a service quota, on how many virtual CPUs of ordinary EC2 machines it may run at once in each region. EC2 is Amazon's service for renting virtual machines. New accounts are sometimes given very little. Check yours:
make quota
your limit for standard EC2 machines in us-east-1: 1 vCPU
this lab needs 1 vCPU: one t2.small server
enough: go ahead

make quota asks the Service Quotas service for the quota with the code L-1216C47A, "Running On-Demand Standard instances", which covers the ordinary machine families such as t2, t3 and m5. It counts virtual CPUs, not machines.
What this means, honestly. Our own account's limit was 1 virtual CPU on the day we built the lab. That is why the lab is a t2.small: it has exactly 1 virtual CPU, so it fits. The plan had penciled in a t3.large, with 2 virtual CPUs, which that limit forbids. For Bramfield's six small containers and its synthetic data, 1 virtual CPU and 2 GB of memory are enough, and the server is far cheaper. If your limit is higher, nothing changes: the lab still uses one t2.small, and nothing in the course needs more. If make quota says 0, it prints "ask AWS for a higher limit first"; the request is free, made in the Service Quotas console, and AWS answers by email.
Your limit is 2 vCPUs, and you already run one t3.medium, which has 2 vCPUs, for another project in us-east-1. Can you build the lab?
Show the answer
The answer: B.
Not yet. The quota counts the virtual CPUs of every running standard machine in the region together, so both of your 2 are already in use, and the lab's one more would make 3. Stop the other server first, or ask AWS for a higher limit.
Step 4: set the budget alert, before anything is built
A smoke alarm warns you that something is burning, but it does not put out the fire. A budget alert is the same kind of thing. A budget in AWS Budgets watches what your account spends in a month and emails you when the spending crosses a line you set. The lab's budget is $10 a month, with an email when actual spending passes $5, another when it passes $10, and one when AWS forecasts that the month will pass $10.
On a fresh account, the only one you use for this course, run it like this, with your own email address:
make budget EMAIL=you@example.com
We ran it slightly differently, and here is why. Our account already spends money every month on the labs of other courses, so a $10 budget for the whole account would have emailed us at once. TAG_ONLY=yes makes the budget count only the costs of resources tagged Project=fde-course-lab, which is the tag the lab puts on everything it builds. That filter needs the Project tag switched on as a cost allocation tag in the Billing console, which we did on 13 November 2026. We also did not want our email address in the recording, so we typed it into a shell variable, a named value your terminal remembers until you close it, with read -s, which hides what you type, and passed the variable:
read -s ALERT_EMAIL
make budget EMAIL=$ALERT_EMAIL TAG_ONLY=yes
counting only resources tagged Project=fde-course-lab
budget fde-course-lab: $10 a month, emails at $5 and $10 spent, and when the forecast passes $10
the emails go to the address you gave

On a fresh account, without TAG_ONLY, the first line is missing and the other two are the same. If you run the command a second time, it prints "the budget fde-course-lab already exists: nothing to do" and changes nothing.
Two things to know about budgets. First, this budget only warns you. It sends an email and stops nothing by itself. AWS Budgets can also run budget actions, which apply a permission policy or stop chosen servers when a line is crossed, but the course's budget does not use them, so nothing happens except the email. What limits a forgotten session is the server's own 4-hour stop, and what ends all spending is make destroy. Second, AWS Budgets updates its figures up to three times a day, not every minute, so an alert can arrive hours after the line was crossed, and the forecast alert needs some spending history before it says anything. So the habit that protects you is stopping or destroying the lab at the end of every session, and the budget is the safety net under that habit.
Your lab's spending crosses $10 at 9 a.m. When can you expect the budget email to arrive?
Show the answer
The answer: B.
Possibly hours later. AWS Budgets updates its figures up to three times a day, so the email can arrive well after the line was crossed. That delay is one more reason the budget is only a safety net, and why the server's own 4-hour stop does the real work.
The self-check: predict two lines before you run them
Idea: If you can read a short Python and SQL program and predict its two printed lines before you run it, your Python and SQL are ready for this course.
A language school gives a short placement test before the first class. It is not an exam. It only shows whether you can follow the lessons from day one. The self-check is that test for this course.
This is the five-minute test of the Python and SQL you need. Bramfield's insurance agents send claims in files where the same amount is written in different ways, and much of this course is turning messy data like that into numbers you can trust. The self-check is a tiny version of that work.
Here are the two files. First the claims, with the amounts written three ways: with a dollar sign and commas, with "USD" after the number, and with commas only:
claim_no,policy_no,amount_claimed,status
CLQ-26000101-6,BMQ-0000011-1,"$1,200.50",PAID
CLQ-26000102-8,BMQ-0000012-3,1200.5 USD,PAID
CLQ-26000103-0,BMQ-0000011-1,640.00,OPEN
CLQ-26000104-2,BMQ-0000013-5,"$15,400.00",PAID
CLQ-26000105-4,BMQ-0000014-7,"2,980.25",DENIED
CLQ-26000106-6,BMQ-0000012-3,310 USD,PAID
CLQ-26000107-8,BMQ-0000015-9,"$880.00",OPEN
CLQ-26000108-0,BMQ-0000013-5,"$2,050.75",PAID
And the policies, with the state each policy is in:
policy_no,state,product
BMQ-0000011-1,PA,AUTO
BMQ-0000012-3,PA,AUTO
BMQ-0000013-5,NJ,AUTO
BMQ-0000014-7,CA,AUTO
BMQ-0000015-9,PA,HOME
Now read the program, before you run it, and write down the two lines you think it will print. Part 1 is Python, and part 2 is SQL on SQLite, the small database that comes with Python.
"""The self-check for "Before you start": read it, PREDICT what it prints, then run it.

    python3 self-check/self_check.py      (from the lab folder)

Part 1 is Python: the agents write amounts three ways, and to_dollars() turns each one into a number.
Part 2 is SQL: the paid claims joined to their policies, totalled by state. It runs on SQLite, which comes with Python.
If you can predict both printed lines before you run it, your Python and SQL are ready for this course.

Author: Roni Das
Created: 2026-11-13
"""

import csv
import sqlite3
from pathlib import Path

HERE = Path(__file__).parent


def to_dollars(text: str) -> float:
    """'$1,200.50', '1200.5 USD' and '1,200.50' all mean 1200.5."""
    return float(text.replace("$", "").replace("USD", "").replace(",", "").strip())


claims = list(csv.DictReader(open(HERE / "claims.csv")))
policies = list(csv.DictReader(open(HERE / "policies.csv")))
print("part 1, the two ways of writing the same amount:", to_dollars(claims[0]["amount_claimed"]) == to_dollars(claims[1]["amount_claimed"]))

db = sqlite3.connect(":memory:")
db.execute("create table claim (claim_no text, policy_no text, amount real, status text)")
db.execute("create table policy (policy_no text, state text, product text)")
db.executemany("insert into claim values (?, ?, ?, ?)",
               [(c["claim_no"], c["policy_no"], to_dollars(c["amount_claimed"]), c["status"]) for c in claims])
db.executemany("insert into policy values (?, ?, ?)", [(p["policy_no"], p["state"], p["product"]) for p in policies])
rows = db.execute("""
    select p.state, count(*) as paid_claims, round(sum(c.amount), 2) as paid_dollars
    from claim c join policy p on p.policy_no = c.policy_no
    where c.status = 'PAID'
    group by p.state
    order by paid_dollars desc
""").fetchall()
print("part 2, paid claims by state:", rows)
A few hints, so that the test is about reading code and not about guessing. to_dollars() removes the dollar sign, the letters "USD" and the commas, then turns what is left into a number. claims[0] is the first claim in the file. In the SQL, join matches each claim to its policy by policy_no, where keeps only the paid claims, group by makes one row per state, and order by paid_dollars desc puts the state with the most paid dollars first. Python prints a list of rows as tuples, which are fixed groups of values, written in round brackets.
Predict, then measure
Part 2 of the self-check totals the paid claims by state, with the most paid dollars first. Which state comes first?
The measured result appears once you lock in. Only your first answer counts toward your progress.
Written down? Then run it:
python3 self-check/self_check.py
part 1, the two ways of writing the same amount: True
part 2, paid claims by state: [('NJ', 2, 17450.75), ('PA', 3, 2711.0)]

What just happened.
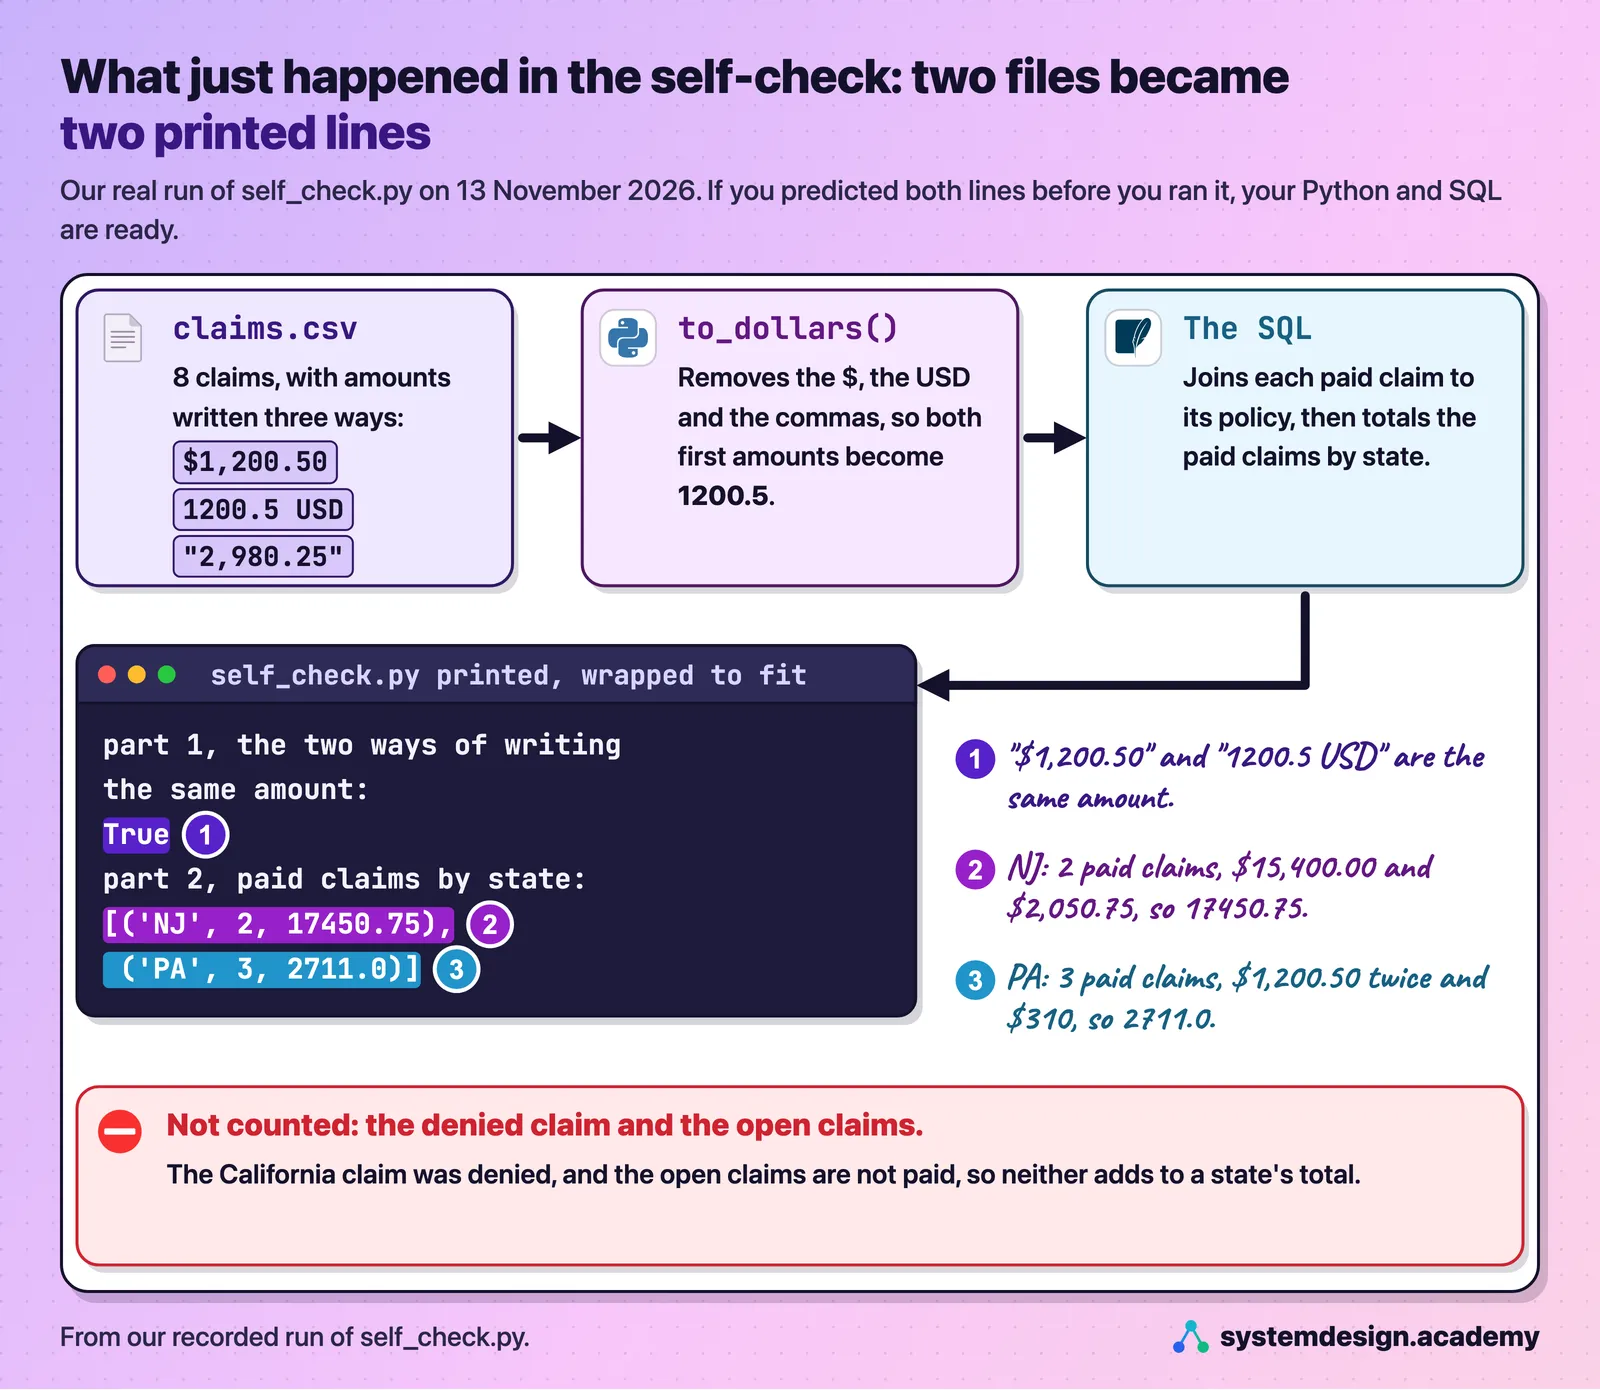
- Part 1. The first claim says
$1,200.50and the second says1200.5 USD. Afterto_dollars(), both are the number 1200.5, so the comparison printsTrue. Compared as text, they would not be equal, and that is the whole point: Bramfield's files cannot be compared until they are cleaned. - Part 2. Five of the eight claims are
PAID. The two New Jersey claims are $15,400.00 and $2,050.75, which make 17450.75. The three Pennsylvania claims are $1,200.50, $1,200.50 and $310, which make 2711.0. The California claim wasDENIEDand the twoOPENclaims are not paid, so thewhereclause drops all three. New Jersey comes first because it has more paid dollars, even though Pennsylvania has more paid claims.
If you predicted both lines, your Python and SQL are ready for this course. If one surprised you, find the line of code that explains it before you move on; that habit, more than any syntax, is what the course asks of you. And if the join or the GROUP BY was new, spend an evening on a SQL tutorial and try again.
Watch out: Never compare money written as text. As text,
"$1,200.50"and"1200.5 USD"are different, and a report built on them counts one claim twice or misses it. Turn every amount into a number first, asto_dollars()does, and only then compare or add.
Suppose claims.csv had one more line: a paid New Jersey claim on policy BMQ-0000013-5, written as 750 USD. What would part 2 print for New Jersey?
Show the answer
The answer: B.
('NJ', 3, 18200.75). to_dollars() removes "USD" and turns 750 USD into 750.0. The claim is PAID and its policy is in New Jersey, so the count goes from 2 to 3 and the total from 17450.75 to 17450.75 plus 750, which is 18200.75.
Troubleshooting
| What you see | Why, and what to do |
|---|---|
command not found: aws (or terraform, uv, session-manager-plugin) | The tool is not installed, or its folder is not on your PATH. Install it from its official page, then open a new terminal. |
FIX the AWS CLI cannot sign in to your account | No access key yet, or the key was deleted. Run aws configure with a working access key, then run python3 check_setup.py again. |
FIX ... as root | You gave aws configure a key for the root user. Make an ordinary user, give aws configure that user's key, and delete the root key in the console. |
FIX region not set or a region other than us-east-1 | Run aws configure set region us-east-1. |
FIX local ports ... in use: 15432 | Another program uses that port, often a local PostgreSQL. Stop it, or close the old tunnels with make untunnel. |
nc: command not found during make tunnel in the next lesson | Install netcat: on Ubuntu, sudo apt install netcat-openbsd. macOS has nc already. |
make: command not found | On macOS, run xcode-select --install. On Ubuntu, run sudo apt install make. |
make quota prints an error about service quotas | Your user may not read Service Quotas. Give it that permission, or read the quota "Running On-Demand Standard instances" in the Service Quotas console. |
make quota says ask AWS for a higher limit first | Your limit is 0. Ask for 1 or more in the Service Quotas console, wait for AWS's email, and run make quota again. |
make budget prints AccessDeniedException | Your user may not create budgets. Give it permission for AWS Budgets, or create the budget in the Billing console by hand: $10 a month, emails at 50% and 100%. |
python3: command not found on Windows | You are in PowerShell. Open the Ubuntu terminal instead. |
The self-check prints FileNotFoundError | You ran it from another folder. Go into lesson-before/lab first. |
Questions people ask
- What should I know before learning to be a forward deployed engineer?
You should be able to read and change a Python program of a couple of hundred lines, write a SQL query with a join and a
GROUP BY, use the terminal and Git, and have an AWS account with a payment card. This lesson's self-check tests the Python and SQL in about five minutes: if you can predict its two printed lines, you are ready. AI, AWS and consulting are taught from zero in the course.- How much does it cost to run this course's AWS lab?
About $0.0302 an hour in us-east-1 while it runs, which is about 72 cents a day, from the AWS Price List on 13 November 2026: $0.0230 for the
t2.smallserver, $0.0050 for its public IPv4 address and $0.0022 for its 20 GB disk. Stopped, it costs about 5 cents a day for the disk, and deleted it costs nothing.- Does an AWS budget stop my spending when it reaches the limit?
No. An AWS budget like the one in this lesson sends emails, here at $5, at $10 and on a $10 forecast, and it switches nothing off. The course's lab protects you in other ways: its server stops itself 4 hours after every start, and
make destroydeletes everything, whichmake leftoversthen proves.- Why does my AWS account only allow 1 vCPU?
AWS gives every account a limit on how many virtual CPUs of ordinary EC2 machines it may run in each region, and new or little-used accounts sometimes start very low. Our own account's limit was 1 on 13 November 2026, and that is why this course's lab uses one
t2.small, which has exactly 1 virtual CPU.make quotaprints yours, and a higher limit can be requested for free in the Service Quotas console.- Can I do this course on Windows?
Yes, through Ubuntu inside WSL2: run
wsl --installin PowerShell as administrator, then type every course command in the Ubuntu terminal, with VS Code on Windows and its WSL extension. We built and ran the course on an Apple computer, so we have not tested the Windows path ourselves; the instructions in this lesson are Microsoft's and each tool's own.- Do I need a powerful computer for this course?
No. The lab runs in AWS, and your own computer only runs VS Code, Python, the AWS CLI and Terraform. Any ordinary computer that runs VS Code comfortably is enough.
The one-minute summary
The course assumes Python, SQL, the terminal and Git at a working level, and an AWS account, and it teaches the AI, the AWS services and the customer work from zero. Seven tools on your computer do the work, and each has one command that proves it is installed. Bramfield's systems will run on one small server in your AWS account in us-east-1, with no way in from the internet except Session Manager. The lab costs about $0.0302 an hour while it runs, about 5 cents a day while it is stopped, and nothing once it is destroyed. check_setup.py and make quota only read, and our account's limit of 1 vCPU is enough for the lab's one t2.small. The $10 budget only sends emails; the server's 4-hour stop and make destroy are what stop the spending. If you predicted both lines of the self-check, you are ready for the next lesson.
Revision sheet
| Idea | The one line to remember | The number or example that proves it |
|---|---|---|
| What you should already know | Bring Python, SQL, the terminal, Git and an AWS account; the rest is taught. | A join and a GROUP BY on day one; AI agents and evals from zero. |
| The tools | Seven tools, one checking command each. | terraform version printed Terraform v1.9.8 in our run. |
| Where everything runs | One server in your account, reached only from the inside. | A t2.small with 1 vCPU and 2 GB; a security group with no inbound rules. |
| What the lab costs | Pay while it runs, a little while stopped, nothing once destroyed. | $0.0302 an hour; a two-hour evening and three days stopped come to about 22 cents. |
| The four checks | Three only read, the fourth sets a budget, and none creates a server. | 10 of 10 checks passed; limit 1 vCPU, the lab needs 1; emails at $5 and $10. |
| The self-check | Predict, then run, then explain any surprise from the code. | NJ comes first with 2 paid claims and 17450.75; PA has 3 and 2711.0. |
Knowledge check
Tap an answer to see straight away whether it is right, and why. You can try the whole check again at the end.
- Question 1
Your budget alert emails you that this month's spending has passed $10. What has AWS done to your lab?
- Question 2
make quotaprintsyour limit for standard EC2 machines in us-east-1: 1 vCPU. Can you build this course's lab? - Question 3
Why did we run
make budgetwithTAG_ONLY=yes, and should you? - Question 4
check_setup.pysaysFIX ... as root. What does it want you to do? - Question 5 · Try it
Run
python3 self-check/self_check.py. On the line "paid claims by state", how many paid claims does Pennsylvania have, and what is their total?
0 of 5 right so far, 0 of 5 answered.
Checks in this lesson: 0 of 7 answered, 0 right. The rest are in the lesson above.
Going deeper, for working engineers and staff engineers
You can skip this part and lose nothing you need for the next lesson.
Why the lab is a t2.small, and not what the plan said. The plan penciled in a t3.large, $0.0832 an hour with 2 virtual CPUs and 8 GB of memory. On 13 November 2026 our account's quota L-1216C47A for standard instances in us-east-1 was 1, and that limit counts virtual CPUs across every running instance of the standard families. A t2.small has 1 virtual CPU and 2 GB, so it fits, and Bramfield's six containers run on it with a 1 GB swap file as a cushion, which is disk space the server can use as extra memory when it runs short. A t2.small at $0.0230 an hour also costs about a quarter of the planned t3.large at $0.0832. A student with a higher limit can set instance_type in terraform/variables.tf, but nothing in the course needs it.
Why a tag-filtered budget is the second-best choice. A budget filtered on user:Project$fde-course-lab sees only charges that AWS attributes to a resource carrying that tag, and only after the tag is switched on as a cost allocation tag, which does not reach back to earlier spending. It is the right tool for a shared account like ours. On an account used only for this course, the unfiltered budget is safer, because it also catches anything the lab did not tag.
Why the server stops itself. A budget email can arrive hours after the line was crossed, and it does nothing on its own. So the server's start-up script installs a small systemd service (systemd is the part of Linux that starts and stops background programs) that sleeps for 4 hours and then shuts the machine down, on every start. A forgotten session then costs about 12 cents of running time instead of about $22 a month. A stopped t2.small keeps its 20 GB disk, which is why stopped still costs about 5 cents a day.
Why check_setup.py never prints the account number. aws sts get-caller-identity returns the user's ARN, the Amazon Resource Name that AWS gives every user and resource, and it contains the 12-digit account ID. The script splits the ARN and prints only the part after the account, such as user/admin, so a screenshot of its output can be shared safely. The same reason is why we typed the alert address with read -s: a recording of a terminal is a document, and documents travel.
Four real problems we hit while building the lab, and their fixes. These are from our debug build on the morning of 13 November 2026, and three of them changed the lab or its checks: the bundle, make check and the port check in check_setup.py.
- Hidden files in the bundle. Keycloak refused to import Bramfield's realm, Keycloak's name for one organization's users and settings, with
Illegal character ((CTRL-CHAR, code 5)). macOStarhad added hidden AppleDouble._files to the bundle that the server unpacks. The Makefile now builds the bundle withCOPYFILE_DISABLE=1. - Ready too early.
make checkfirst declared the lab ready before Keycloak answered. Setup now waits for Keycloak's/health/ready. - A rate limit that never tripped. The policy service allows 10 requests a second. Fifteen requests in a row through the Session Manager tunnel never tripped it, because each call took about a second; 40 at once did, 12 of 40 failed in one try and 7 of 40 in another.
- Ports held after destroy. After
make destroy, the Session Manager plugin's processes kept the local ports open.make untunnelnow stops them too, andcheck_setup.pychecks the five ports, which is the last line of its output.
Words from this lesson
| Word | What it means |
|---|---|
| terminal | the window where you type commands, such as the one inside VS Code |
| PATH | the list of folders your terminal searches when you type a command |
| AWS CLI | Amazon's command-line tool, which every lab command uses to talk to your account |
| region, us-east-1 | one of AWS's separate groups of data centers; us-east-1 is in N. Virginia, and the course uses it |
| root user | the identity an AWS account was created with, which can do anything; never used for the labs |
| access key | the ID and secret that let a command-line tool act as one AWS user |
| IAM Identity Center | AWS's single sign-on; aws configure sso gives your terminal short-lived keys through it |
| Terraform state | the file in the lab folder where Terraform records what it built; it holds the lab's passwords, so it is never committed |
| Terraform | a tool that builds cloud resources from text files and deletes them again |
| Session Manager | the AWS service that opens a shell or a tunnel to a server from the inside, with no open port |
| port | a numbered door a program listens on; the tunnels use five ports on your own computer |
| security group | a firewall around one server that lists exactly which traffic may come in; the lab's lists nothing |
| vCPU | a virtual CPU, one share of a processor that AWS rents to you |
| service quota | a limit AWS sets on an account, such as how many vCPUs of ordinary machines it may run in a region |
| AWS Budgets, budget alert | the AWS service that watches spending and emails you when it crosses a line; the course's budget stops nothing |
| cost allocation tag | a resource tag switched on in Billing so that costs can be counted per tag |
read -s | a shell command that reads what you type without showing it |
| SQLite | a small database that comes inside Python, used by the self-check |
GROUP BY | the SQL clause that makes one row per group, such as one row per state |
What to keep
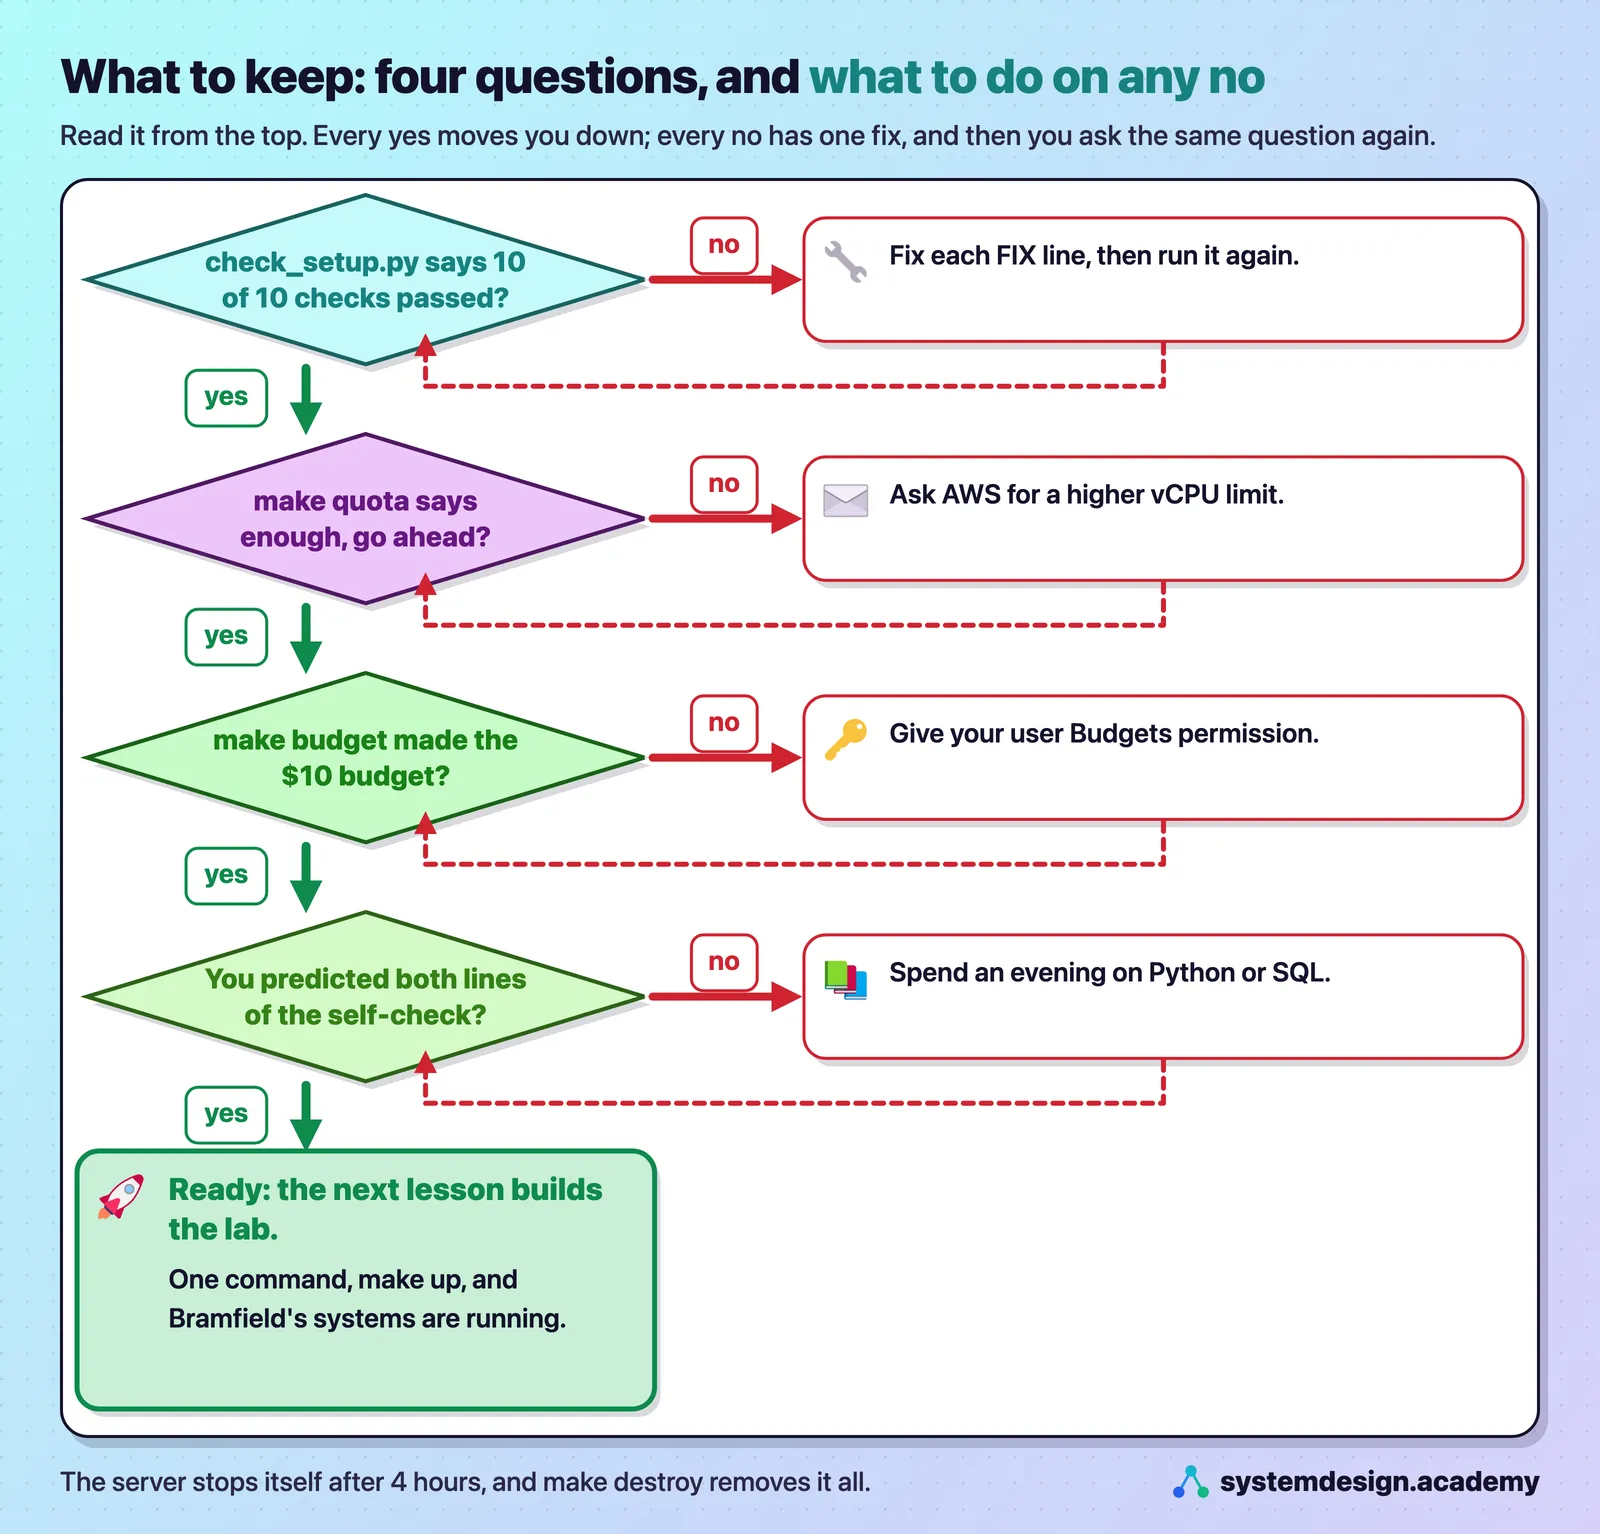
You need Python, SQL, the terminal and Git at a working level, and an AWS account with a card, and nothing about AI, AWS or consulting. Install seven tools, plus make and nc, and check each with one command. python3 check_setup.py checks Python and the five command-line tools, plus the moment your AWS account answers, as a user that is not root, in us-east-1. Keep one lab folder for the whole course, and never commit its Terraform state. make quota shows your account's machine limit, and 1 vCPU is enough, because the lab is one t2.small. make budget sets a $10 alert before anything exists, and it only warns: the server's 4-hour stop and make destroy are what stop the spending. If you predicted both lines of the self-check, you are ready.
Download the code for this lesson: lesson-before.zip.
The next free lesson, "What a forward deployed engineer does", explains the job in the companies' own words. After it, "Meet Bramfield Mutual, the customer in this course" builds Bramfield's systems in your account with make up, looks around them with read-only access, and deletes them again.
The code
check_setup.py
"""Check that this computer is ready for the course labs. It reads, and changes nothing.

    python3 check_setup.py

Each line starts with OK or FIX. It prints your AWS user's name but never your 12-digit account number or your keys.

Author: Roni Das
Created: 2026-11-13
"""

from __future__ import annotations

import json
import re
import shutil
import socket
import subprocess
import sys

results: list[bool] = []


def report(ok: bool, text: str, fix: str = "") -> None:
    results.append(ok)
    print(f"{'OK ' if ok else 'FIX'}  {text}" + ("" if ok or not fix else f"\n     {fix}"))


def run(*cmd: str) -> str:
    try:
        return subprocess.run(cmd, capture_output=True, text=True, timeout=30).stdout.strip()
    except (OSError, subprocess.TimeoutExpired):
        return ""


v = sys.version_info
report(v >= (3, 10), f"Python {v.major}.{v.minor}.{v.micro}, need 3.10 or newer", "install Python 3.12 from python.org")

for tool, args, need in [("aws", ["--version"], "the AWS CLI version 2"), ("terraform", ["version"], "Terraform 1.6 or newer"),
                         ("session-manager-plugin", ["--version"], "the Session Manager plugin"), ("uv", ["--version"], "uv"),
                         ("git", ["--version"], "Git")]:
    if shutil.which(tool):
        first = run(tool, *args).splitlines()
        report(True, f"{tool}: {first[0] if first else 'installed'}")
    else:
        report(False, f"{tool} is not installed", f"install {need}; the page lists where to get it")

ident = run("aws", "sts", "get-caller-identity", "--output", "json")
if ident:
    arn = json.loads(ident)["Arn"]
    who = arn.split(":", 5)[5]
    report(who != "root", f"the AWS CLI can sign in to your account, as {who}",
           "you are signed in as the root user: make an ordinary user for the labs")
else:
    report(False, "the AWS CLI cannot sign in to your account", "run aws configure, then try again")

region = run("aws", "configure", "get", "region")
report(region == "us-east-1", f"region {region or 'not set'}", "run: aws configure set region us-east-1")

if ident:
    quota = run("aws", "service-quotas", "get-service-quota", "--region", "us-east-1", "--service-code", "ec2",
                "--quota-code", "L-1216C47A", "--query", "Quota.Value", "--output", "text")
    have = int(float(quota)) if re.fullmatch(r"[\d.]+", quota or "") else 0
    report(have >= 1, f"your account may run {have} vCPU of standard machines in us-east-1; the lab needs 1")

PORTS = (15432, 18080, 18081, 12222, 18180)
busy = []
for port in PORTS:
    with socket.socket() as sock:
        if sock.connect_ex(("127.0.0.1", port)) == 0:
            busy.append(str(port))
report(not busy, "local ports 15432, 18080, 18081, 12222 and 18180 are free for the tunnels",
       f"in use: {', '.join(busy)}. Close the program using them, or run make untunnel")

print(f"{sum(results)} of {len(results)} checks passed" + ("" if all(results) else ": fix the lines marked FIX, then run this again"))
self-check/self_check.py
"""The self-check for "Before you start": read it, PREDICT what it prints, then run it.

    python3 self-check/self_check.py      (from the lab folder)

Part 1 is Python: the agents write amounts three ways, and to_dollars() turns each one into a number.
Part 2 is SQL: the paid claims joined to their policies, totalled by state. It runs on SQLite, which comes with Python.
If you can predict both printed lines before you run it, your Python and SQL are ready for this course.

Author: Roni Das
Created: 2026-11-13
"""

import csv
import sqlite3
from pathlib import Path

HERE = Path(__file__).parent


def to_dollars(text: str) -> float:
    """'$1,200.50', '1200.5 USD' and '1,200.50' all mean 1200.5."""
    return float(text.replace("$", "").replace("USD", "").replace(",", "").strip())


claims = list(csv.DictReader(open(HERE / "claims.csv")))
policies = list(csv.DictReader(open(HERE / "policies.csv")))
print("part 1, the two ways of writing the same amount:", to_dollars(claims[0]["amount_claimed"]) == to_dollars(claims[1]["amount_claimed"]))

db = sqlite3.connect(":memory:")
db.execute("create table claim (claim_no text, policy_no text, amount real, status text)")
db.execute("create table policy (policy_no text, state text, product text)")
db.executemany("insert into claim values (?, ?, ?, ?)",
               [(c["claim_no"], c["policy_no"], to_dollars(c["amount_claimed"]), c["status"]) for c in claims])
db.executemany("insert into policy values (?, ?, ?)", [(p["policy_no"], p["state"], p["product"]) for p in policies])
rows = db.execute("""
    select p.state, count(*) as paid_claims, round(sum(c.amount), 2) as paid_dollars
    from claim c join policy p on p.policy_no = c.policy_no
    where c.status = 'PAID'
    group by p.state
    order by paid_dollars desc
""").fetchall()
print("part 2, paid claims by state:", rows)
self-check/claims.csv
claim_no,policy_no,amount_claimed,status
CLQ-26000101-6,BMQ-0000011-1,"$1,200.50",PAID
CLQ-26000102-8,BMQ-0000012-3,1200.5 USD,PAID
CLQ-26000103-0,BMQ-0000011-1,640.00,OPEN
CLQ-26000104-2,BMQ-0000013-5,"$15,400.00",PAID
CLQ-26000105-4,BMQ-0000014-7,"2,980.25",DENIED
CLQ-26000106-6,BMQ-0000012-3,310 USD,PAID
CLQ-26000107-8,BMQ-0000015-9,"$880.00",OPEN
CLQ-26000108-0,BMQ-0000013-5,"$2,050.75",PAID
self-check/policies.csv
policy_no,state,product
BMQ-0000011-1,PA,AUTO
BMQ-0000012-3,PA,AUTO
BMQ-0000013-5,NJ,AUTO
BMQ-0000014-7,CA,AUTO
BMQ-0000015-9,PA,HOME
Makefile
# Bramfield Mutual's systems on AWS: build them, look around, and remove them, one command at a time.
#
#   make budget EMAIL=you@example.com   a $10 monthly cost budget that emails you at 50% and 100%. Run this first.
#                   (add TAG_ONLY=yes to count only the lab, on an account that already spends on other things)
#   make quota      your account's limit for standard machines in us-east-1, and what the lab needs (1 vCPU)
#   make up         build Bramfield's systems with Terraform (about 1 minute, then about 3 to 8 more inside the server)
#   make check      wait until every system answers, then print each one
#   make tunnel     reach the systems from your computer through Session Manager (ports 15432, 18080, 18081, 12222, 18180)
#   make untunnel   close those tunnels
#   make look PART=db|policy|queue|drops|docs|identity   look around one system with read-only access
#   make cost       what the running lab costs per hour, from the AWS Price List
#   make stop       stop the server between sessions (you then pay only for its disk)
#   make start      start it again (it stops itself again after 4 hours)
#   make destroy    delete everything, then check that nothing is left
#   make leftovers  list anything still tagged Project=fde-course-lab, and the things that are easy to forget
#
# Nothing accepts a connection from the internet: there is no SSH key and no open port.
# Author: Roni Das. Created: 2026-11-13.

SHELL := /bin/bash
.SHELLFLAGS := -o pipefail -c
REGION ?= us-east-1
export AWS_REGION := $(REGION)
export AWS_PAGER :=
TF := terraform -chdir=terraform
ID = $$($(TF) output -raw instance_id)

.PHONY: help budget quota up check tunnel untunnel look cost stop start destroy leftovers
help:
	@sed -n '2,17p' Makefile | sed 's/^# \{0,1\}//'

budget:
	@test -n "$(EMAIL)" || { echo "say where the alerts go: make budget EMAIL=you@example.com"; exit 2; }
	@TAG_ONLY=$(TAG_ONLY) bash bin/budget.sh "$(EMAIL)"

quota:
	@have=$$(aws service-quotas get-service-quota --service-code ec2 --quota-code L-1216C47A --query Quota.Value --output text); \
	echo "your limit for standard EC2 machines in $(REGION): $${have%.*} vCPU"; \
	echo "this lab needs 1 vCPU: one t2.small server"; \
	if [ "$${have%.*}" -ge 1 ]; then echo "enough: go ahead"; else echo "ask AWS for a higher limit first"; exit 1; fi

build/app.tgz: $(shell find app -type f)
	@mkdir -p build && COPYFILE_DISABLE=1 tar --exclude ".DS_Store" -czf build/app.tgz app

up: build/app.tgz
	@$(TF) init -input=false -upgrade >/dev/null && echo "terraform is ready"
	@$(TF) apply -input=false -auto-approve -compact-warnings > build/apply.log 2>&1 || { cat build/apply.log; echo "terraform apply failed: the full message is above"; exit 1; }
	@grep -E "Creation complete|Apply complete" build/apply.log | sed -E 's/ \[id=[^]]*\]//; s/ after [0-9]+s//'
	@echo "the server is starting. Bramfield's data takes about 8 more minutes to build: run make check"

check:
	@bash bin/check.sh "$(ID)"

tunnel:
	@bash bin/tunnel.sh "$(ID)"

untunnel:
	@bash bin/tunnel.sh stop

look:
	@PGPASSWORD=$$(aws ssm get-parameter --name /bramfield/readonly-password --with-decryption --query Parameter.Value --output text) \
	 LAB_PASSWORD=$$(aws ssm get-parameter --name /bramfield/lab-password --with-decryption --query Parameter.Value --output text) \
	 BUCKET=$$($(TF) output -raw bucket) uv run --quiet look_around.py $(PART)

cost:
	@uv run --quiet cost.py "$$($(TF) output -raw instance_type)"

stop:
	@aws ec2 stop-instances --instance-ids $(ID) --query 'StoppingInstances[0].CurrentState.Name' --output text
	@echo "stopping: you now pay only for the 20 GB disk, about 5 cents a day"

start:
	@aws ec2 start-instances --instance-ids $(ID) --query 'StartingInstances[0].CurrentState.Name' --output text
	@echo "starting: run make check in about 2 minutes. The server stops itself again after 4 hours."

destroy:
	@mkdir -p build
	@bash bin/tunnel.sh stop >/dev/null 2>&1 || true
	@$(TF) destroy -input=false -auto-approve -compact-warnings > build/destroy.log 2>&1 || { cat build/destroy.log; echo "terraform destroy failed: the full message is above"; exit 1; }
	@grep -E "Destruction complete|Destroy complete" build/destroy.log | sed -E 's/ after [0-9]+s//' | tail -4
	@bash bin/leftovers.sh

leftovers:
	@bash bin/leftovers.sh
Sources
- Our own run of 13 November 2026, at about 07:56 UTC, in our own AWS account, from the
labfolder in this zip, recorded withscriptin the terminal of our VS Code with the prompt set to show only the folder name:runs/session-2026-11-13-a.log. Every output in this lesson is filled from that recording. The email address for the budget was typed withread -sand never shown. The costs are the ones the lab'smake costread from the AWS Price List API the same day, in us-east-1:t2.small$0.0230 an hour, gp3 storage $0.080 per GB-month (20 GB is $0.0022 an hour), a public IPv4 address $0.0050 an hour. The 4-hour stop is interraform/user-data.sh.tftpl; the budget isbin/budget.sh; the leftovers check isbin/leftovers.sh. - AWS, "Installing or updating to the latest version of the AWS CLI": https://docs.aws.amazon.com/cli/latest/userguide/getting-started-install.html. AWS, "Install the Session Manager plugin for the AWS CLI": https://docs.aws.amazon.com/systems-manager/latest/userguide/session-manager-working-with-install-plugin.html, with the Ubuntu page https://docs.aws.amazon.com/systems-manager/latest/userguide/install-plugin-debian-and-ubuntu.html and the macOS page https://docs.aws.amazon.com/systems-manager/latest/userguide/install-plugin-macos-overview.html.
- HashiCorp, "Install Terraform": https://developer.hashicorp.com/terraform/install and https://developer.hashicorp.com/terraform/tutorials/aws-get-started/install-cli.
- Astral, "Installing uv": https://docs.astral.sh/uv/getting-started/installation/. Python downloads: https://www.python.org/downloads/. Git downloads: https://git-scm.com/downloads. VS Code: https://code.visualstudio.com/download, and its WSL guide https://code.visualstudio.com/docs/remote/wsl.
- Microsoft, "Install WSL": https://learn.microsoft.com/en-us/windows/wsl/install.
- AWS, "Setting up your India billing" (Amazon Web Services India Private Limited, invoices in rupees, tax invoices and GST numbers): https://docs.aws.amazon.com/awsaccountbilling/latest/aboutv2/manage-account-payment-aispl.html. AWS IAM Identity Center with the AWS CLI,
aws configure sso: https://docs.aws.amazon.com/cli/latest/userguide/cli-configure-sso.html. - AWS Budgets: https://docs.aws.amazon.com/cost-management/latest/userguide/budgets-managing-costs.html, the CLI reference https://docs.aws.amazon.com/cli/latest/reference/budgets/create-budget.html, and pricing https://aws.amazon.com/aws-cost-management/aws-budgets/pricing/. Cost allocation tags: https://docs.aws.amazon.com/awsaccountbilling/latest/aboutv2/cost-alloc-tags.html.
- EC2 service quotas for On-Demand instances: https://docs.aws.amazon.com/ec2/latest/instancetypes/ec2-instance-quotas.html.
aws sts get-caller-identity: https://docs.aws.amazon.com/cli/latest/reference/sts/get-caller-identity.html. - Python tutorial: https://docs.python.org/3/tutorial/. PostgreSQL tutorial: https://www.postgresql.org/docs/current/tutorial.html. SQLite in Python: https://docs.python.org/3/library/sqlite3.html.